Creating beautiful vector flowers in Adobe Illustrator: A complete guide
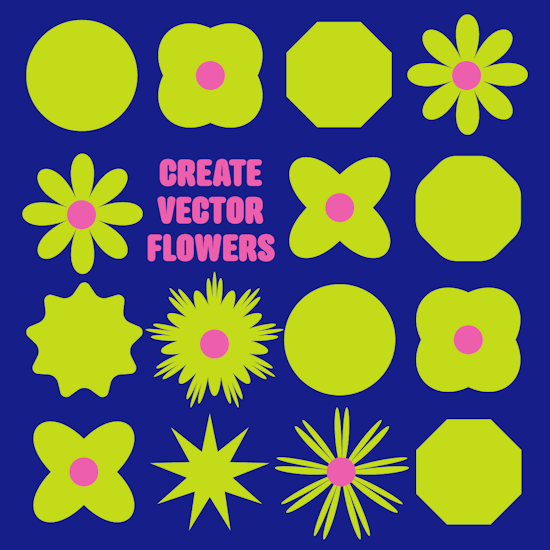
11 minute readVector flowers are a popular design element in various types of artwork, from logos and illustrations to patterns and web design. Whether you're working on a digital illustration or a branding project, creating natural-looking, intricate flower shapes can add a unique and artistic touch to your design. Adobe Illustrator offers several powerful tools and effects to help you design these flowers efficiently, and in this guide, we'll walk through how to use some of the most effective techniques.
We’ll explore a variety of methods, including the Pucker & Bloat effect, which is ideal for creating symmetrical petal shapes, as well as more hands-on tools like the Shape Builder Tool and PathScribe, which allow for more control and manipulation of your vector paths. These tools and effects can be used both independently and in combination, allowing you to experiment and find the method that best suits your creative style.
By the end of this guide, you'll not only be able to create beautiful vector flowers, but you'll also have a deeper understanding of how Illustrator’s features can be used to streamline your workflow, giving you more freedom to focus on the artistic side of your design.
Skip ahead to:
Using the Pucker & Bloat live effect to create flowers
The Pucker & Bloat live effect found in Adobe Illustrator’s effect library is a very useful tool for creating flower petals. As with many of Adobe Illustrator's live effects, it provides a Preview option, allowing you to see any changes in real-time. By using live effects, you can always return at a later time to make further adjustments, making them ‘non-destructive’.
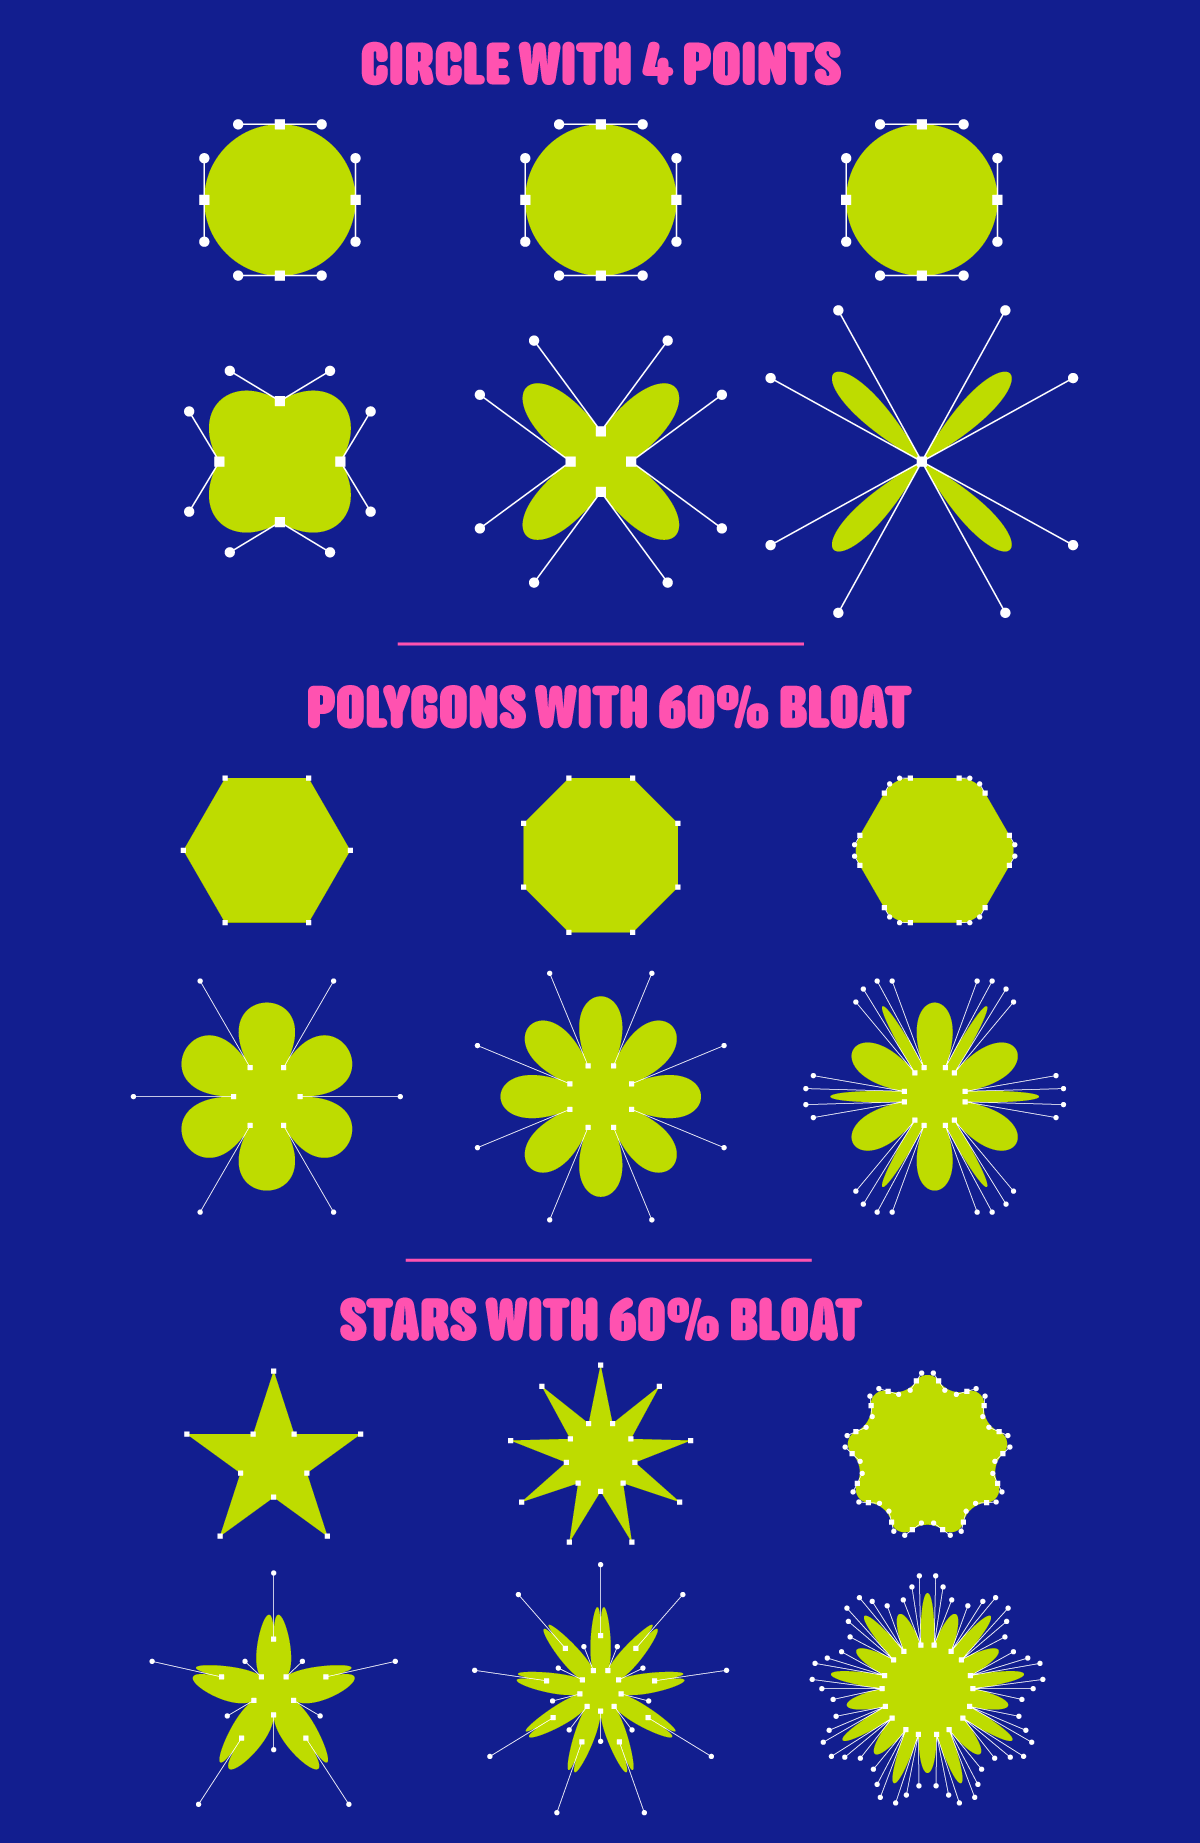
The number of petals you can create depends on how many anchor points and path handles your original shape has.
Using the image below as a quick guide—and before we dive into how you can do it yourself—you can visually see the anchor points and handles (if any) marked out in white. We’ve used the Bloat element of Pucker & Bloat to “throw” the path’s handles outwards, away from the center of the object. If your original path contains only corner points with no handles, Pucker & Bloat will create handles for you. Depending on how much of the effect you apply, the amount of space between the anchor point and the handle will vary.
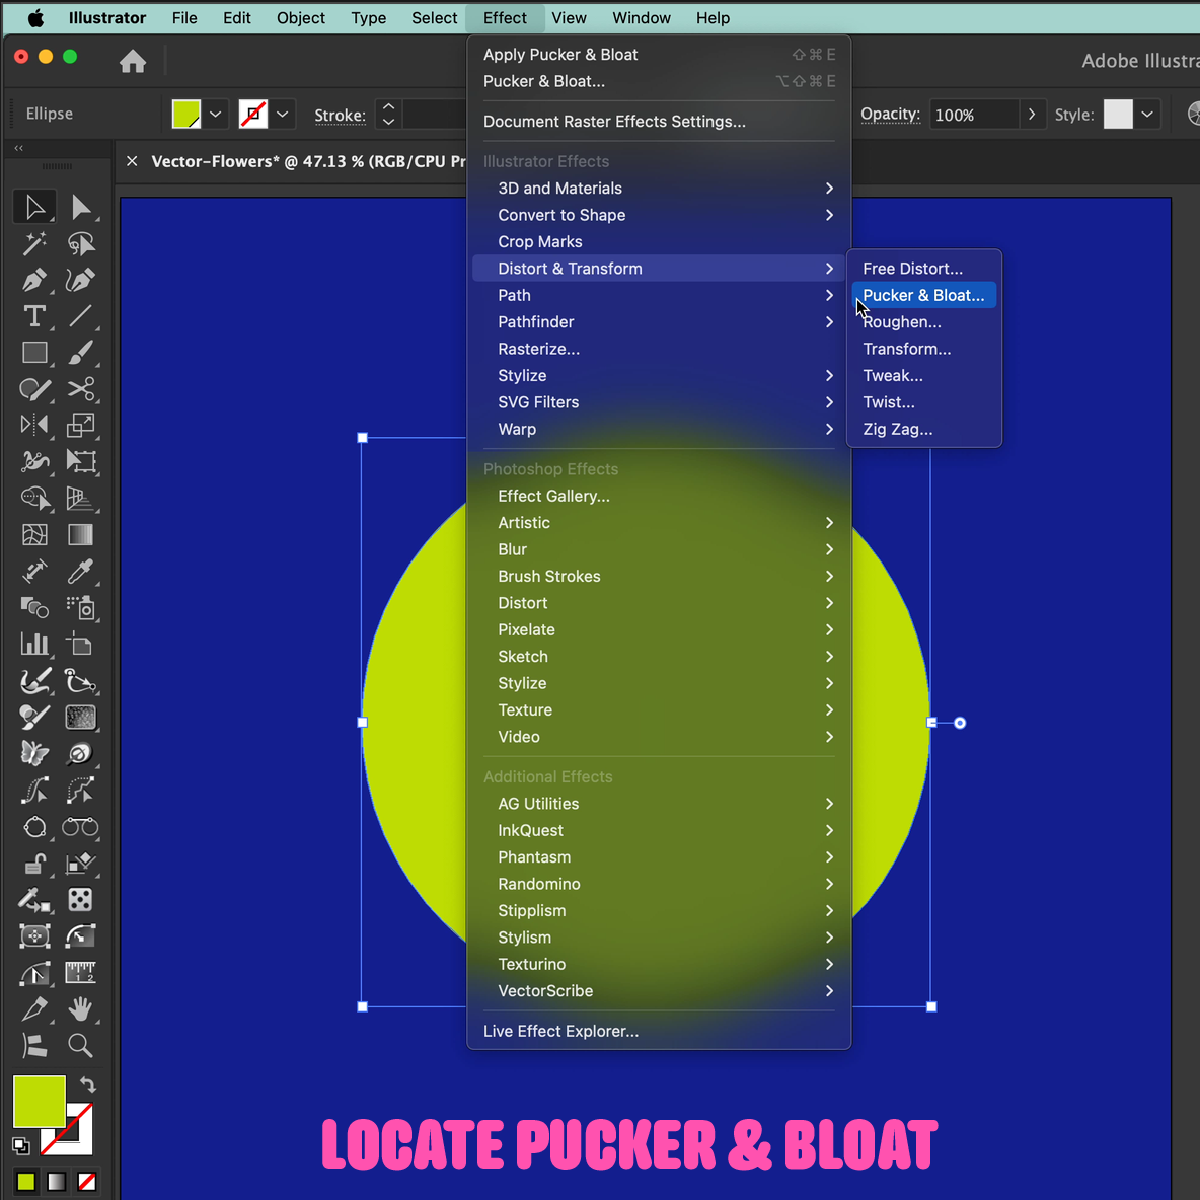
To locate and apply the Pucker & Bloat live effect, first create or select your object (we’re starting with a normal 4 segment circle) and navigate to Illustrator’s main menu: Effect > Distort & Transform > Pucker & Bloat…
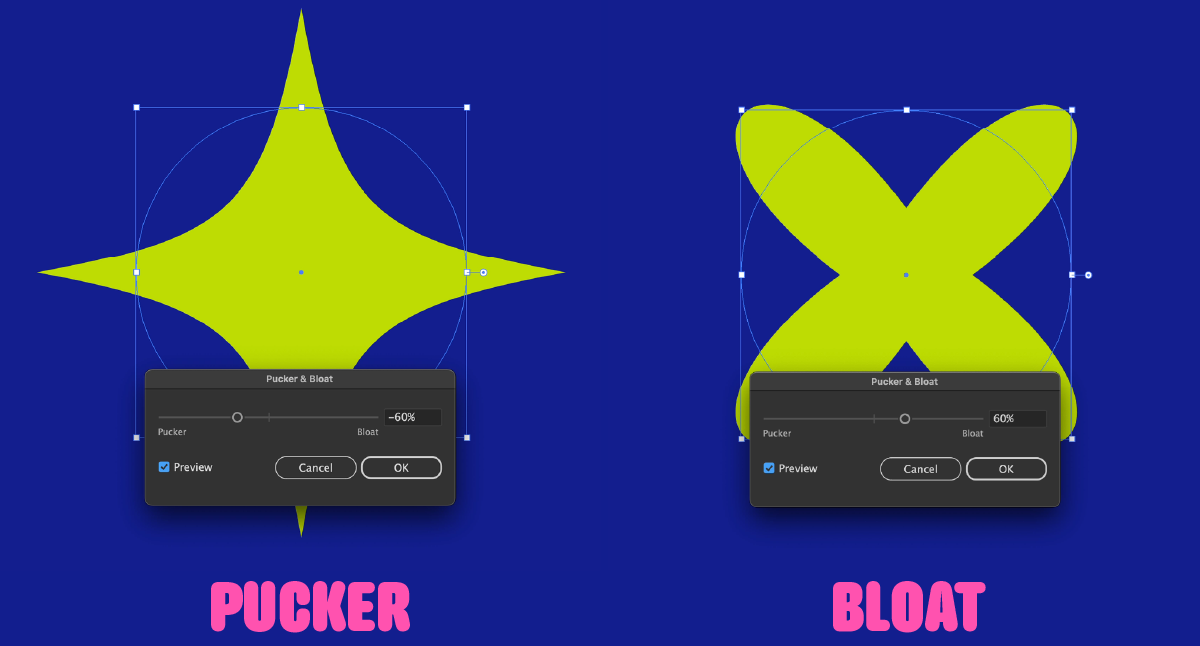
The Pucker & Bloat dialog window will appear, and the options available are simple. You can either drag the slider to Pucker or to Bloat.
Dragging the slider towards Pucker will update the field value to a negative percentage, and the live preview will show how the resultant anchor points are thrown inwards, while the handles move outwards. Dragging the slider towards Bloat has the opposite effect and will increase the percentage, throwing the handles outwards from the center of the object and pulling the resultant anchor points inwards.
Adding a bloat effect to a four-point circle will create a four petal shape. The petals will be thinner and longer depending on how far you move the slider. A lower value will keep them shallow and round.

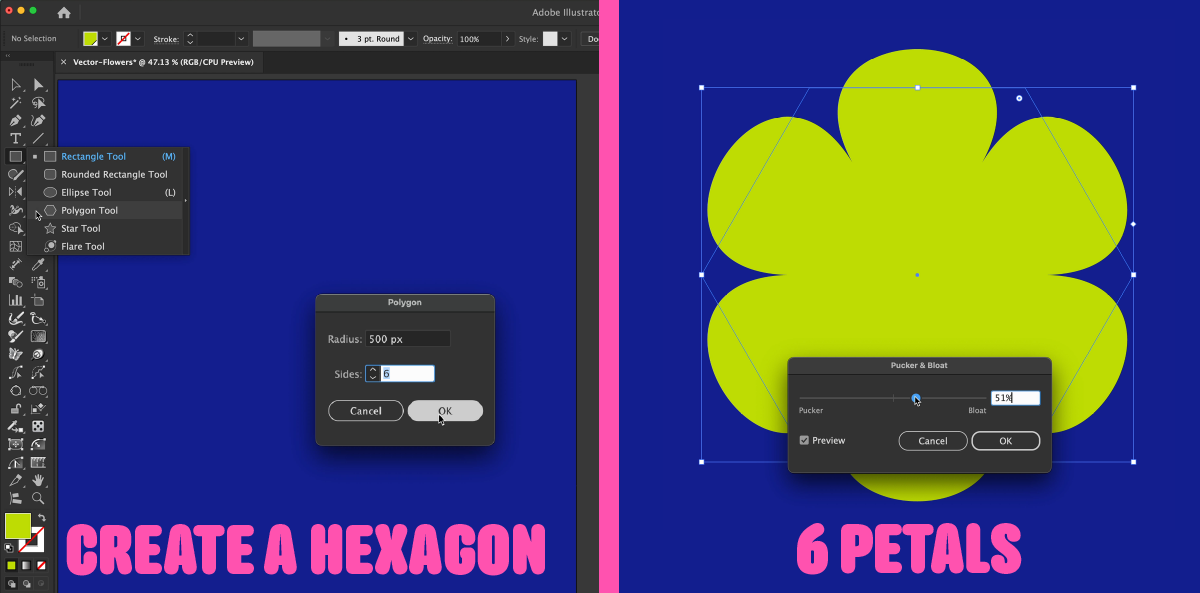
If you want to create a flower shape with more than four petals in Illustrator, explore what happens when you use a polygon shape with more than four sides. The Polygon Tool by default creates regular polygons (all sides and angles equal).
The Polygon Tool can be found stacked under the Rectangle Tool in the Advanced Toolbar (Window > Toolbars > Advanced). When you have selected the Polygon Tool, click in an empty space on your canvas to open the dialog window. This allows you to specify the size and number of sides for your new shape. Click OK to confirm.
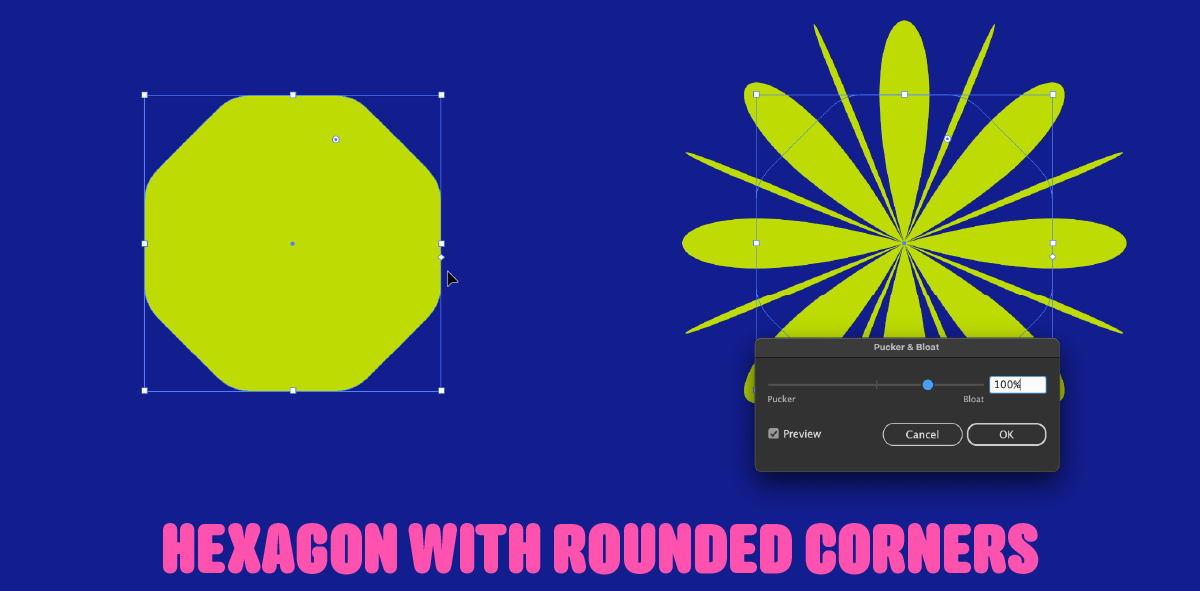
For even more complex petals, try rounding the corners of your shape first. This produces more anchor points on the original path, which will add more petals of varying sizes.
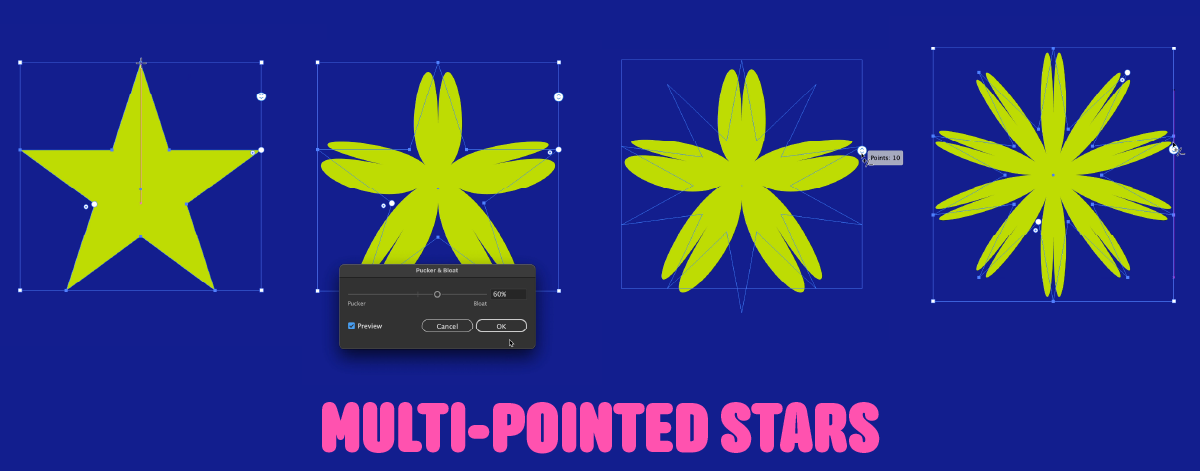
We also recommend exploring the Star Tool available in Illustrator (also stacked under the Rectangle Tool). It’s an easy way to create an editable "live" star. Once you’ve applied the Pucker & Bloat effect, experiment with increasing and decreasing the number of sides of the star, and the live effect will automatically update your flower shape.
How to adjust multiple path handles without live effects
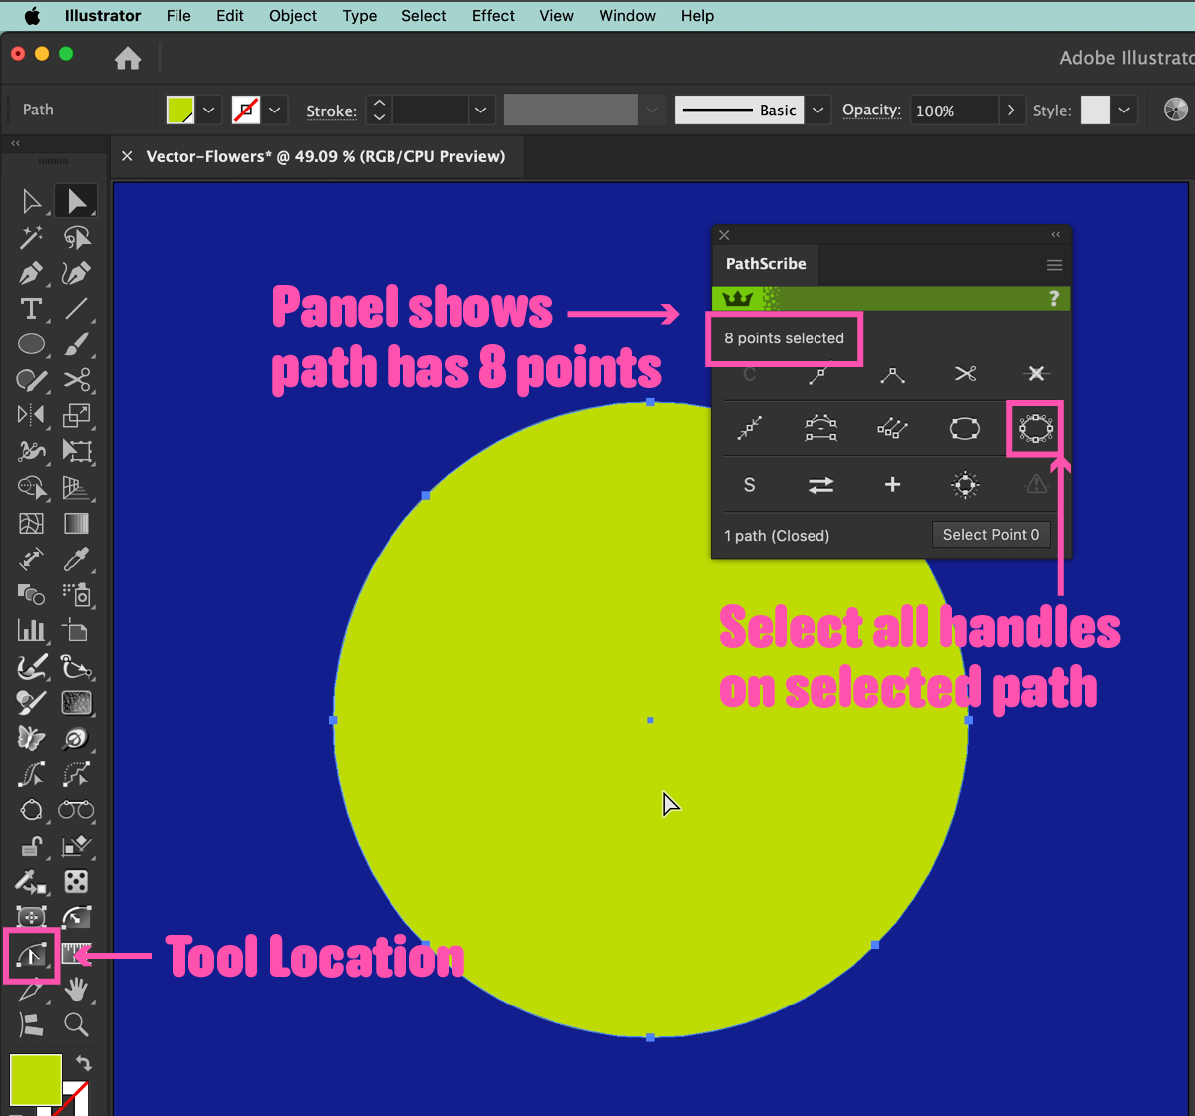
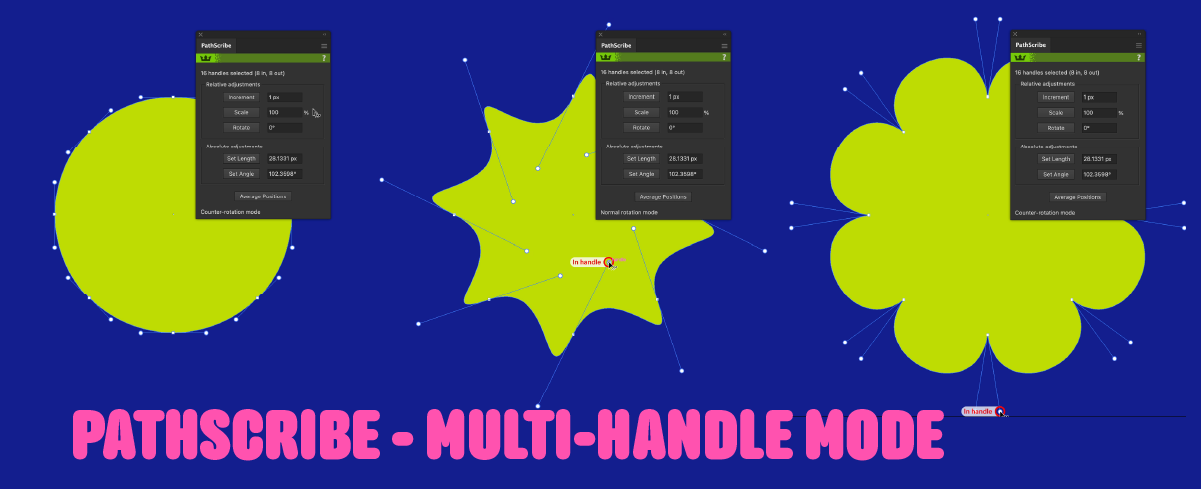
Rather than using a live effect like Pucker & Bloat to manipulate multiple anchor points and their handles at once, we’re going to show you an option within PathScribe. PathScribe is a tool with an associated panel from Astute Graphics that has path and point manipulation features for you to try. The one we want to focus on, which is especially useful for graphic designers, is the option to Select All Handles on a Selected Path.
You can find the PathScribe Tool in the Advanced Toolbar (Window > Toolbars > Advanced). Clicking on the PathScribe tool in the toolbar will automatically open the PathScribe panel. If you’d prefer, you can locate the panel under Window > Astute Graphics > PathScribe, and double-clicking the green banner will activate the tool (see image below for locations).
If you want to try PathScribe for free for 7 days, sign up for a free trial, no card details required.
We have started with a circle that has 8 anchor points. One quick way to create this is to draw a circle as normal, and then click the “Plus” icon button in the PathScribe panel. This adds extra points equally on each segment of the selected path. More information on this is available in PathScribe’s documentation.
PathScribe is part of the VectorScribe plugin which you can try free for 7 days with just your email address. Find out more here…
To select multiple handles on a vector path in Adobe Illustrator, select your object with the Selection Tool (V), and click the Select All Handles on Selected Paths button in the PathScribe panel. You will immediately see the handles and handle lines annotated on your path. When selecting the PathScribe Tool once more, dragging one handle will move them all simultaneously.
By default, the handles will move in Normal rotation mode, but you can switch to Counter-rotation mode by pressing the C key when the mouse is down. In both these modes, the selected handles will rotate through the same angle as the dragged handle. But in Counter-rotation mode, the handles will rotate in the opposite direction. By using PathScribe’s multi-handle counter-rotation mode, you can quickly and easily create symmetrical flower petal shapes on any vector path. This mode can save time when manually creating shapes that need to rotate in opposite directions.
Making petal shapes with the Shape Builder Tool
In this example, we are going to make a heart shape in Illustrator and use Distort & Transform to make copies rotating in a circle, resulting in a different type of flower shape.
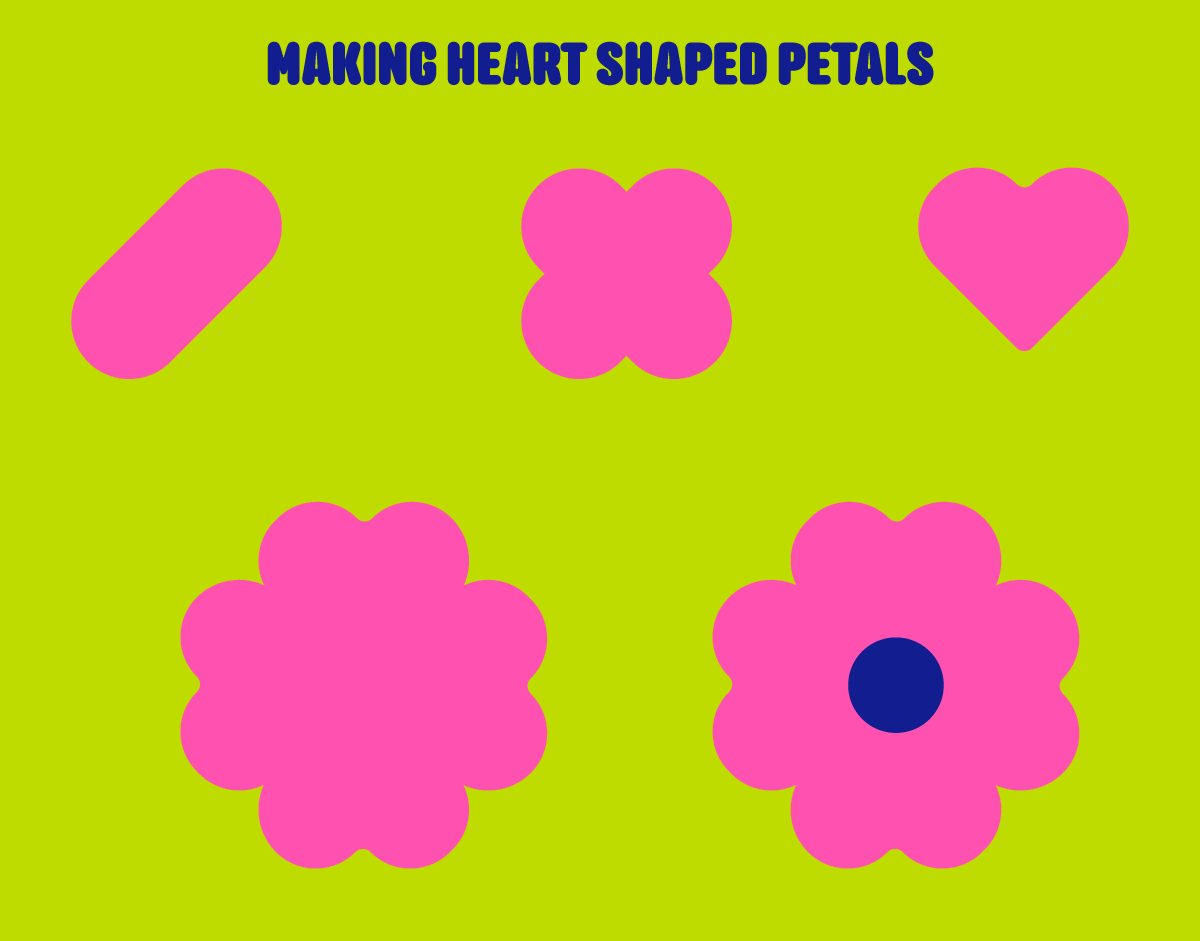
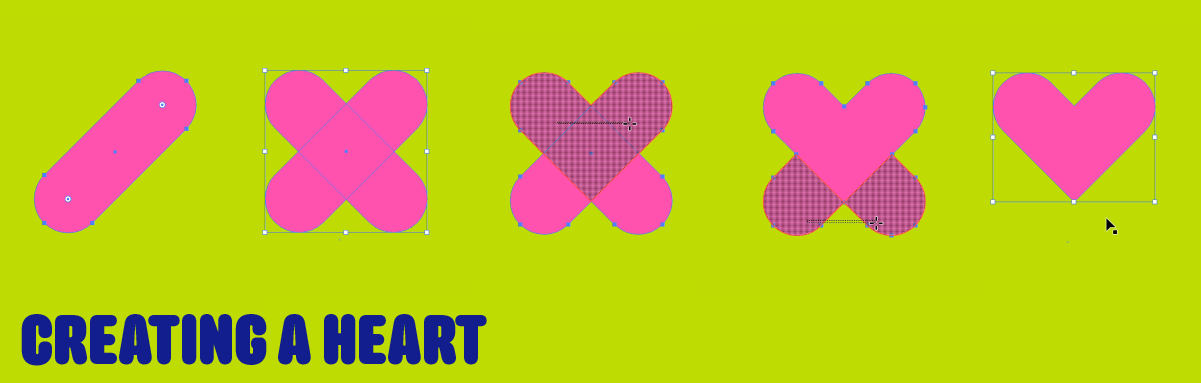
Starting with a rounded rectangle or pill-shaped object that's been rotated to a 45° angle, make a copy (Cmd/Ctrl + C) and paste (Cmd/Ctrl + V) a second one, and rotate it by 90° to create an X shape.
Using the Shape Builder Tool (Shift + M), we can connect the top cross and intersections to create a heart shape. The Shape Builder Tool is great for combining and subtracting shapes.
Holding the Alt/Option key while using the Shape Builder Tool will allow us to subtract unwanted areas (such as the lower overhangs) to leave just the heart shape.
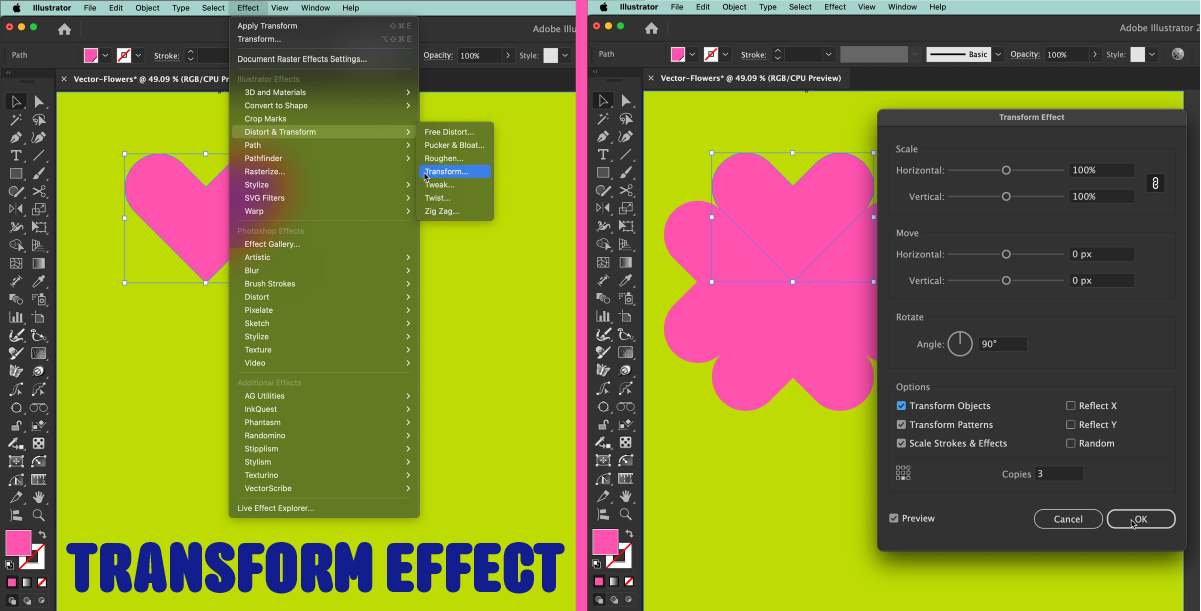
To transform this single heart shape into flower petals, we will use the Transform live effect found under Effect > Distort & Transform > Transform…
The Transform Effect dialog window has several options for multiplying, moving, and scaling objects. To repeat the heart around in a circle, we will need to make the following changes:
Copies: Increase to 3 (as we have the original + 3 copies, totalling 4 hearts).
Rotate: Rotate them each by 90°.
9-Square Alignment Block: Adjust the transformation on the 9-square to the bottom center. You should now see the repeats form a full circle, resembling a flower.
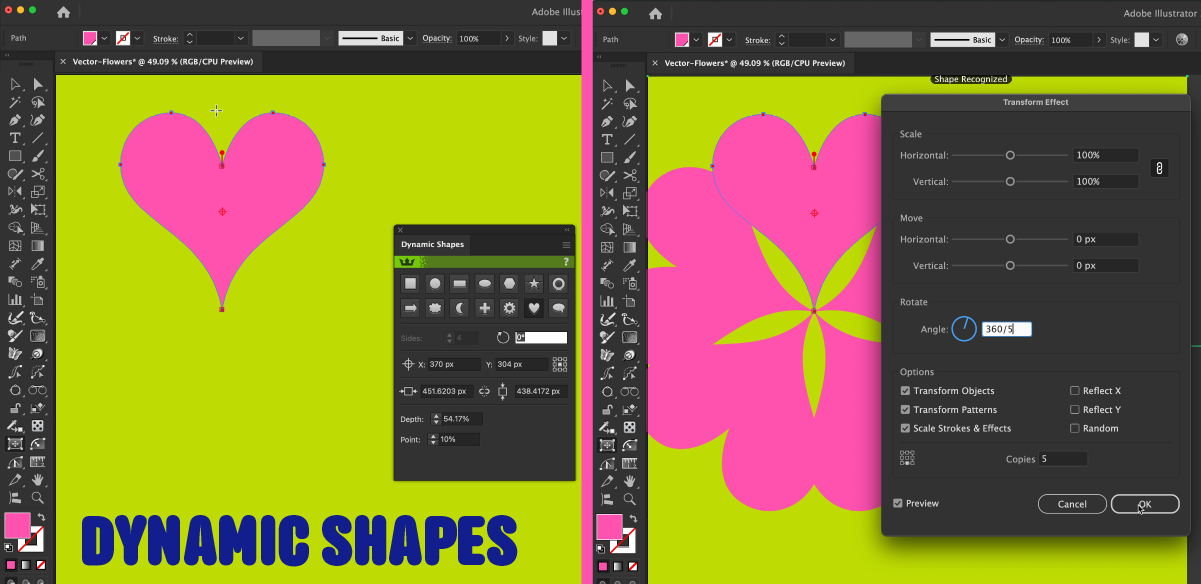
Top Tip: If you want more or fewer copies but don’t know the angle to rotate by to distribute them evenly, you can perform math in the value field box. For example, typing “360/5” will symbolize 360° ÷ 5 = 72°.
The Transform live effect is now applied to the original heart object and can be found in the Appearance Panel (Window > Appearance). To expand this live effect so that your copies become vector objects, head up to Object > Expand Appearance.

How to make a heart quickly in Adobe Illustrator
If the steps above for making a heart seem long and convoluted, and you wish there were a quicker way, try the Dynamic Shapes feature from Astute Graphics.
Dynamic Shapes is designed to provide a number of common shapes that can save you time in Adobe Illustrator. Dynamic Shapes includes a built-in heart shape, which you can fully control using the tool or panel, making our heart flower petal workflow much quicker.
Try It for Free for 7 Days
Dynamic Shapes is part of the VectorScribe plugin which you can try free for 7 days with just your email address. Find out more here…
Please refer to the Dynamic Shapes documentation for further details on how to use this tool.
