Gradiator User Manual
17 minute readGradiator Overview
Gradiator is an Astute Graphics panel for working with artwork containing linear or radial gradients. It includes several functions which are not available on the native Gradient panel, such as numerically setting the origin or length of a gradient; changing the angle of multiple gradients; capturing a gradient including its absolute position and applying it to one or more paths; and rotating or randomizing the color order of one or more gradients’ stops. Additionally, it includes three specialty functions, including converting flat color fills and strokes to gradients and vice versa.
Gradiator Panel
Menu items to show and hide the Gradiator panel can be found in the main menu under Window > Astute Graphics > Gradiator.
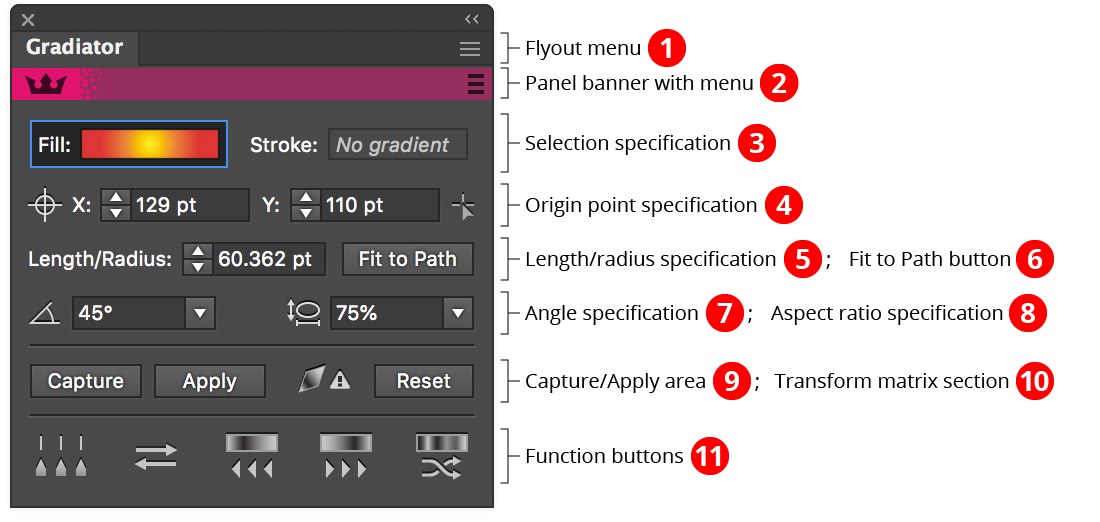
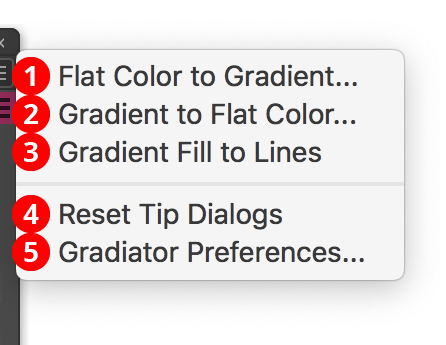
1. Flyout menu: See Gradiator Panel: Flyout Menu.
2. Panel banner: The flyout menu on the right provides links to the Astute Graphics website.
3. Selection Specification: Specifies which gradients to operate on: those on the fills of the selected paths, those on the strokes, or both. Clicking on the Fill or Stroke area toggles its selection state. Previews of the gradient present in each area are shown; if multiple, different gradients are selected, the corresponding area will show “Mixed gradients”.
4. Origin Point Specification: Lets you specify the origin point of the selected gradients either by entering the coordinates numerically, or, after clicking the icon on the right side, by using a tool to click on the art- board to specify the position.
The first time you change the origin point of a linear gradient, Gradiator will display a message reminding you that a linear gradient’s origin is always adjusted by Illustrator so it lies on a line passing through the center of the path’s bounding box (this behavior is also apparent when using the native Gradient tool). You can suppress this message from coming up again by clicking the Don’t show again checkbox. To restore this and other messages and warnings, see Gradiator Panel: Flyout Menu.

To center the gradient’s origin, Shift-click the crosshair icon on the left. To set a gradient’s center rather than its origin when clicking with the origin setter tool, hold down Shift before clicking. After clicking, the tool will switch back to the previously-selected tool.
5. Length/Radius Specification: Allows you to numerically specify the length (for linear gradients) or radius (for radial gradients) of the selected gradients.
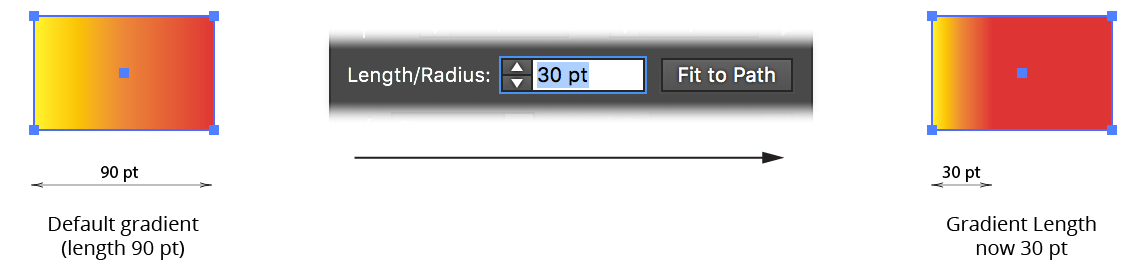
By default, the length is adjusted from the origin (i.e., the left side, for linear gradients with no rotation). To adjust the length from the middle of the gradient, enable the preference Adjust Linear Gradient Lengths From Center (see Gradiator Preferences).
Note that Illustrator places lower limits on the length of a gradient. Specifically, it cannot be less than 0.1% of the default (fitted) length. A warning message will be displayed if the gradient length could not be changed to the length specified.
6. The Fit to Path button resets the length (and origin) of each gradient to the default values that Illustrator assigns whenever the path’s geometry is edited, causing linear gradients to precisely stretch across the entire bounds of the path.
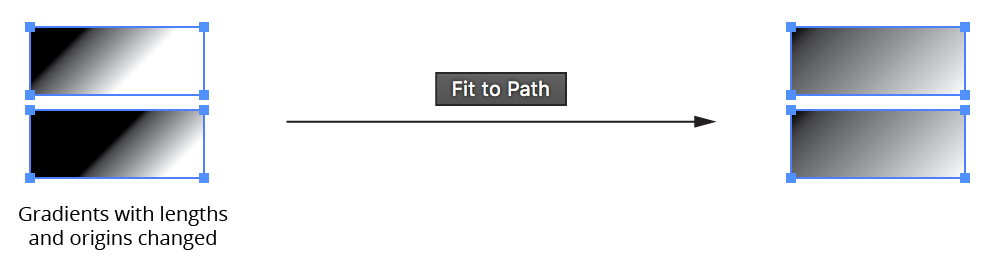
For radial gradients, the default fit is more complicated: its radius is set to half the hypotenuse of the bounding box divided by the square root of 2.
7. Angle Specification: By default, the Gradiator panel angle control is in Absolute mode; i.e., the value you enter becomes the gradient’s new angle (the same as the native Gradient panel). However, either through the preferences or by Option/Alt-clicking on the angle icon, you can change this mode to Relative. In this mode (indicated by a change in icon), the value specified is added to the current angle of each gradient when the now-visible Change button is clicked.
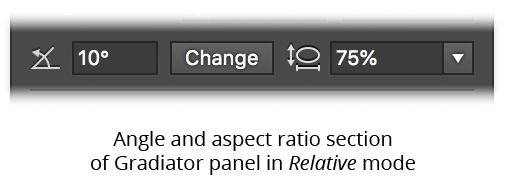
Holding Shift when clicking the Change button has the effect of reversing the sign of the angle value (thereby causing the gradient to rotate in the opposite direction).
8. Aspect Ratio Specification: This control is only enabled when a radial gradient is present in the selection. Unlike the native gradient panel, you can change the aspect ratio of all selected radial gradients even if there are linear gradients also present in the selection.
9. Capture/Apply Area: Available when a single gradient is selected, the Capture button allows you to effectively take a “snapshot” of the gradient; this snapshot can then subsequently be applied to any other paths, or to the same path after it has been edited. Crucially, the gradient retains its absolute position, allowing you to effortlessly line up a single gradient across several separate paths, or to return a gradient to the position it was in before the path was changed.

If Shift is held down when the Apply button is clicked, only the captured gradient’s length and origin will be applied to the selected gradients.
10. Transform Matrix Section: When a path with a gradient fill or stroke is subsequently transformed (scaled, rotated, or sheared), the gradient internally stores this transform using a mathematical construct called a matrix. This can lead to several issues. For example, if the path’s geometry is modified by certain Pathfinder operations, Illustrator resets the transform matrix, causing the gradient’s angle to change. Also, if the transform is non-uniform (caused by shearing or the equivalent rotation plus non-uniform scaling), the numerical values of the gradient’s length, angle and aspect ratio will not always agree with its visual appearance, even though the displayed values are technically correct in a mathematical sense. For these reasons, it is generally preferable to keep artwork free of transform matrices.
The Transform Matrix Alert icon is displayed whenever at least one gradient in the current selection has a transform matrix. Also displayed is the Reset button, which will remove each transform matrix from the selected gradients.

When Reset is used on a linear gradient, the gradient’s position is retained. Unfortunately, this is generally not possible with radial gradients. As a convenience, holding down Shift when clicking the Reset button will also reset the angle to 0°.
11. Function Buttons
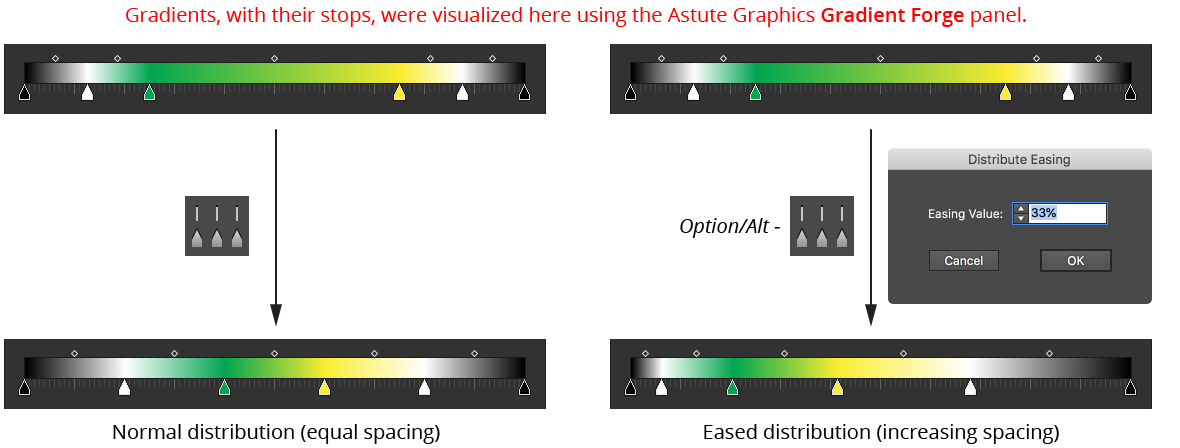
a. Distribute Stops Button: Adjusts the positions of the selected gradients’ stops (except for the first and last) so that there is equal space between them, and sets all midpoints to a location of 50%. To retain the midpoints’ positions, hold Shift when clicking the button. To use an eased distribution, where the space between stops gradually increases or decreases, hold Option/Alt which clicking.
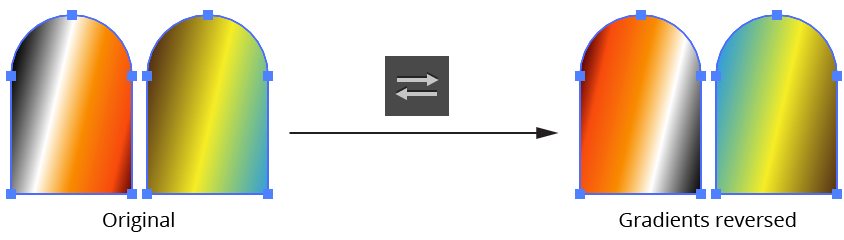
b. Reverse Gradient Button: Reverses the stop positions of the selected gradients. Unlike the native Gradient panel, you can do this even when there is a mix of different gradients selected.
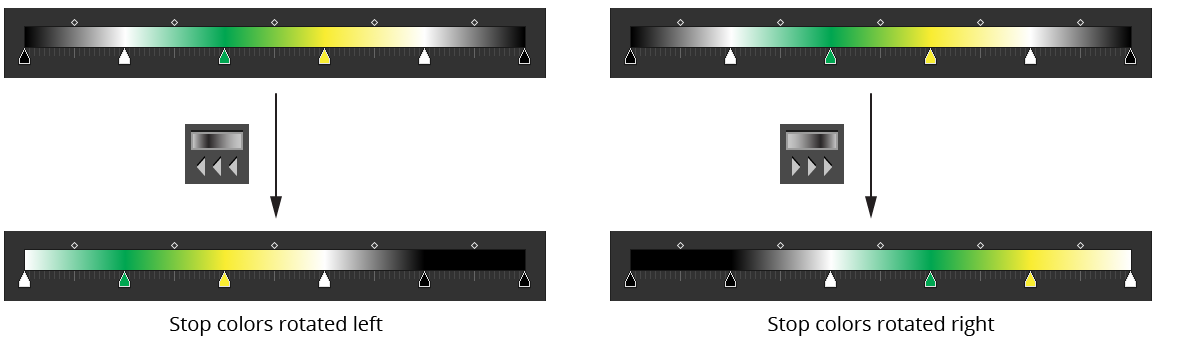
c. Rotate Colors Left Button: Changes the colors of the selected gradients’ stops so the color of each stop is moved one stop to the left (and the color of the last stop becomes the color of the first stop). This, therefore, has the effect of rotating the colors to the left.
d. Rotate Colors Right Button: Changes the colors of the selected gradients’ stops so the color of each stop is moved one stop to the right (and the color of the first stop becomes the color of the last stop). This, therefore, has the effect of rotating the colors to the right.
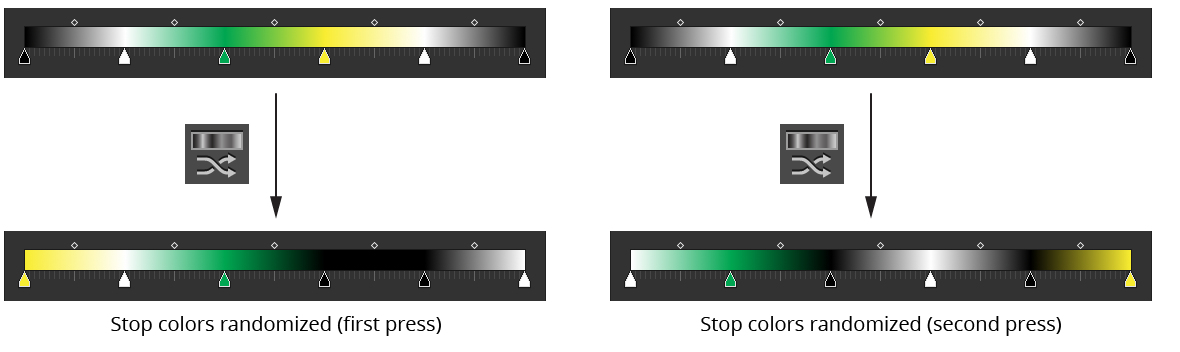
e. Randomize Color Order Button: Randomizes the order of the colors of the selected gradients’ stops. The positions of the stops themselves are not changed. A new random seed is used on each press of the button, which usually results in a different look.
Gradiator Panel: Flyout Menu
The Gradiator panel flyout menu items are contextually sensitive and all items may not be available, depending on the current selection.
1. Flat Color to Gradient...
Allows you to convert the fills and/or strokes of the selected paths from flat colors into two-stop linear gradients, according to the parameters in the Flat Color to Gradient dialog:
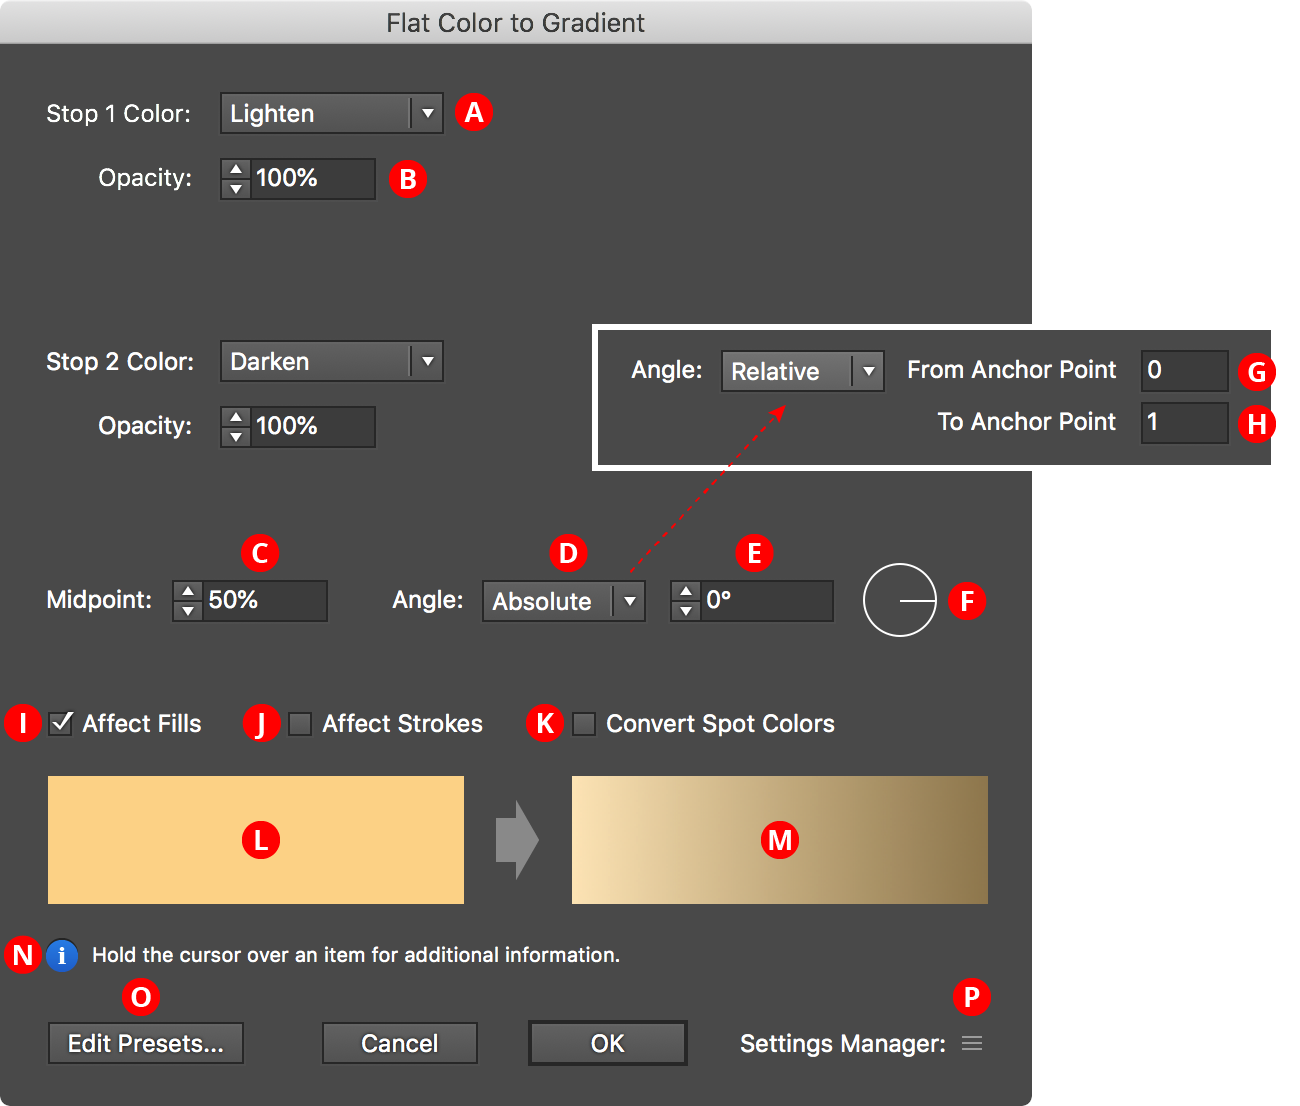
A. Color Adjustment Method
Specifies the method that is used to create the color of the first (or second) stop of the new gradient based on the flat color. Five of the methods — Retain, Lighten, Darken, Saturate, and Desaturate — are “presets” (although their underlying parameters can be altered), while the other two, Alter Black and Custom, require numerical parameters to be entered. The default method for the first stop is Lighten; for the second stop it is Darken.
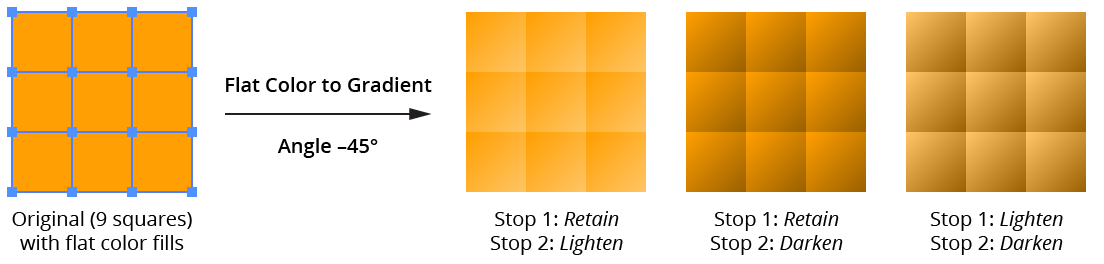
a. Retain: The stop color is identical to the original color.
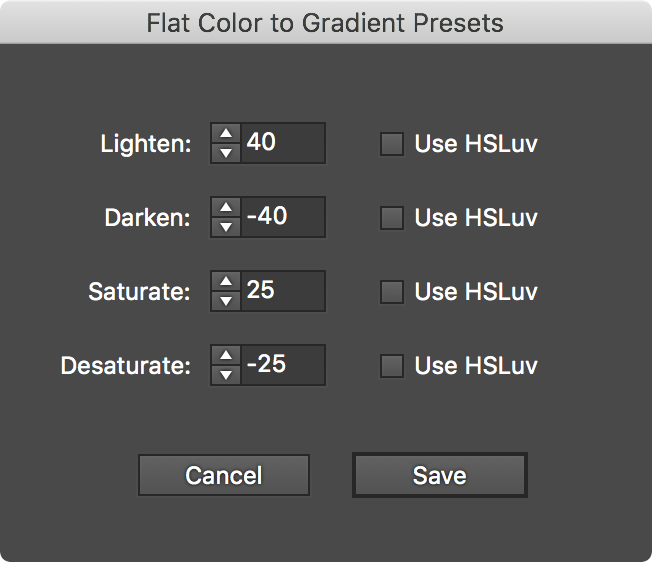
b. Lighten: The stop color is a lightened version of the original color (default change: +40 Lightness).
c. Darken: The stop color is a darkened version of the original color (default change: –40 Lightness).
d. Saturate: The stop color is a saturated version of the original color (default change: +25 Saturation).
e. Desaturate: The stop color is desaturated version of the original color (default change: –25 Saturation).
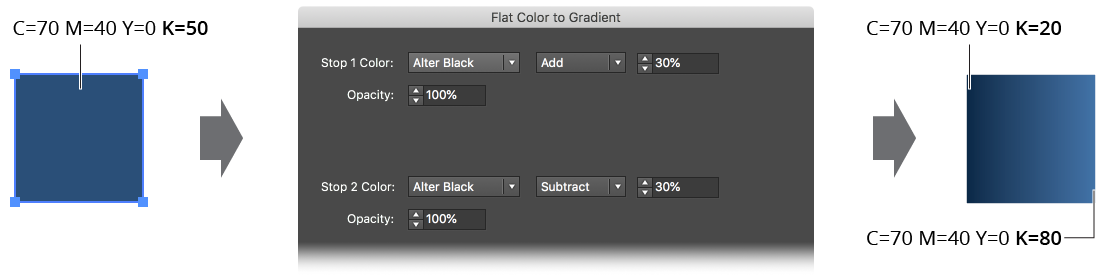
f. Alter Black: Available only for CMYK documents. The stop color uses the original color with the black value changed by the specified amount (the final value, of course, being held between 0% and 100%).
g. Custom: Enables full control of changing the Hue, Lightness and Saturation of the original color.
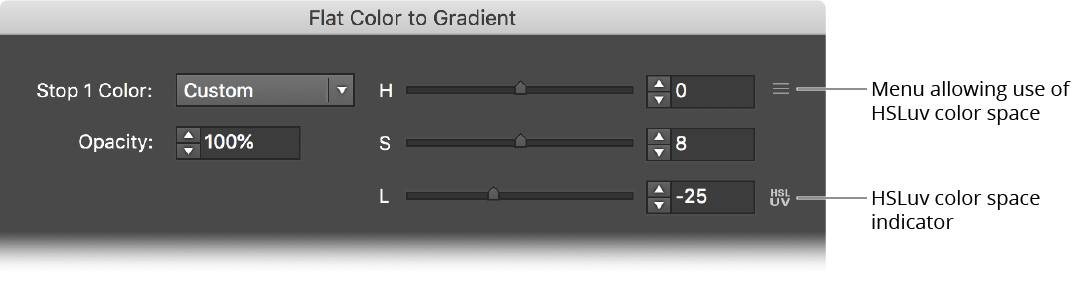
By default the Hue, Saturation and Lightness sliders operate in standard HSL color space, but using the popup menu you can change this to use the HSLuv space. This is indicated by a small icon.
B. Opacity
Specifies the opacity of the first (or second) stop of the gradient.
C. Midpoint
Specifies the midpoint location of the gradient.
D. Angle mode
Specifies the method used to determine the angle of the new gradient. The default is Absolute.
a. Absolute: The gradient angle is simply taken from the provided value.
b. Relative: The gradient angle is the same as the angle from one anchor point in the path to another, using the anchor point indices provided. This can be useful if you are converting the flat colors of many paths that are the same except for their rotation.
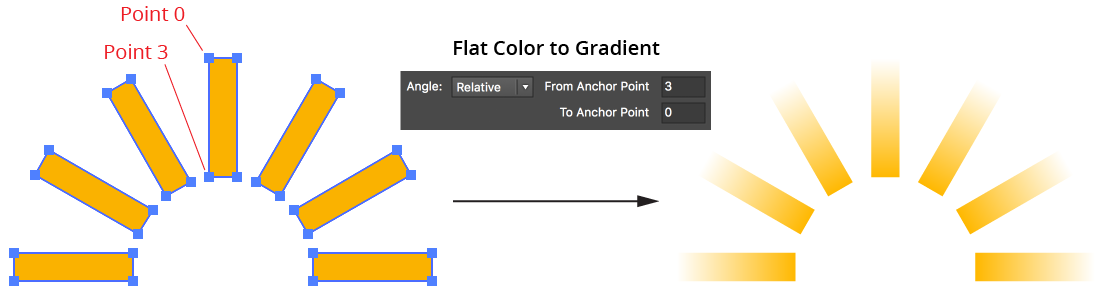
c. Random: The angle is randomly chosen between –180° and 180°. E. Angle (Absolute)
The value that each new gradient will be given.
F. Angle (Absolute) Visualizer
Shows the angle that each new gradient will be given, graphically. Clicking on the widget will set the angle appropriately.
G, H. Angle (Relative) Anchor Point Indices
The indices of the anchor points in each path from which to calculate the gradient angle. To specify the last anchor point, you can use an index higher than the length of any selected path, such as “9999”.
I, J. Affect Fills/Affect Strokes Checkboxes
Enables conversion of flat colors in the corresponding area of the path.
K. Convert Spot Colors Checkbox
When enabled, spot colors used as a fill or stroke will be converted to the document color model (RGB or CMYK) in order to perform the appropriate color adjustment.
L. “Before” Preview
Shows a sample flat color (taken from the selection) before being converted to a gradient. To cycle through different colors in the selection (if any), click on the preview.
M. “After” Preview
Shows a preview of the gradient into which the sample flat color will be converted.
N. Informational area: Shows a brief description of each control when the cursor is being held over it.
O. Edit Presets... Button
Allows you to change the parameters used in each of the six preset operations:
P. Settings Manager
The Settings Manager popup menu provides access to saving, managing, and applying Flat Color to Gradient settings.
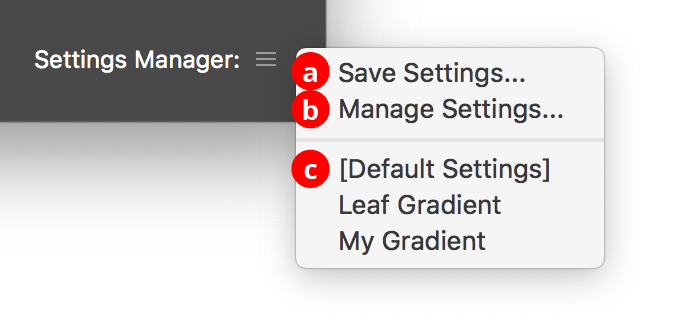
a. Save Settings...
When you save the settings, all of the current settings in the dialog are captured in a file which can be recalled later.
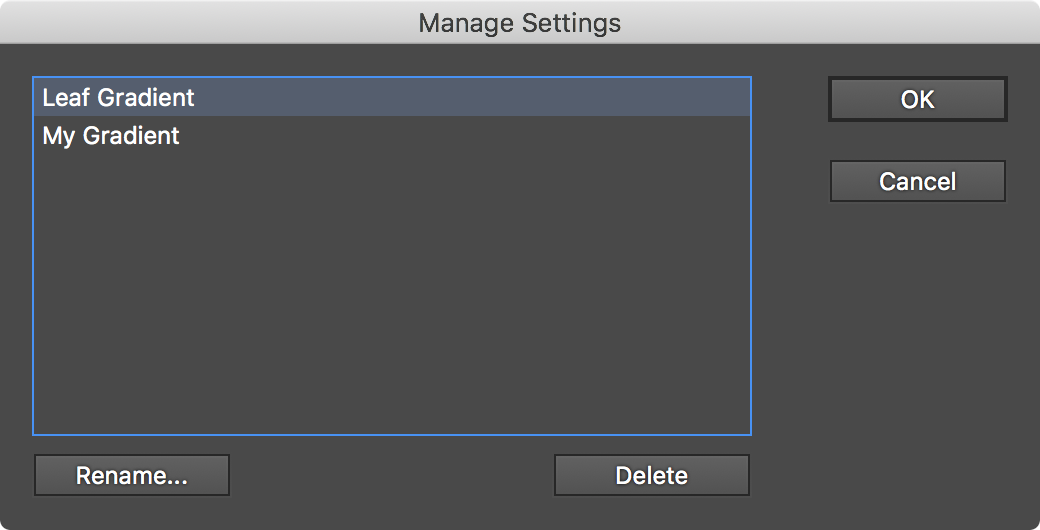
b. Manage Settings...
Brings up the Manage Settings dialog, which lets you rename or delete existing settings files:
2. Gradient to Flat Color...
Allows you to converts the gradients in the fills and/or strokes of selected paths to flat colors using one of three different methods.
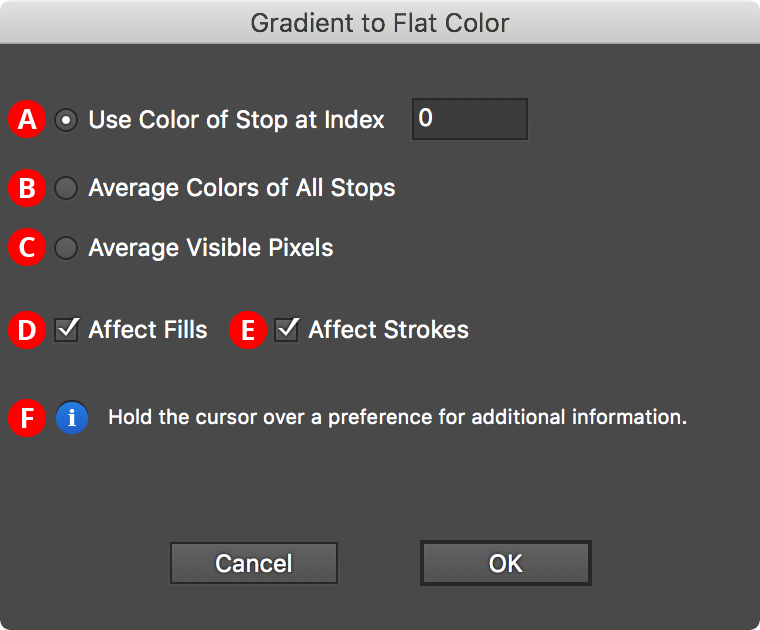
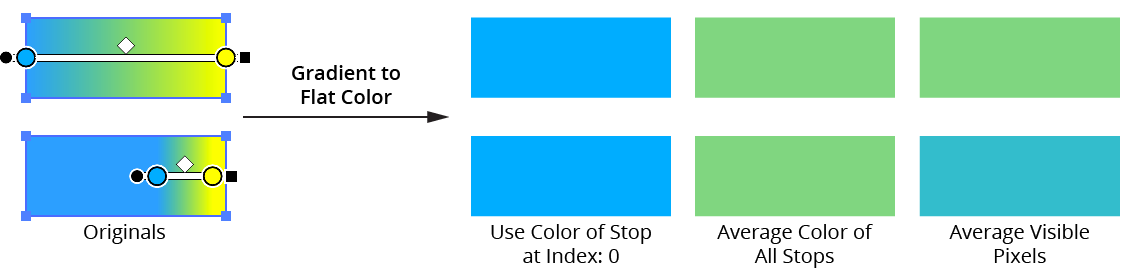
A. Use Color of Stop at Index
The flat color is simply taken from the color of the gradient stop with the given index (starting at zero). To specify the last stop, you can use an index higher than the number of stops in any of the selected path, such as “9999”.
B. Average Color of All Stops
The flat color is calculated by averaging the colors of all the stops in the gradient. When spot colors are used, they are converted to the document color model (RGB or CMYK) for the purposes of averaging. Stops which do not contribute to the gradient (e.g., a stop at location 0% when there is a second stop stacked directly above it) are not included in the average.
C. Average Visible Pixels
The flat color is calculated by rasterizing the art and averaging the colors of the pixels making up the fill or stroke. Thus, when you can only see a portion of the gradient (because its length has been changed by the Gradiator panel or native Gradient tool), only the portion of the gradient that is actually visible contributes to the flat color.
D, E. Affect Fills/Affect Strokes Checkboxes
Enables conversion of gradients in the corresponding area of the path.
F. Informational area
Shows a brief description of each control when the cursor is being held over it.
3. Gradient Fill to Lines
Converts the gradient in the fill of a path into a group of simple lines with the same angle as the gradient, located at the stop positions of the gradient, and having stroke colors corresponding to the stops. If the path has a stroke, the lines use the same stroke width; otherwise, they are made with 1pt strokes. If Shift is held down before the menu is opened and the menu item is selected, the item will change to “Gradient Fill to Lines (Keep Original). In this case the original art is retained behind the newly-created lines.

These lines may be used for creative purposes or can be duplicated and/or manipulated and turned back into a new gradient using the Build Gradient From Lines function of Astute Graphics’ Gradient Forge panel. For the latter use, it is generally advisable to have the gradient at a zero-degree angle.
4. Reset Tip Dialogs Button
If one or more of Gradiator’s tip dialogs have been suppressed using the Don’t show again checkbox, clicking this button will re-enable them.
5. Gradiator Preferences...
Brings up the Preferences dialog (see below).
Gradiator Panel: Preferences
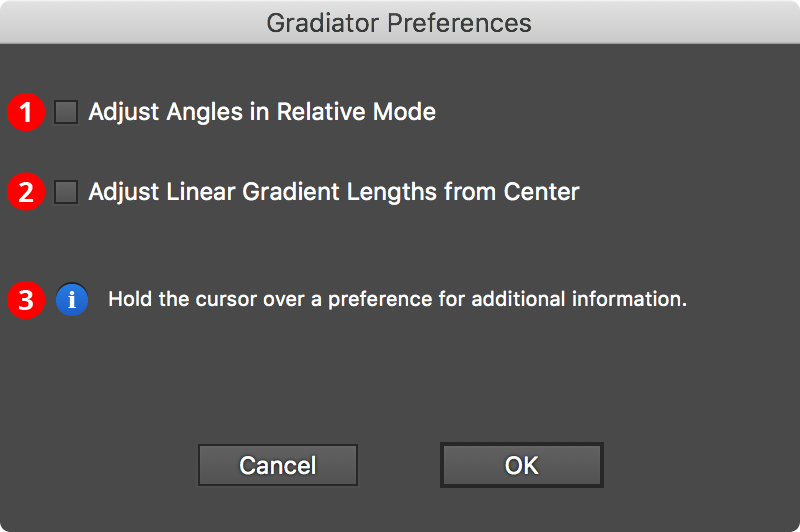
1. Adjust Angles in Relative Mode
When enabled, the angle input field is used to specify the change in angle of the selected gradients, as opposed to their actual value. This preference can be switched quickly without entering the Preferences dialog by Option/Alt-clicking on the Angle icon.
2. Adjust Linear Gradient Lengths from Center
When enabled, changing the length of a linear gradient will keep the center of the gradient (as opposed to the start of the gradient) in the same place.

3. Informational area: Shows a brief description of each preference control when the cursor is being hovered over it.

