Gradient Forge User Manual
22 minute readGradient Forge Overview
Gradient Forge is an Astute Graphics panel for editing a single linear or radial gradient. It addresses several shortcomings of the native Gradient panel, including its inability to select and operate on multiple stops or midpoints; the lack of stop snapping to integer values while dragging; its inability to see or select stops that lie directly under others; and its inability to tell at a glance whether a stop has a custom color or opacity set. Additionally, Gradient Forge includes functions to create new gradients directly from artwork or swatches.
Gradient Forge Panel
Menu items to show and hide the Gradient Forge panel can be found in the main menu under Window > Astute Graphics > Gradient Forge.
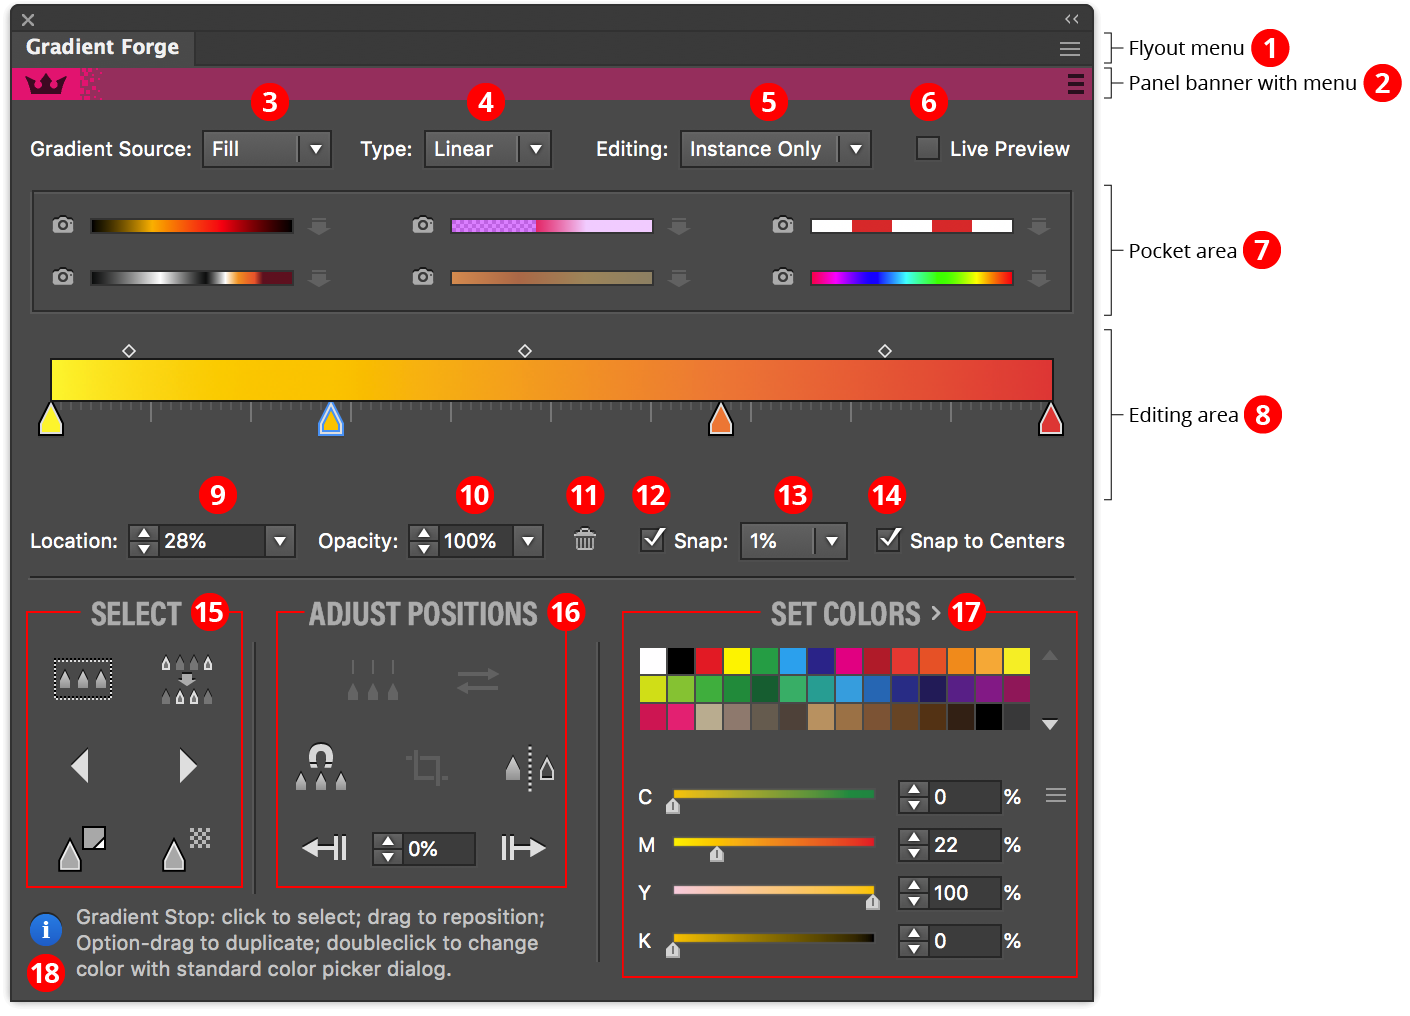
1. Flyout menu: See Gradient Forge Panel: Flyout Menu.
2. Panel banner: The flyout menu on the right provides links to the Astute Graphics website.
3. Gradient Source
Indicates the source of the gradient currently being edited. This may be the selected swatch, the selected art’s fill, or the selected art’s stroke. If the selected artwork has a gradient in both the fill and the stroke, a popup menu will be displayed allowing you to switch between the two.
4. Type Popup
Changes the active gradient between linear and radial. Option/Alt-clicking the “Type:” label is a fast way to switch the menu between its two values.
5. Editing Mode Popup
Determines how changes to a gradient are applied. Instance Only mode (the default) acts similarly to the native Gradient panel: edits to the gradient are only applied to the selected artwork. If the gradient is used elsewhere, it remains unchanged. Therefore, a new gradient is created. But in Global mode, changes are immediately applied to the gradient wherever it appears in the document, including all art objects (regardless of selection, locked or hidden status); symbols; swatches, etc. Because this powerful functionality can also cause unintended changes if you are not aware of how it works, a tip dialog will be displayed the first time the Editing Mode is changed to Global. Enabling the Don’t show again setting will keep the dialog from showing again (unless tips and warnings are reset; see Gradient Forge: Flyout Menu).
When editing a swatch gradient with no gradient art selected, the setting is hidden, because swatch edit- ing is always done in Global mode.
6. Live Preview
When enabled, changing the active gradient by dragging (such as moving, duplicating, or deleting gradient stops) causes the affected art to be updated in real time. Because Illustrator gives priority to artboard redraw, this may cause some lag in the redraw of the panel interface elements.
7. Pocket Area
Allows you to make and store up to six “snapshots” of the active gradient. These “pocket gradients” are retained even if you switch documents or quit and restart Illustrator.

A. Snapshot Button: When there is an active gradient in the main editing area, clicking the snapshot button copies it to the corresponding pocket slot. If there is already a gradient in the pocket, a dialog will come up to confirm that you want to overwrite the existing gradient. To avoid this dialog, hold Option/Alt when clicking on the button.
B. Pocket Gradient: Each pocket displays a small preview of the gradient it contains. When the cursor is passed over the preview (or the buttons to the left and right of it), the gradient’s stops and midpoints are also temporarily displayed. To delete the pocket gradient, Shift-click on it.
C. Insert/Save Button: Inserts the corresponding pocket gradient into the selected stops of the active gradient, or, if no stops are selected, replaces the entire active gradient. Insertion is only valid when the selected stops are contiguous. If the pocket gradient has stops at both ends (at positions 0% and 100%), then the outer selected stops in the main gradient are replaced by the end stops of the pocket gradient. Otherwise, they are retained and only the inner stops are replaced.
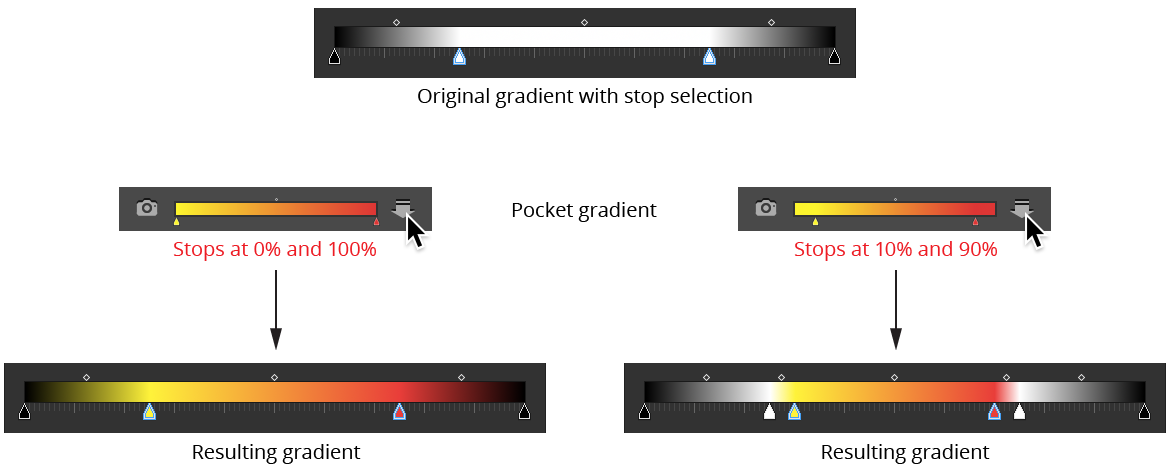
If the button is Shift-clicked, the pocket gradient is saved to a gradient swatch. A dialog will appear letting you specify the name of the new swatch. You can save a pocket gradient to a gradient swatch as long as a document is open, even if the Insert/Save button is grayed out.
8. Editing Area
This is the main area, which displays the active gradient and allows you to manipulate its stops and midpoints as with the native Gradient panel. However, unlike the native panel, you can select and operate on multiple stops or midpoints.
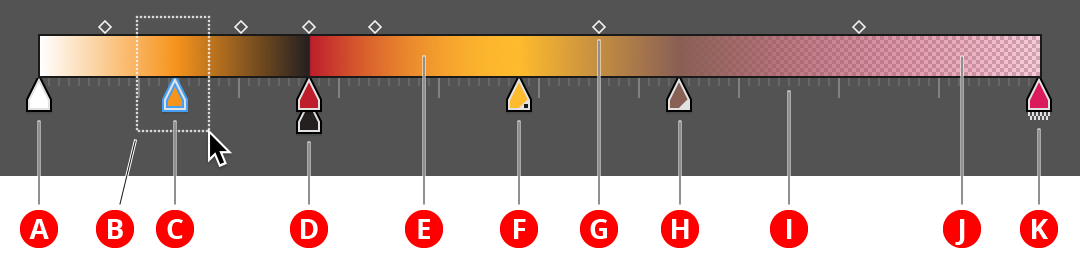
A. Unselected Stop: Can be made selected by dragging the marquee over it, or clicking on it. Shift-clicking or dragging inverts the selection, as per the Illustrator artboard.
B. Marquee: Dragging the cursor starting from an empty spot in the editing area creates a marquee which is used to select either midpoints or stops.
C. Selected Stop: Distinguished by a hollow blue highlight around it. While some of the function buttons will work with no stops selected (and, in general, then act as if all the stops were selected), other functions, such as setting the location/opacity value or the delete button, require there to be a stop selection.
D. Stacked Stops: Unlike the native Gradient panel, Gradient Forge lets you see stops which are “on top of each other”, i.e., have the same location value. Stacked stops create a hard edge in the gradient, and can be used to create stripes. Stops can be stacked to any depth, but only the first and last contribute to changing the color. Just as stop order proceeds from left to right, stacked stops should be read from bottom to top. In the example shown, the second, orange stop blends to the black stop; the color then changes abruptly to dark red, and then blends to the lighter orange of the right-hand stop.
E. Gradient Preview
F. Spot Color Stop: Stops with spot colors are indicated by the small triangular badge at lower right with a dot (similar to swatches).
G. Midpoint: As per the native Gradient panel; indicates the midpoint of the gradient between stops to its left and right. Selected midpoints are solid while unselected ones are hollow.
H. Global Color Stop: Stops with global colors are indicated by the small triangular badge at lower right (similar to swatches).
I. Ruler: Indicates the positions to which stops are snapped when snapping is enabled (up to 1.0% snapping increments; 0.5% increments are not shown).
J. Opacity Grid: Per the native Gradient panel; the opacity grid is drawn below the gradient, and therefore shows areas where the gradient’s color is not fully opaque.
K. Stop With Opacity: Stops with non-100% opacity are indicated by a small checkered badge below. This is useful for spotting opacities that close to but not exactly 100% (and would therefore leave the opacity grid almost invisible).
Editing Area: Midpoint Operations
Midpoints may be repositioned by dragging them. When a single midpoint is selected, it may be reset to its default 50% location by doubleclicking it.
Editing Area: Stop Operations
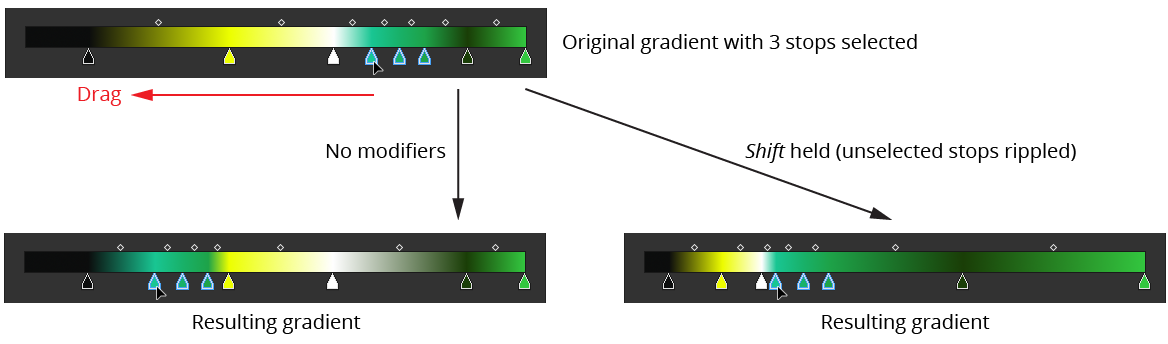
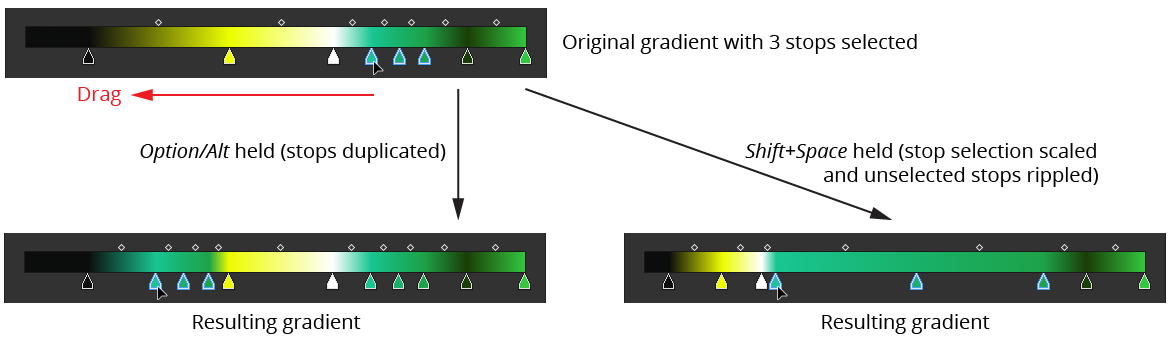
Stops may be repositioned by dragging them. If the stops are dragged far enough below the gradient preview, they will deleted when the mouse button is released (as per the native Gradient panel). Various modifier keys can by used when dragging stops to change functionality:
Shift: “Ripples” the locations of unselected stops, i.e. moves them proportionally in the drag direction. This essentially stretches the gradient around the selected stops, retaining stop order:
Option/Alt: Duplicates the dragged stop(s), as per the native Gradient panel.
Command/Ctrl: Temporarily disables snapping, if enabled (see below).
Space: Applicable only when a contiguous selection of two or more stops is being dragged by either the first or last stop in the selection; scales the selected stops proportionally (in effect, stretching them out or together). Can be combined with Shift to ripple the other stops.
By default, clicking just below the gradient preview will add a new stop at the clicked position, with its color and opacity automatically set to match that of the gradient at that position (interpolating adjacent stops). If you find yourself accidentally adding stops, you may enable the preference Require Option/Alt to Add New Stop (see Gradient Forge: Preferences). In that case, you must hold down Option/Alt when clicking in order to add a new stop. After the stop is added it may immediately be dragged.
9. Location Value
As per the native Gradient panel; allows you to specify the absolute position of the selected stop(s), or the relative location of selected midpoint(s). Midpoint locations can range between 13% and 87%.
10. Opacity Value
As per the native Gradient panel; allows you to specify the opacity of the selected stop(s).
11. Delete Button
As per the native Gradient panel; deletes the selected stop(s), with the limitation that gradients must contain at least two stops.
12 and 13. Snap Checkbox and Value
When enabled, the dragged stop will have its location snapped to multiples of the Snap Value (0.5%, 1%, 2%, 5%, or 10%), except when it is being snapped to a centerpoint. Unselected stops, when rippled, are not snapped. If multiple stops are being dragged, their “non-snap” locations are calculated and then rounded to the nearest snap location. Thus the spacing between dragged stops may change if they were unsnapped to begin with. To snap selected stops without dragging them, see Adjust Positions Section: Snap Button below. To temporarily disable snapping, hold down the Command/Ctrl key when dragging a stop.
14. Snap to Centers Checkbox
When enabled, the dragged stop will snap to locations that are halfway between the stops on either side of it, with magenta arrow annotations indicating this. Snapping to a centerpoint takes precedence over the grid snapping (i.e., the center snap value may not lie on the current snap grid).
15. Select Section
Contains controls which select stops or change the current selection.
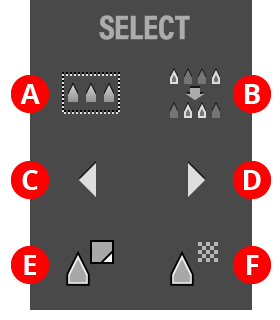
A. Select All Button: Selects all the stops in the gradient. If Option/Alt is held, every other stop (starting with the first) is selected instead.
B. Select Inverse Button: Inverts the stop selection (stops which were selected become unselected, and vice versa).
C. Select Previous Button: Selects the previous stop(s), wrapping around the end of the gradient if necessary. To extend the selection, hold Shift when clicking the button.
D. Select Next Button: Selects the next stop(s), wrapping around the end of the gradient if necessary. To extend the selection, hold Shift when clicking the button.
E. Select Same Color Button: Selects all stops with the same color as the selected stop. If multiple stops are selected, all of their colors are included in the matching.
F. Select Same Opacity Button: Selects all stops with the same opacity as the selected stop. If multiple stops are selected, all of their opacity values are included in the matching.
16. Adjust Positions Section
Contains controls which change the positions of one or more stops.
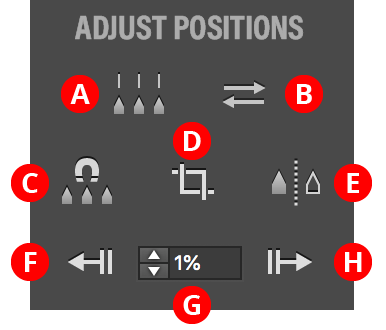
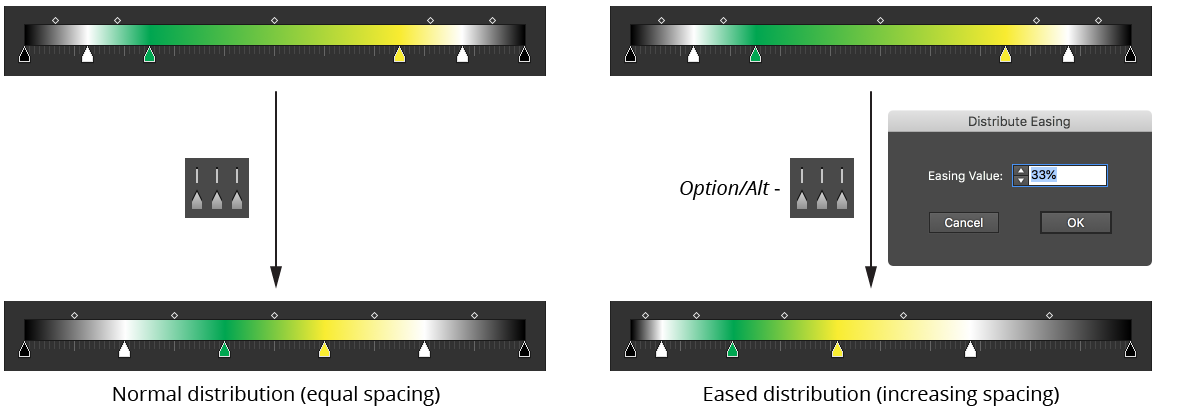
A. Distribute Button: Available when three or more contiguous stops are selected (or when no stops are selected, in which case it acts as all stops are selected); distributes their positions equally. The first and last selected stops are not moved. If Option/Alt is held, a dialog is shown allowing you to specify an eased distribution. In this case the stops are not distributed evenly, but gradually get closer together or further apart.
B. Reverse Gradient Button: Available when two or more contiguous stops are selected (or when no stops are selected, in which case it acts as all stops are selected); reverse the order of the stops, as per the native Gradient panel Reverse Gradient button. Affected midpoints will have their locations invert- ed to keep the look of the gradient identical.
C. Snap Button: Snaps all selected stop locations to multiples of the Snap Value (see above).
D. Crop Button: Available when the stop selection is contiguous (or, when no stops are selected, if the first stop is not at 0% or the last stop is not at 100%); removes all unselected stops and scales the remaining stops such that the gradient runs full-length (0% to 100%).

E. Mirror Button: Mirrors the entire gradient along its right-hand side. Stop selection is ignored.

F. Move Left Button: Moves the selected stops’ locations to the left by the amount specified in the Move Value. Holding Shift moves them by ten times the specified value. Once a stop reaches the start of the gradient, it (and any additionally selected stops) cannot be moved any further left.
G. Move Value: The amount by which selected stops are moved using the Move Left and Move Right buttons.
H. Move Right Button: Moves the selected stops’ locations to the right by the amount specified in the Move Value. Holding Shift moves them by ten times the specified value. Once a stop reaches the end of the gradient, it (and any additionally selected stops) cannot be moved any further right.
17. Set Colors/Adjust Colors Section
Contains controls which set or adjust the colors of selected stops. To switch between Set Colors and Adjust Colors, click the header text.

A. Swatch List: Shows all of the flat color swatches (i.e., no gradients or patterns) in the document. Each swatch’s name is shown below the grid when the cursor is hovered over it. Clicking on a swatch will change the color of the selected stop(s). Holding Option/Alt while clicking automatically advances the stop selection to the right after recoloring. A swatch may be dragged upwards into the Editing Area just below the gradient preview to add a new stop or recolor an existing stop without having to select it first.
B. Swatch Scroll Arrows: If more 42 swatches exist, these arrows are enabled, allowing you to scroll the list up or down to reveal additional rows of swatches.
C. Color Sliders: Similar to the native Color panel; display and allow editing of the color of the currently selected stop(s). When a global or spot color is being editing, the single slider specifies the tint of the color.
D. Color Value Inputs: Reflect the same color values as displayed in the sliders but allow precise numeric input of these values.
E. Color Model Popup Menu: Available when all selected stops have colors using the same color model; allows switching the color model for editing the color(s), choosing between Grayscale, RGB, HSB, HSLuv, and CMYK. Unlike the native Color panel, switching the color model will immediately convert the color(s) to the chosen model, which may change the color when the gamut of the new color model does not include the original color.
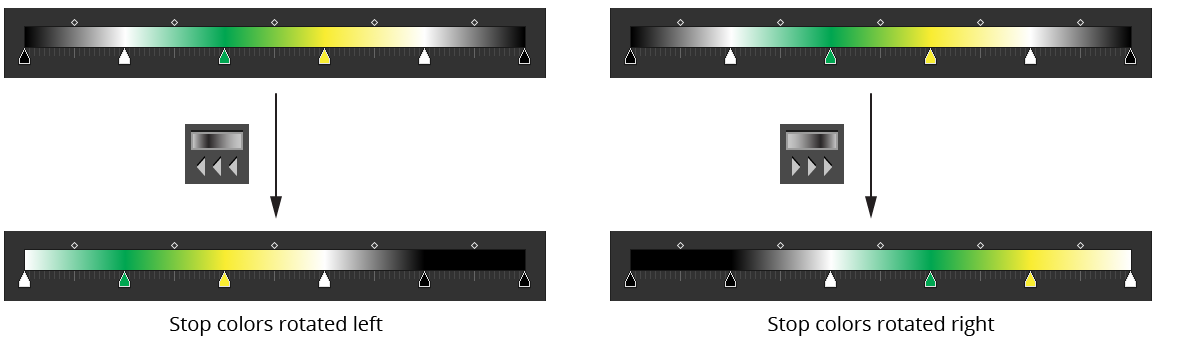
F. Rotate Colors Left/Right Button: Changes the colors of the selected stops (or all stops, if no stops are selected) so the color of each stop is moved one stop to the left/right (wrapping around for the end stops). This, therefore, has the effect of rotating the colors either to the left or right. The positions of the stops themselves are not changed.
G. Randomize Color Order Button: Randomizes the order of the colors of the selected stops (or all stops, if no stops are selected). The positions of the stops themselves are not changed. A new random seed is used on each press of the button, which usually results in a different look.

H. HLS Sliders: Control the Hue, Lightness and Saturation values which modify the colors of the selected stops when the Adjust button is pressed. While the sliders are dragged, the gradient preview will change in real-time to show what the color would look like with the current adjustment. The H, S and L labels may be clicked to reset each corresponding value to zero.
I. HLS Value Inputs: Reflect the same values that are displayed in the HLS Sliders, but allow precise numeric input of these values. Hue change can vary from -180 to 180; Lightness and Saturation can vary from -100 to 100.
J. HLS Popup Menu: Allows you to use the HSLuv color space instead of the default HSL colorspace (see https://www.hsluv.org).
K. HLSuv Indicator: When visible, indicates that the HSLuv color space is being used.
L. Adjust Button: Applies the adjustment specified by the HSL values to the color(s) of the selected stop(s) (or all stops, if no stops are selected). Stops with spot colors are not affected. When the cursor is hovered over the button, the gradient preview will change to show what the color(s) would look like after adjustment with the current values, but the gradient will not actually be changed until the button is pressed.
18. Informational Text Area
Displays information about each panel control when the cursor is hovered above it, as well as listing keypresses when dragging items in the editing area. It can be disabled in the Gradient Forge Preferences (see below).
Gradient Forge Panel: Flyout Menu
The Gradient Forge panel flyout menu items are contextually sensitive and all items may not be available, depending on the current selection.
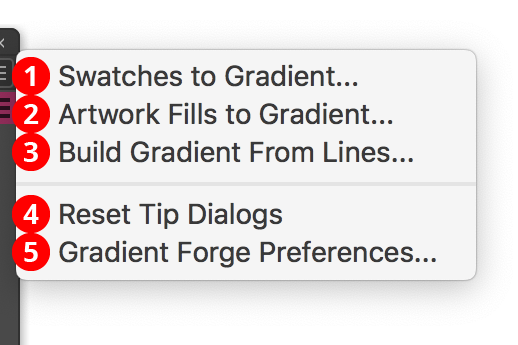
1. Swatches to Gradient...
Available when one or more swatches are selected in the native Swatches panel (and no gradient artwork is selected). The menu item brings up a dialog showing the gradient that would be created with equally-spaced stops from each selected flat-color or gradient swatch:
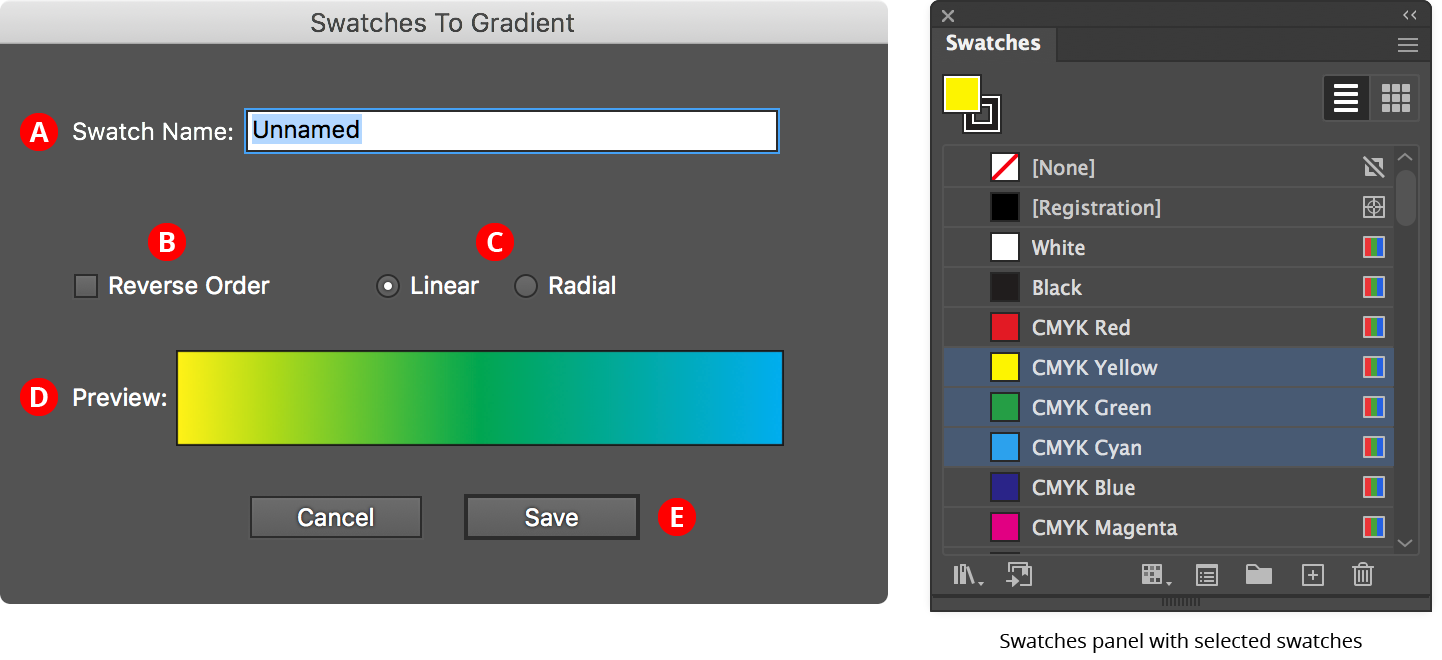
A. Swatch Name: The user-specified name of the new gradient swatch.
B. Reverse Order Checkbox: Reverses the order of the stops.
C. Linear/Radial Buttons: Specify whether the new gradient will be linear or radial.
D. Preview Area: Previews the new gradient with the current settings.
E. Save Button: Saves the new gradient as a swatch when clicked; the new swatch is automatically selected and displayed in the Gradient Forge panel, and can be edited further.
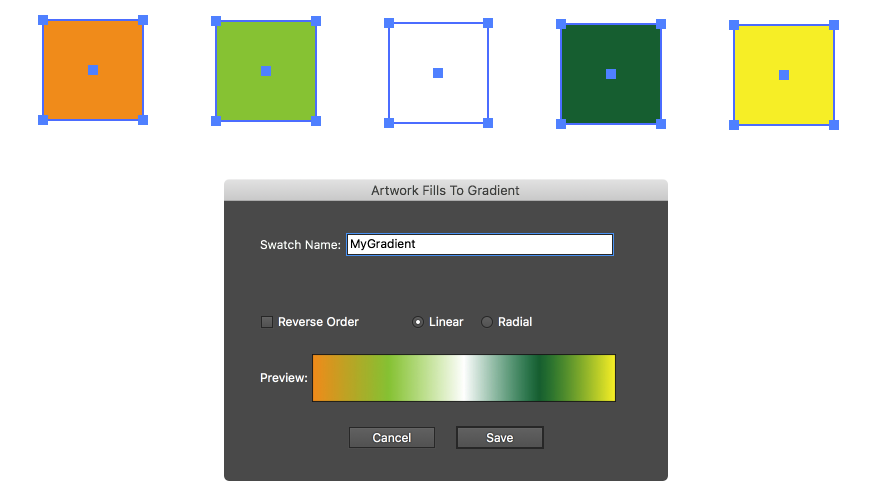
2. Artwork Fills to Gradient...
Similar to Swatches to Gradient..., but uses the fill colors of the selected artwork rather than swatches to determine the stop colors. The stacking order of the artwork determines the order of the stops. If any fill has a non-100% opacity value, this is retained in the resulting stop.
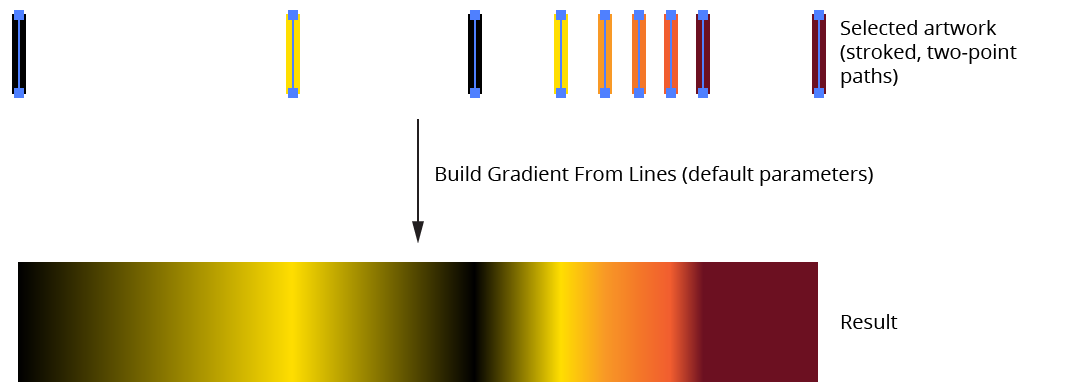
3. Build Gradient From Lines...
Creates a new gradient (saved as a swatch, with the same dialog as the previous two functions) from a selection of vertical, stroked two-point paths, with the leftmost line representing the first stop, the rightmost line representing the last stop, and the relative distances between the lines preserved as distances between stops. Stroke weight is ignored. The paths may have been manually created, or may be the result of using the Gradiator panel’s Gradient Fill to Lines function. Lines which are at the same horizontal position will be stacked in the resulting gradient.
4. Reset Tip Dialogs Button
If one or more of Gradient Forge’s tip dialogs have been suppressed using the Don’t show again checkbox, clicking this button will re-enable them.
5. Gradient Forge Preferences...
Brings up the Preferences dialog (see below).
Gradient Forge Panel: Preferences
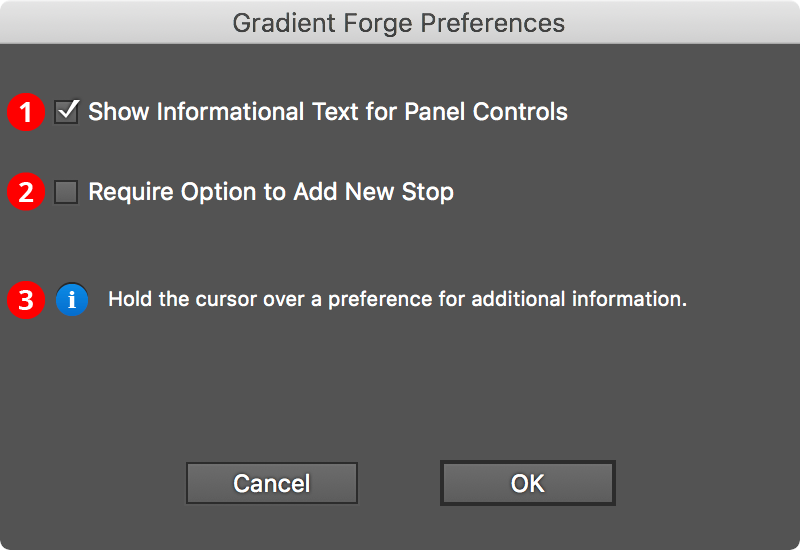
1. Show Informational Text for Panel Controls
When enabled (the default), informational text is shown at the bottom of the Gradient Forge panel when the cursor is hovered over controls on the panel, or when gradient stops or midpoints are dragged.
2. Require Option to Add New Stop
When enabled, Option/Alt must be held down when clicking to create a new stop in the main editing area. This can be useful if you find yourself inadvertently creating stops by starting the marquee in the add stop area.
3. Informational area: Shows a brief description of each preference control when the cursor is being hovered over it.

