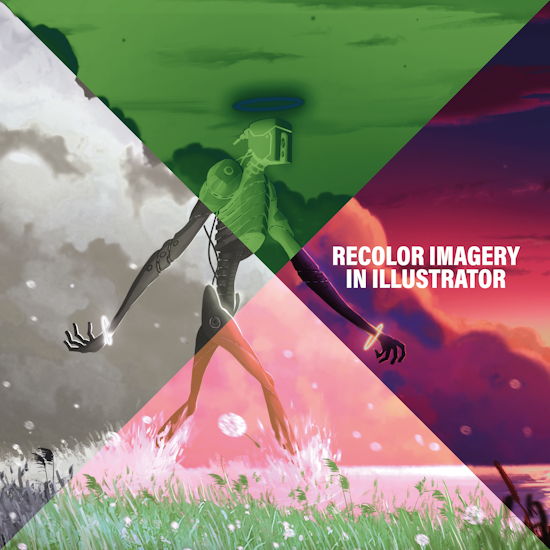
How to change the color of an image in Adobe Illustrator
15 minute readThis tutorial will guide you through:
All the Curves, Levels, Hue/Sat, etc. control you expect... and how to access them in Illustrator
Hiding this amazing design hack from others
How to work with linked images
Create your very own Instagram-style “filter”
There's so much more to discover
Introduction
Adobe Illustrator is a vector design product. Even vector designs need pictures (including JPG/JPEG, PNG, PSD's) on frequent occasions — it's not unreasonable. However, adding images to Illustrator has always been a pain when it comes to changing the color of images in the document.
In this tutorial, we'll walk through the native Adobe Illustrator options. Then we'll move on what you really want to read; how to truly change image colors using the same controls as you'd expect in Photoshop and other image editors. Yes, that is possible!
Embedded vs Linked images
Throughout this article, there are references to embedded and/or linked images. For more details on linked and embedded images, please refer to Adobe's help on this.
There is no longer the fear of embedding images in Illustrator as, for some years, it's been possible to un-embed them equally quickly — ie. relink them to external images files.
With the native Properties panel (Window > Properties), if an image is selected, you can check to see whether it's embedded if it states “Image” top left:
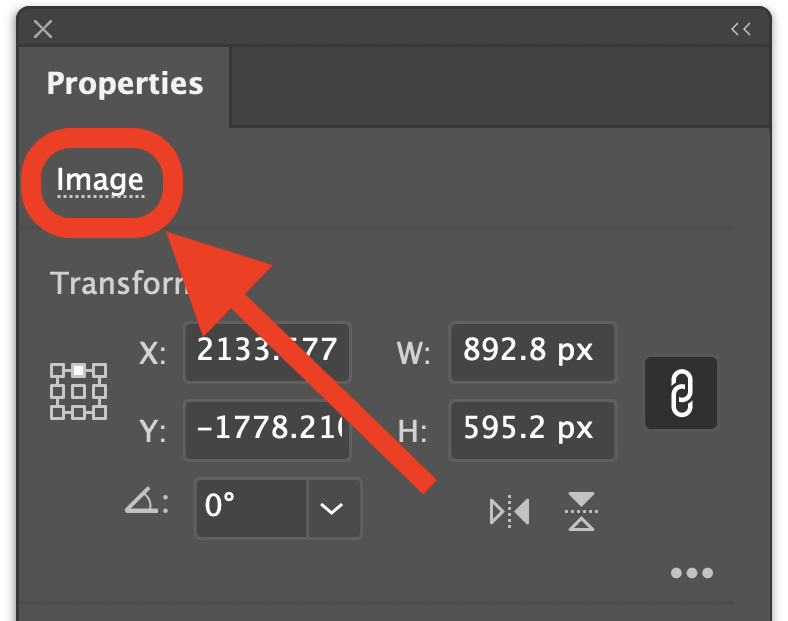
If the image were linked (ie. an external image file placed in the document), this would instead state “Linked File”.
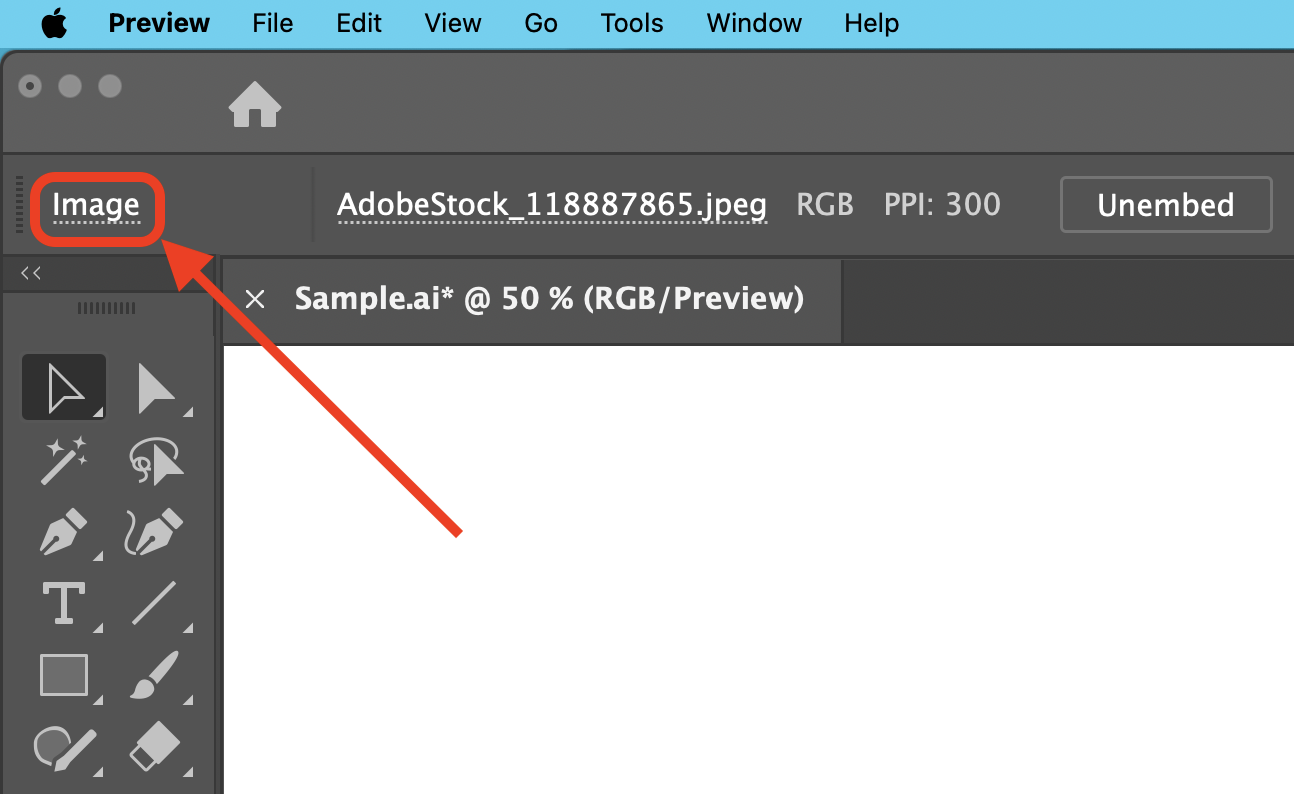
If you use the traditional horizontal Control bar (Window > Control), then the same feedback applies:
If you need to unembed an image, this is possible natively using the Unembed button that appears in both the Properties panel and Control bar when an embedded image is selected. The Unembed option is also available for a highlighted image in the Links panel's (Window > Links) fly-out menu.
How to change the color of an image natively in Illustrator
Firstly, no. The much-vaunted native Recolor and Generative Recolor panels only work for vectors and doesn't have any effect on images, embedded or linked. Instead, we'll have to dig deeper.
The following (limited) method is only available to embedded images.
Select the embedded image
Open the Edit > Edit Colors > ... sub-menu:
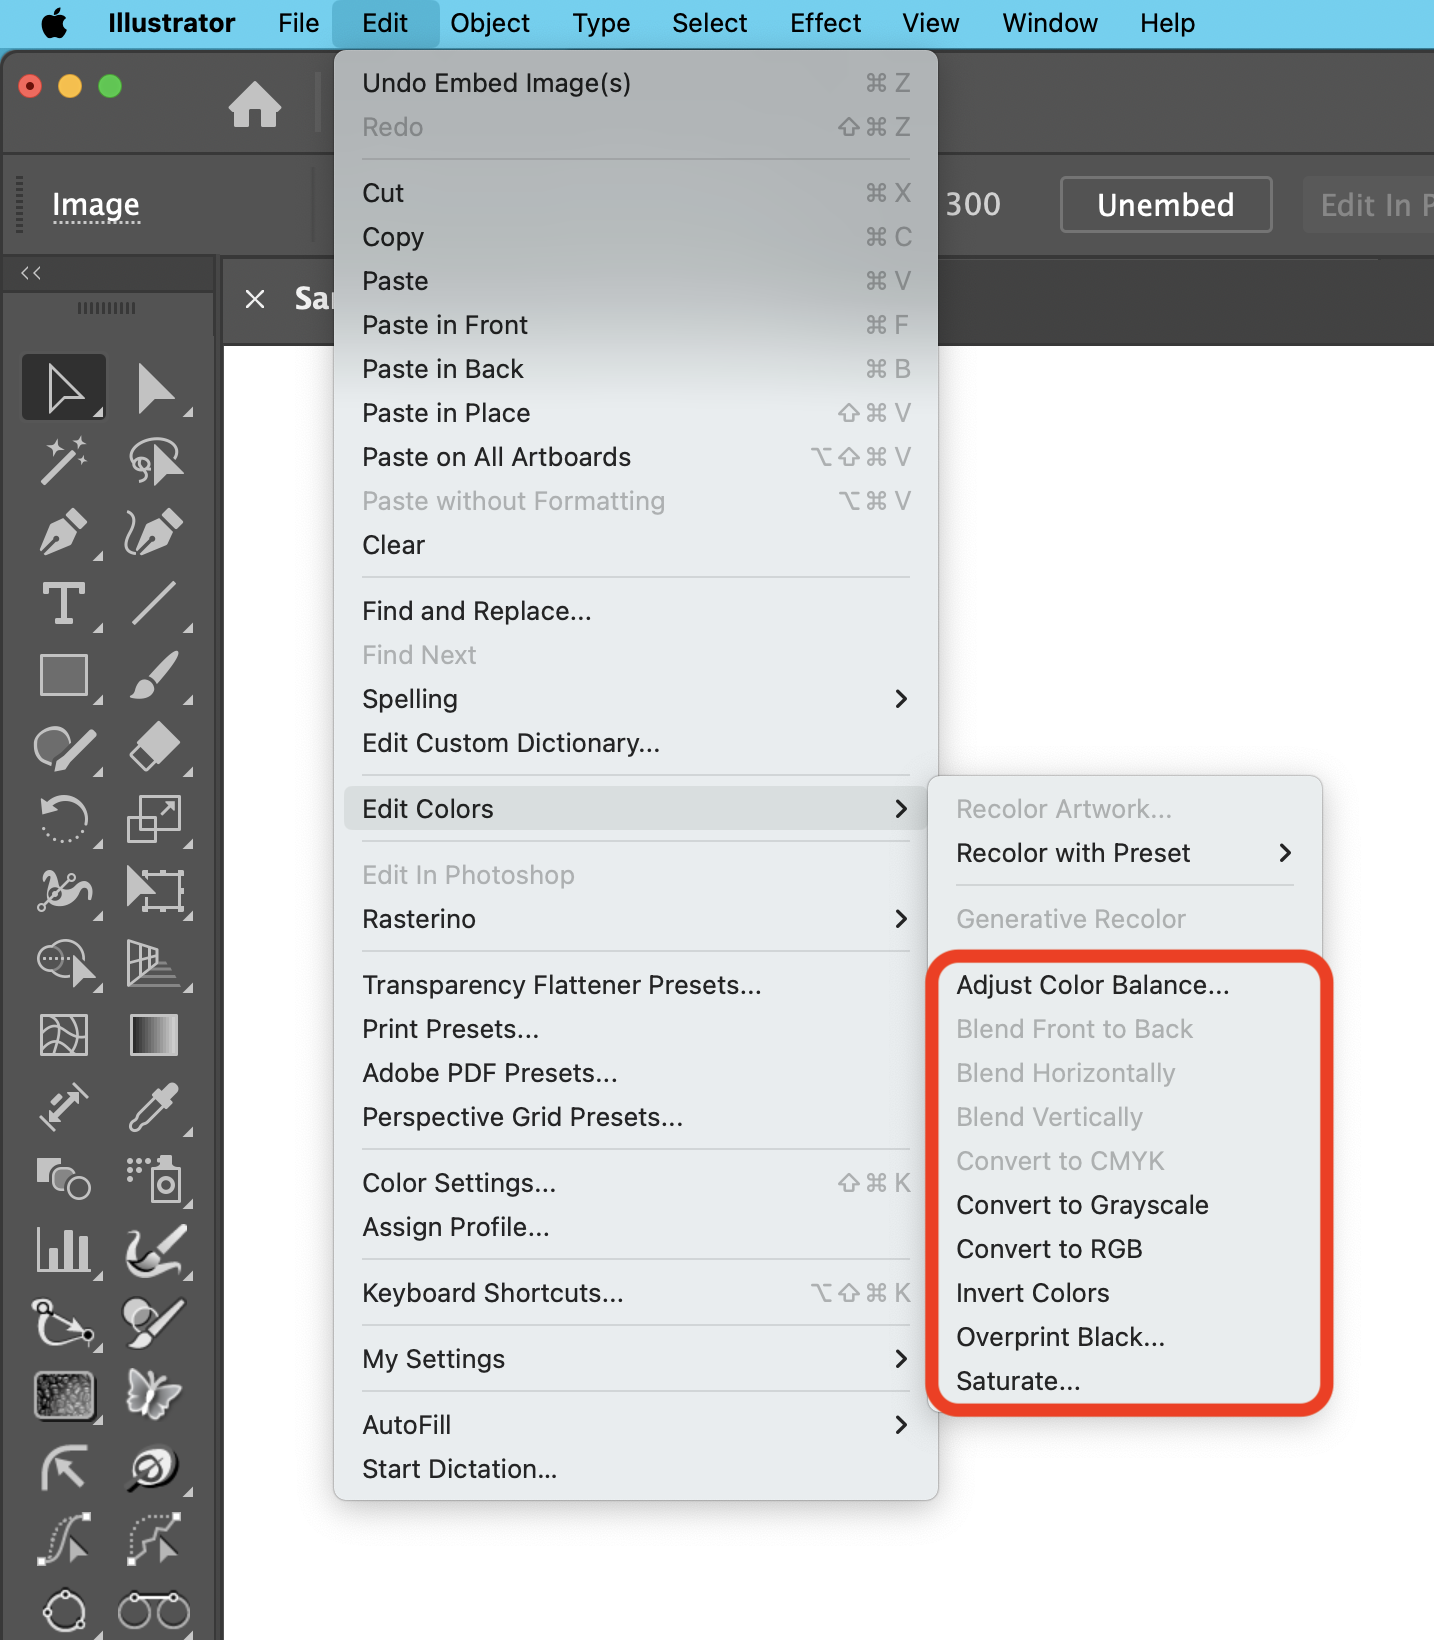
From here, there are a limited number of options. The main one is Adjust Color Balance...
Opting for this on a selected embedded image results in this primitive control dialog:
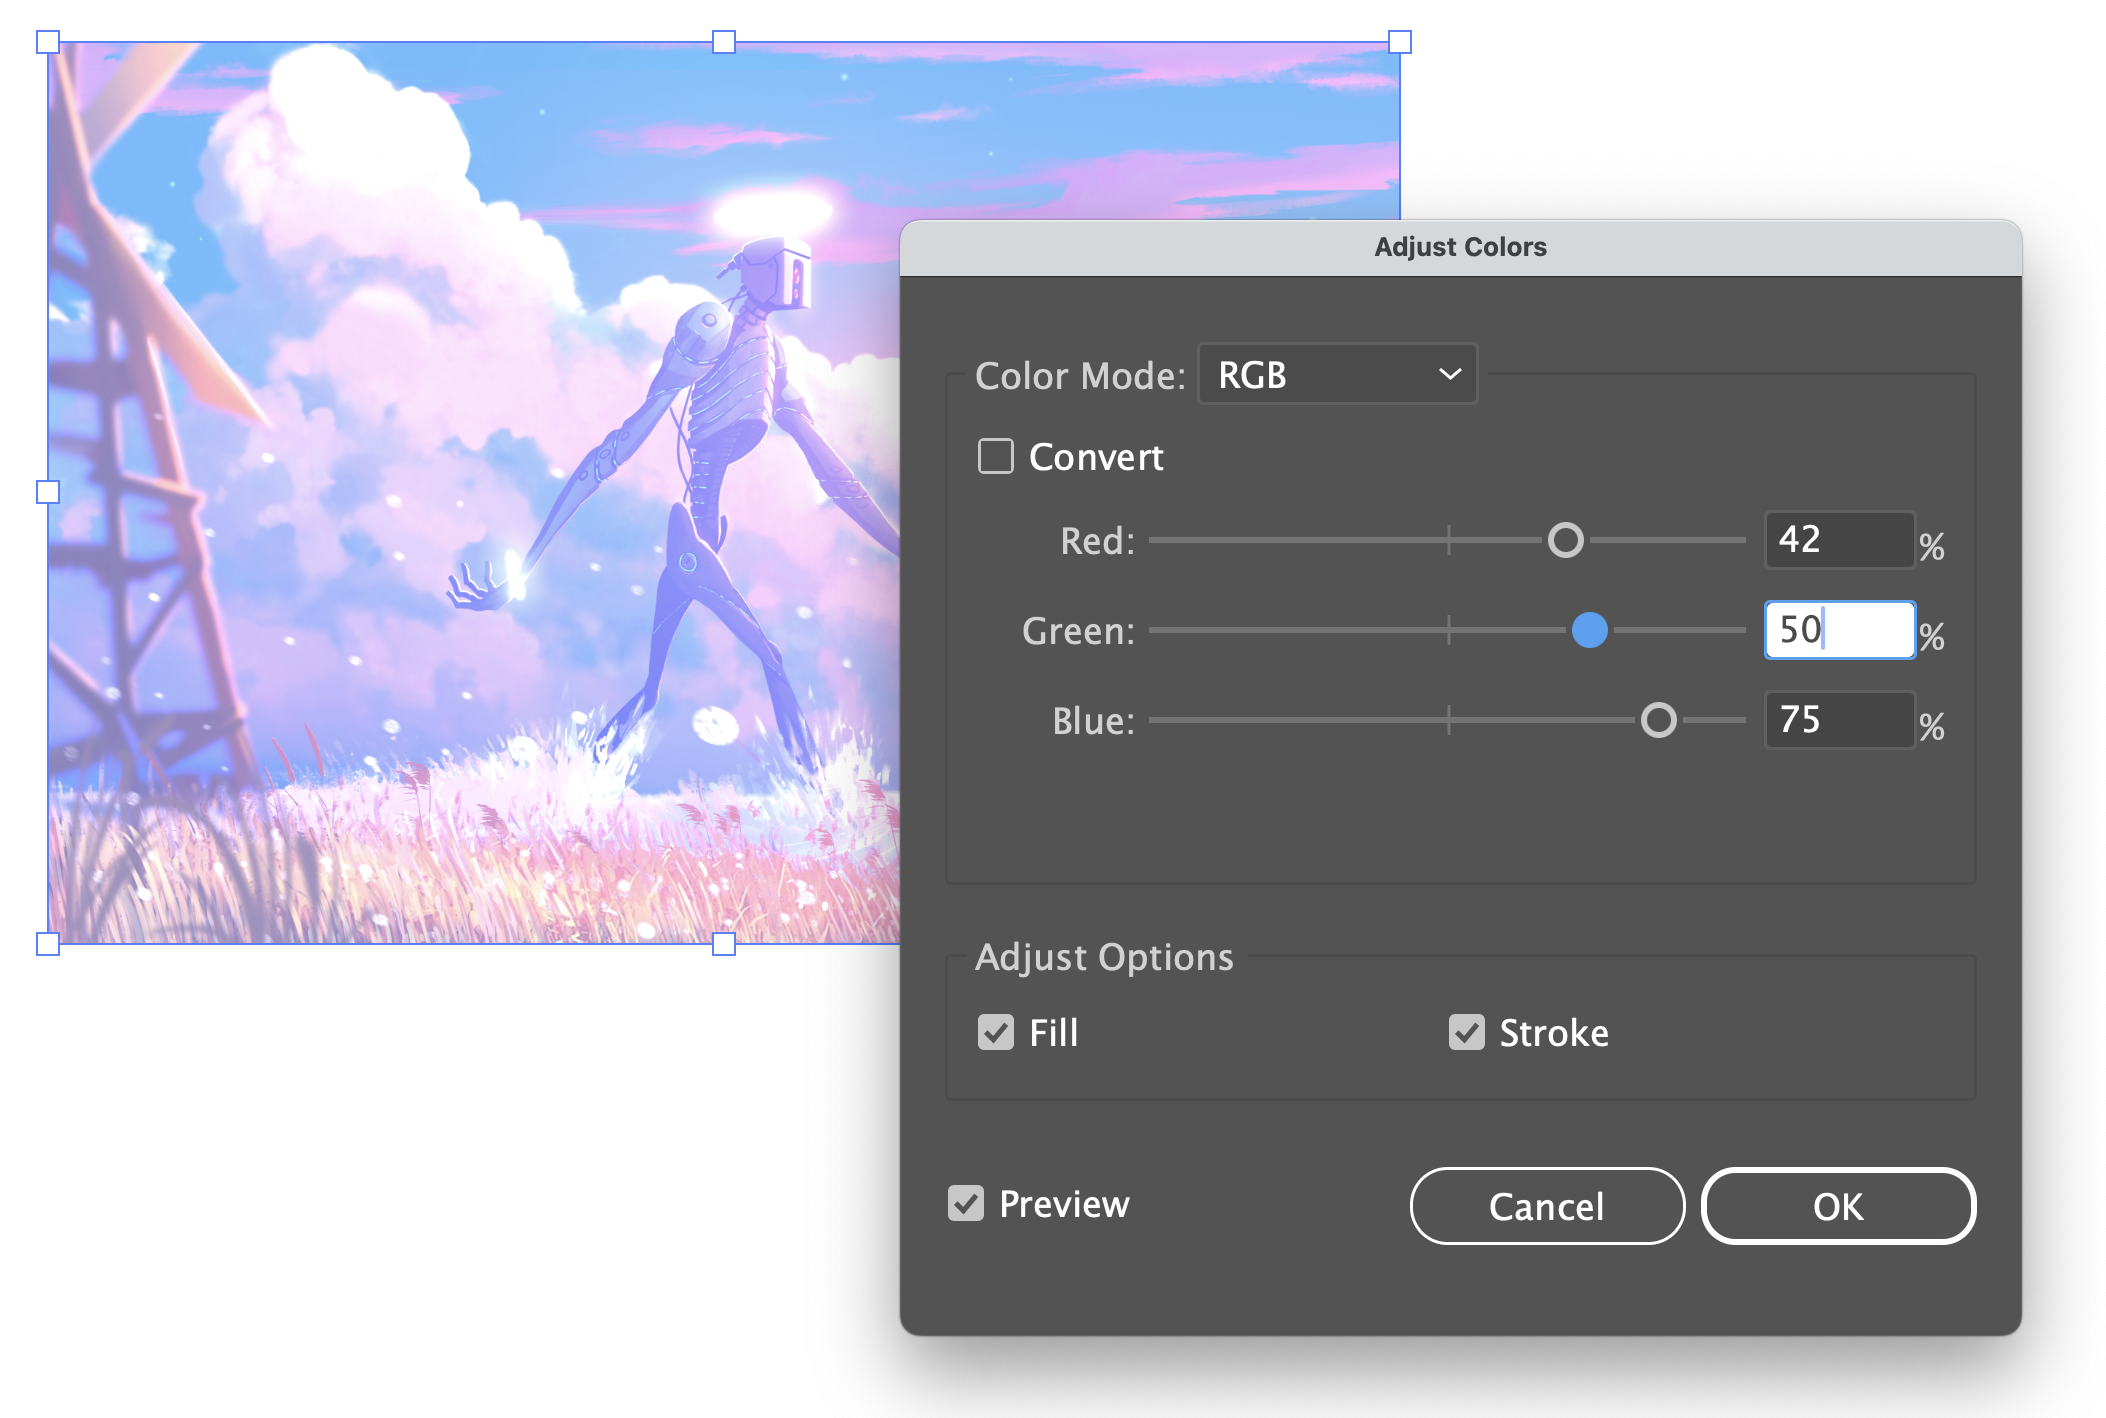
Ensure you tick the Preview box. Then push the slider controls as you like. If the document is in CMYK mode, the sliders will be for CMYK levels, otherwise RGB as shown here.
The top pull-down menu will only really offer the opportunity to change the image to Grayscale (you can't have a CMYK image embedded in an RGB document, or vice versa, whilst the Global option refers to color swatches and not embedded images).
Oddly, if you select Grayscale, you then need to tick the Convert option to ensure any conversion to grayscale happens.
The Fill and Stroke options are only relevant for vector artwork.
This method is “destructive” in that, beyond undo-ing, you can't revert to the original embedded image without having access to the original image, stored externally.
The remaining options in the Edit > Edit Colors > ... sub-menu include Convert to Grayscale, Convert to RGB/CMYK (depending on the document's color mode, and only relevant to already grayscale images), Invert Colors and Saturate.
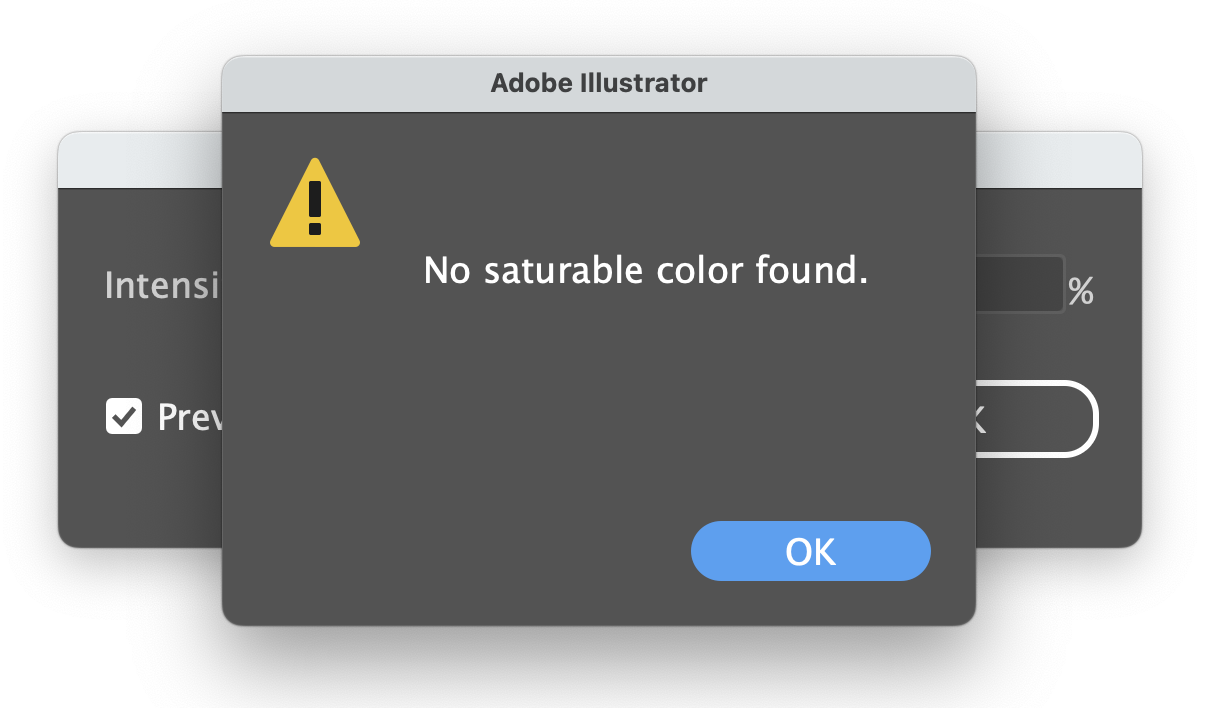
With Saturate, there is an annoying issue that is not possible to overcome (at least in Illustrator v28, at the time of writing). When you tick Preview, it unhelpfully and inaccurately reports “no saturable color found”, which is not true. But each time you adjust the Intensity slider, it will remind you of this! You must OK this each time and continue to edit with this single, basic control.
Ignore the Edit > Edit Colors > Overprint Black option as it's not relevant to images and shouldn't really be available to select if only an embedded image is selected.
You quickly get the impression that this is a forgotten and neglected legacy menu. It is, so let's move on to a more useful native approach to changing an image's color.
Relinking and editing externally to change colors
The second native method is reliant not on Illustrator, but an external image editor such as Photoshop. By its nature, this method only works with linked images.
Method 1 — when the image is embedded
If the image you wish to change the color of is embedded, you first need to unembed it (see above). The image will then be linked.
Next, locate the linked external image in the filing system and edit it in Photoshop or any other image editor. Following the color changes (or any other change to the image), save the file and return to Illustrator. Illustrator should then provide this dialog automatically:
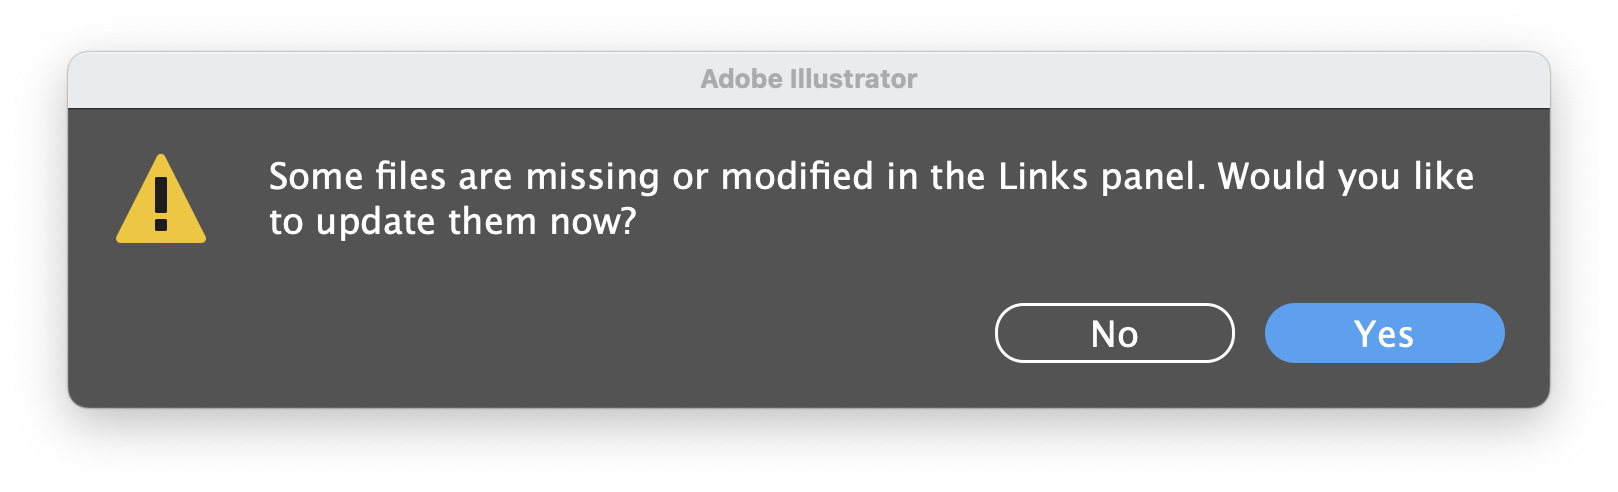
Click on the Yes button and the linked image will be updated in the Illustrator document along with any color changes than may have taken place.
Embed the image once more if need be.
This method doesn't allow editing in-situ within the Illustrator document, making color matching tricky. Therefore, any changes may have to be guessed and then the process tried again. Neither does Illustrator retain any undo/redo information of images edited externally, which can be even more problematic.
Unfortunately, these negatives apply to the next method too...
Method 2 - when the image is linked
Locate the file externally as part way through method 1, then open it directly in your favorite image editor. Edit it in the image editor and save the file.
Or, with the linked image selected, you can make use of the Edit in Photoshop button that appears in the Control bar, Properties panel or the “Ps” icon button in the Contextual Task Bar (Window > Contextual Task Bar). This option is also available via Edit > Edit in Photoshop. This will automatically open the linked image in Photoshop (you can't change this to another image editor by default), where you can do any edits and then save the file.
With either approach, upon returning to Illustrator, you're given the opportunity to update the linked image.
All the Curves, Levels, Hue/Sat, etc. control you expect... and how to access them in Illustrator
If all the above sounds a little negative, that's because the native methods have always been lackluster, often breaking any creative flow and experimentation.
It was this exact reason the first Astute Graphics plugin — Phantasm — was developed way back in 2006. Its main purpose is to allow expected levels of professional color editing directly in the Illustrator document, importantly with non-destructive methods.
The Phantasm plugin has developed significantly since those early days and is now part of the single subscription which features 20 further Illustrator plugins with hundreds of functions in total. You can try it today with a free 7-day no-obligation trial: astutegraphics.com/freetrial
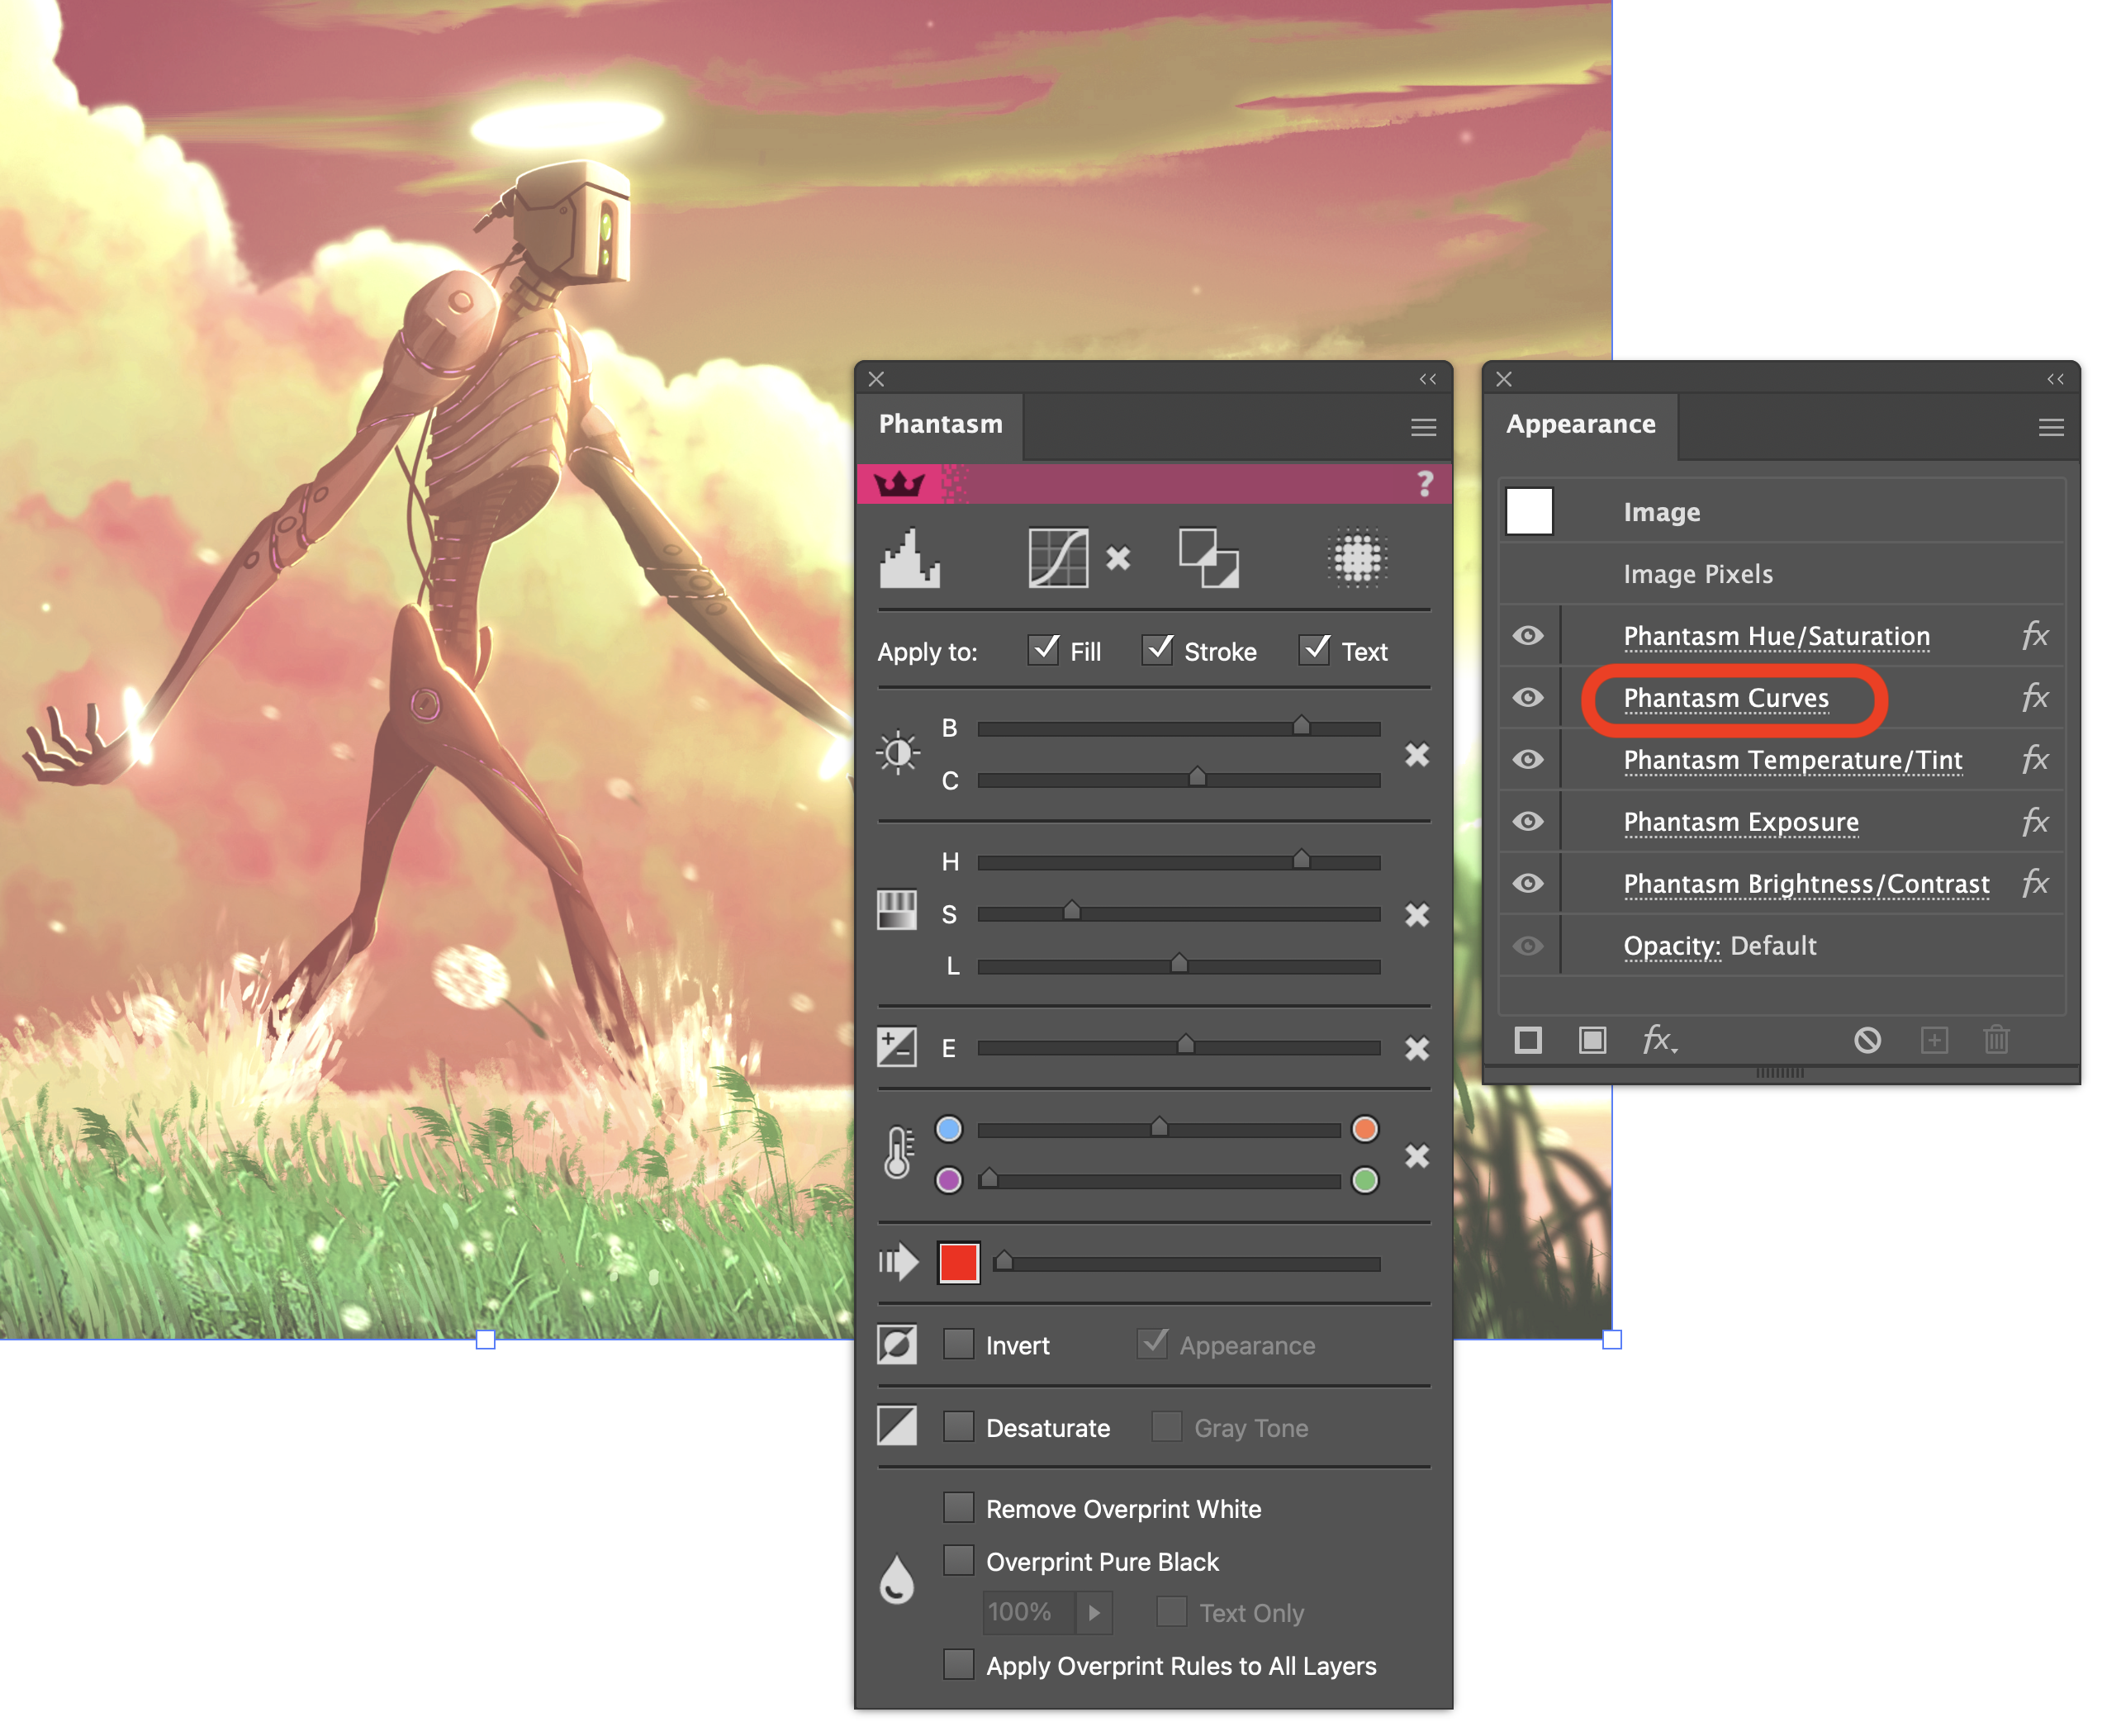
Having installed the Phantasm plugin, ensure the Phantasm panel is visible (Window > Astute Graphics > Phantasm). It's also recommended that the native Appearance panel (Window > Appearance) is open.
The following relates to embedded images. Later, we'll look at how this works with linked images.
For the first experiment, we'll take an Adobe Stock image, embed it in an RGB Illustrator document and then ensure it remains selected.
Next, in the Phantasm panel, tick the Desaturate option. Note that the Gray Tone sub-option is only applicable to CMYK documents, where this option forces the resultant grayscale conversion to purely use Black ink (avoiding CMY inks).
After being applied, you will notice that the Phantasm Desaturate effect has been automatically applied in the native Appearance panel. This Phantasm color change is performed non-destructively as a live effect, allowing the change to be hidden, shown or removed in the Appearance panel.
With a simple desaturation applied to the image, it's possible to quickly adjust the contrast level by sliding the C control (part of the Brightness/Contrast controls). Operating the slider provides feedback in real-time allowing you to make fluid, creative decisions without fear of not being able to revert to the original. It's all about allowing for experimentation.
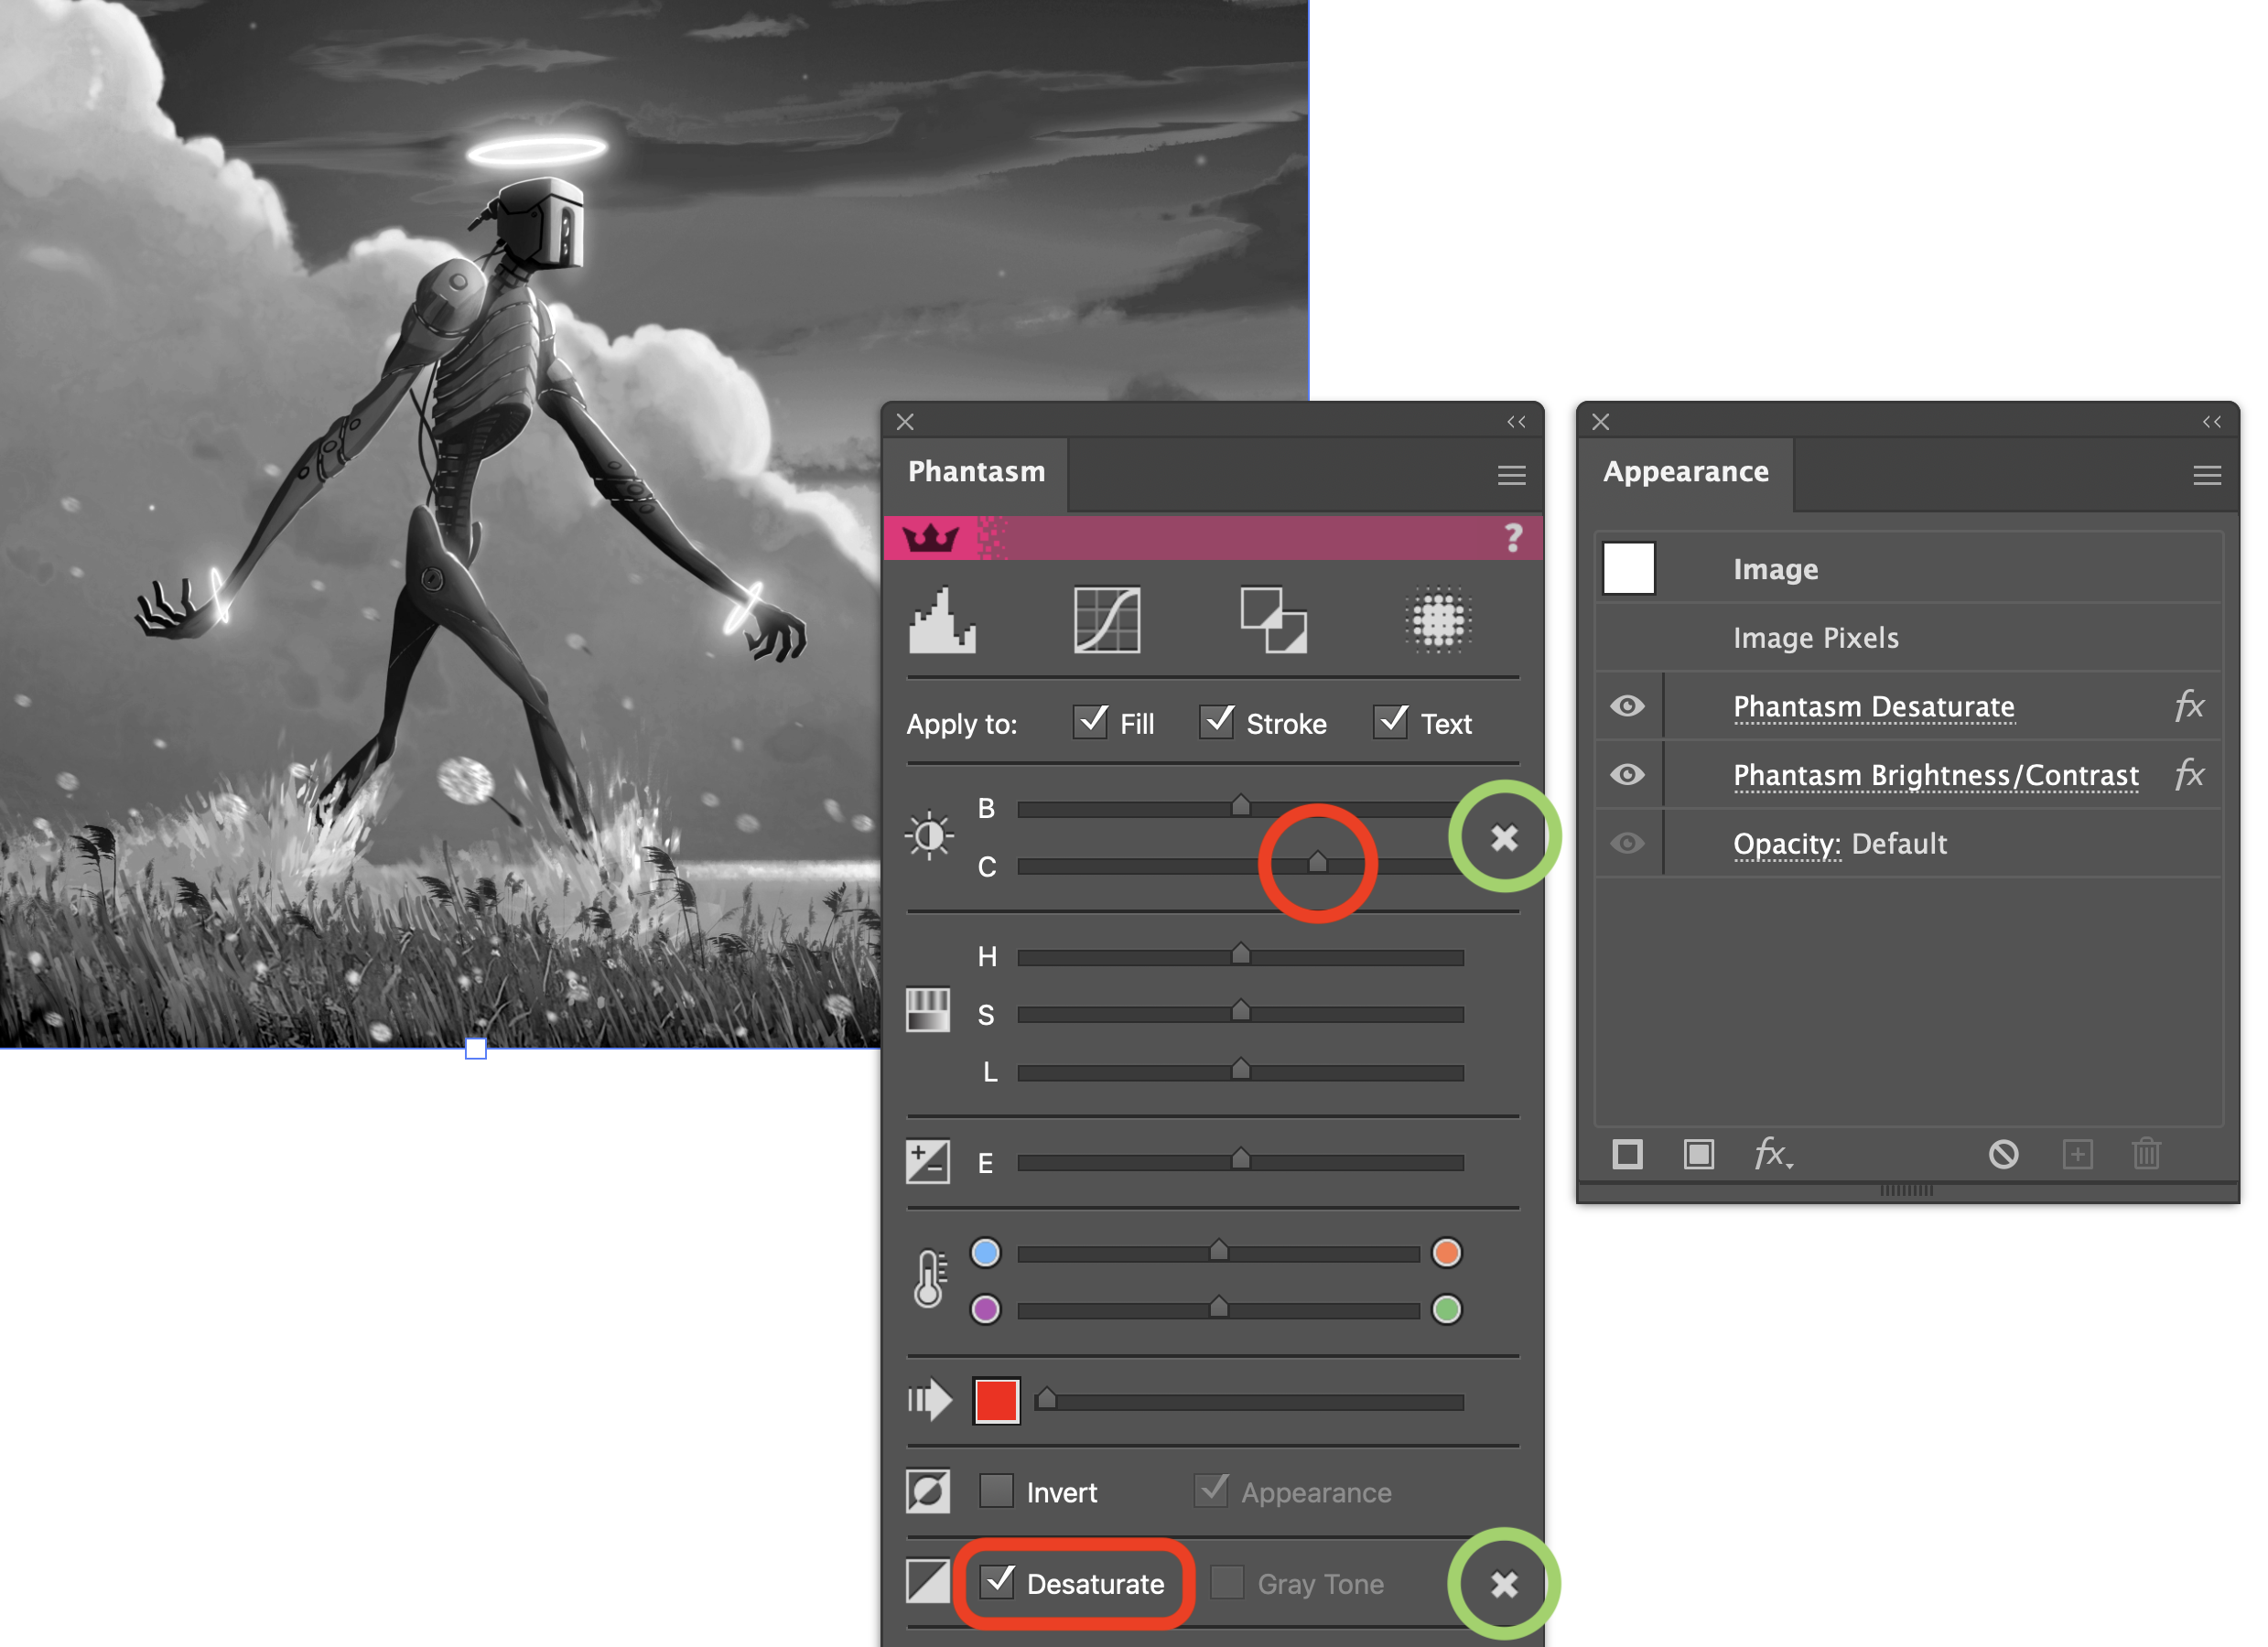
With the two color changes applied, the Appearance panel is updated once more to show the two effects stacked. The Appearance panel is not required to remove these effects, as you can simply use the × button in the Phantasm panel (highlighted in green, above) for each color change set applied.
Apart from the simpler Bright/Contrast, Hue/Saturation/Levels, Exposure, Temperature/Tint, Shift to Color, Invert and Desaturate controls in the main area of the Phantasm panel, along the top, a series of commonly required color controls are available via buttons. These include Levels, Curves, Duotone and vector Halftone. The latter is beyond the focus of this article as it's not an image color change control.
Reverting to the original embedded Adobe Stock image, the Curves control button is opted for, which brings up the professional Curves control dialog:

As per Photoshop, it's possible to control the color of the image as a whole or use the top Channel drop-down to target individual RGB or CMYK channels, plus an Image Alpha (transparency) channel if present in the image.
The user interface should be familiar to all Photoshop and alternative photo editing software users, so this will not be described in detail here. For full details of operation, please refer to Astute Graphics' extensive documentation library.
One final note about the Phantasm Curves dialog, in common with many of the plugin's dialogs including Levels, HSL and Duotone, is the presence of the Load and Save buttons (highlighted in green, above). These allow precise color control settings defined in Phantasm and/or Photoshop's equivalent controls, to be directly exchanged.
As per Photoshop's non-destructive color editing methods, the live Effect approach in Illustrator with Phantasm provides additional benefits including re-ordering the sequence of adjustments. Take this example:

This embedded image has been treated with five color adjustments to ensure a unique result. However, if the Phantasm Curves entry is dragged into a higher position, the image is automatically updated to reflect this:
Hiding this amazing Illustrator hack from others
As with all effects, the changes are stored in the Illustrator file. That means, if you re-open the file later, you can continue to make adjustments to the color edits, remove them and more.
If an Illustrator user who doesn't have the Phantasm plugin installed opens the file, they will be warned that the Phantasm plugin is missing. There are two quick remedies:
They make use of the Astute Graphics 7 day free trial: astutegraphics.com/freetrial
Before you save the file, first select all artwork with Phantasm color effects applied and opt for Object > Expand Appearance.
Note that the second option will “fix” the color change, where the embedded image will be permanently changed (which can also be useful in other ways). But you may want to save these expanded appearance artwork files as a copy so that you can always revert back to an editable version.
For full details on considerations for plugin effects and best practices, please refer to our popular article What happens if the Astute Graphics plugins are not present?
How to work with linked images
So far, we have been applying color changes to embedded images. But what about externally stored linked images? Fear not — there's a simple way to ensure Phantasm color changes can be applied to these, whilst the images remain linked.
When you select a linked image and then apply a color change via the panel, you will be warned:
Phantasm can only modify linked images or objects with Freeform Gradients when 'Auto Rasterize' (in the Advanced Options section of the Live Effect parameters dialog) is enabled.
Simply opt for Enable Auto Rasterize and the effect will automatically gain the advanced Phantasm control Auto Rasterize.
Full details of this option can be found in this documentation page.
Create your very own Instagram-style “filter”
In Instagram, and many other apps, you will often find instant image-changing “filters”, such as sepia effect or vintage camera styles. With Phantasm, it's possible to recreate this approach direct in Illustrator.
Once you have created your stack of Phantasm effects (one or more) which adjusts the image to your liking, store this effect stack as a Graphic Style. Then, with a single click, this “filter” style can be applied to any other selected artwork, group or targeted layer.
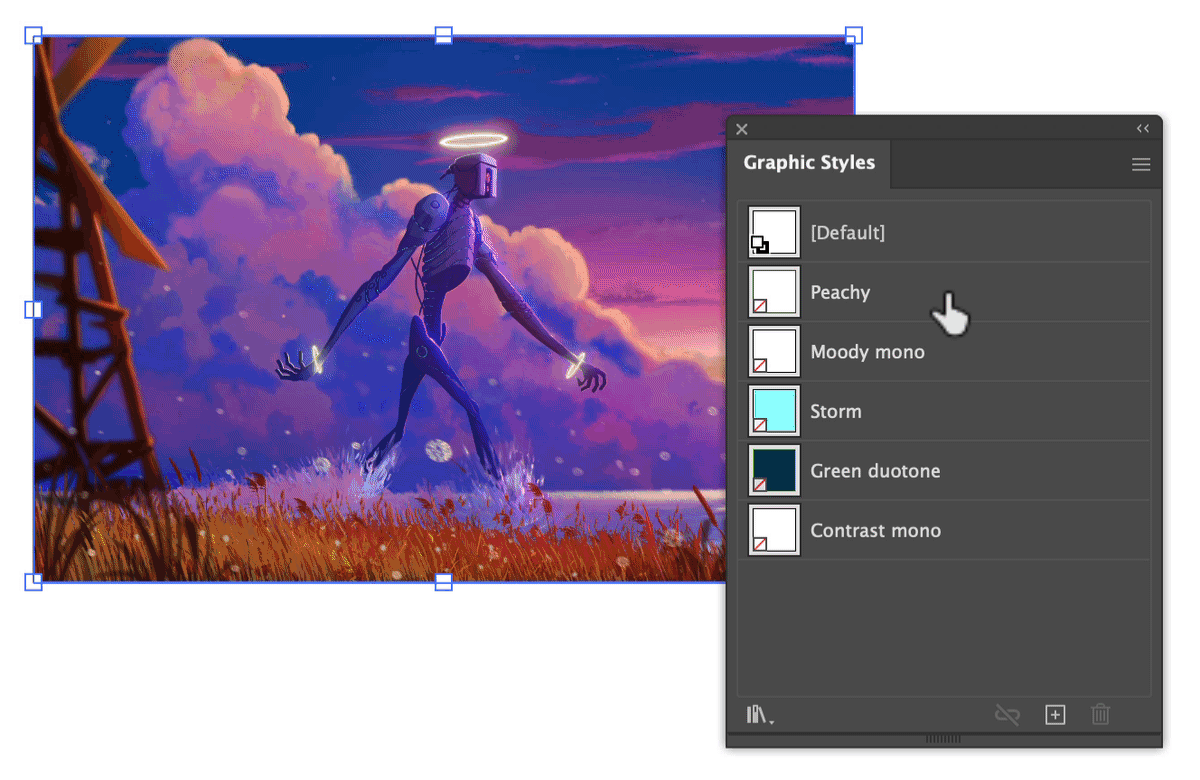
For full details on how to use Graphic Styles in Adobe Illustrator, please refer to Adobe's Graphic Styles documentation.
There's so much more to discover
Phantasm is an immensely powerful set of controls for all Adobe Illustrator users. We've barely scratched the surface. Here are some additional features to explore:
All these Phantasm color changes can be applied to vector artwork, such as a logo, editable text, in addition to images.
The very popular Phantasm vector Halftones.
Applying color changes as Filters (permanently applying the color change, and not as an editable Effect). Click here to read more about Filters vs Effects.
Happy experimenting!
If you don't already have the plugins, it takes less than 5 minutes to create a 7 day free trial account. No credit card details are required, only your email address. Visit https://astutegraphics.com/freetrial to sign up and install these Adobe Illustrator Plugins on a 7 day free trial.