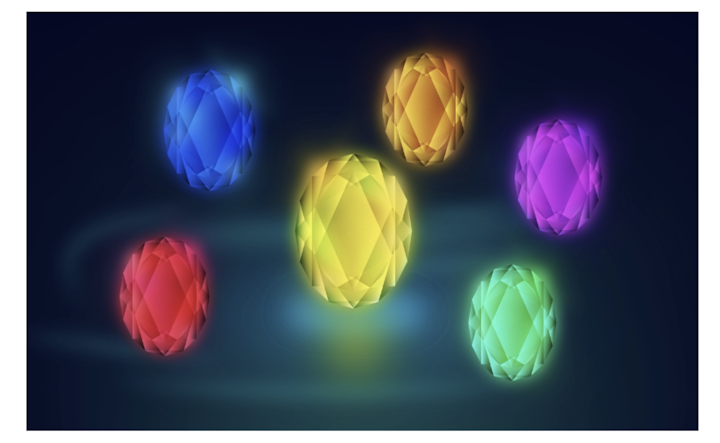
It’s easy to get the Infinity Stones when you have MirrorMe
8 minute readThe Avengers End Game has completed a long series of movies. What better way to celebrate than to create some of your own vector infinity stones. In this tutorial, I'll show you how you can quickly create an infinity gemstone that has your own unique spin on it, and an additional infinite number of other types of stones too, by using the Astute Graphics MirrorMe Plugin.
Creating the base contours
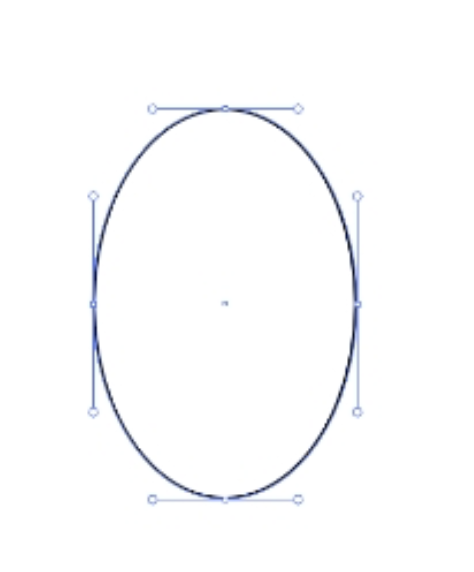
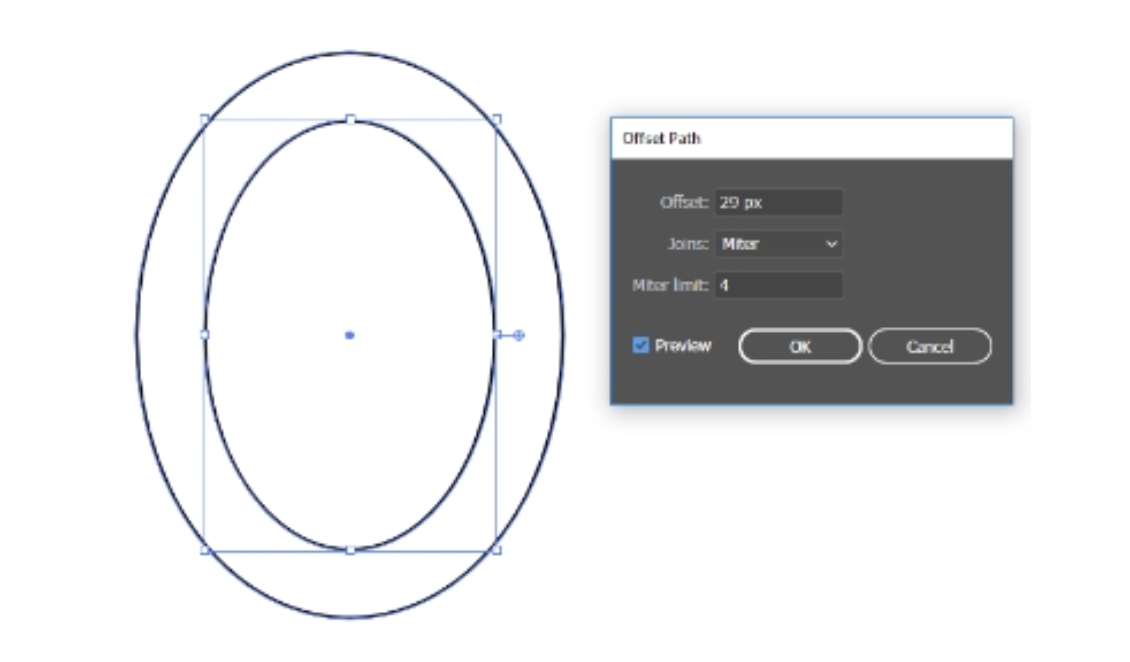
Once you have Illustrator open, create a simple oval with the ellipse tool.
With your oval created, use offset path (Object > Path > Offset Path), to make a larger or smaller oval along with the first oval as in the example below. This will be the base of our stone.
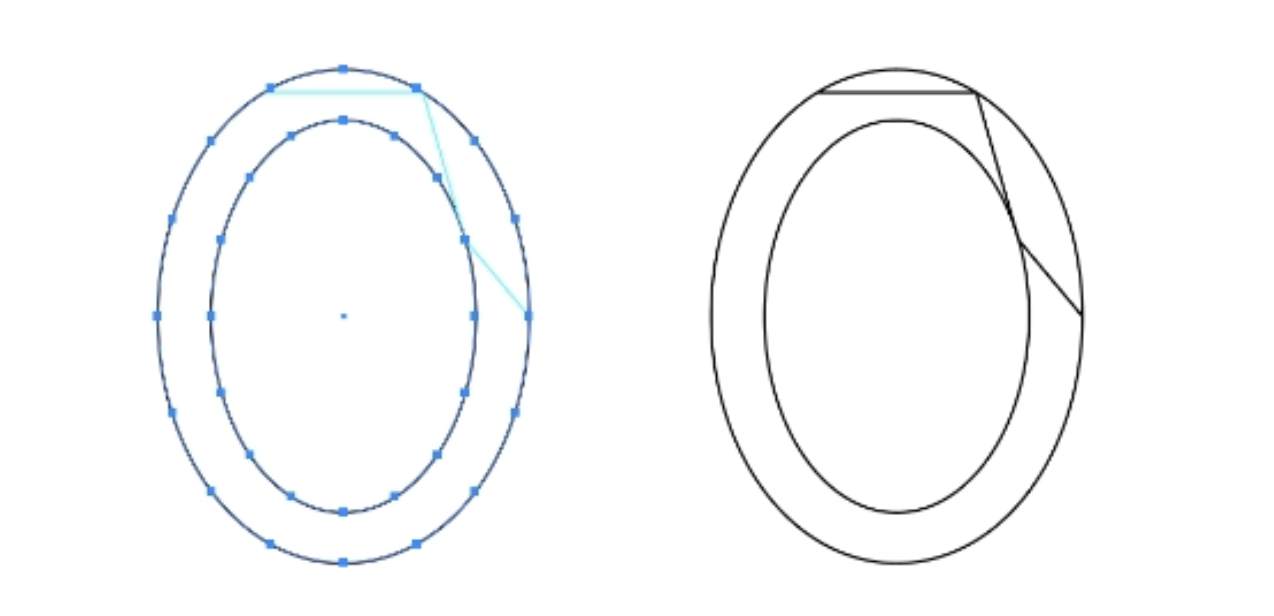
This suggestion is optional, but you may find it adds some convenience when creating the cut gemstone lines. Select each oval, and go to (Object > Path > Add Anchor Points). Repeat this step twice. It should add evenly spaced anchor points all along your ovals.

Cutting your Infinity Stone
For the next few steps, we'll be primarily focusing on just one quadrant of the oval shapes, because we will be able to mirror everything to be symmetrical later. Create a path across the top of the outer oval and create a zig-zag pattern to the right side of the oval. You can use the anchor points you created as reference to try to evenly space your angles if you want, or you can just eyeball it. The anchor points can be helpful though because it gives you something to snap each line segment to.
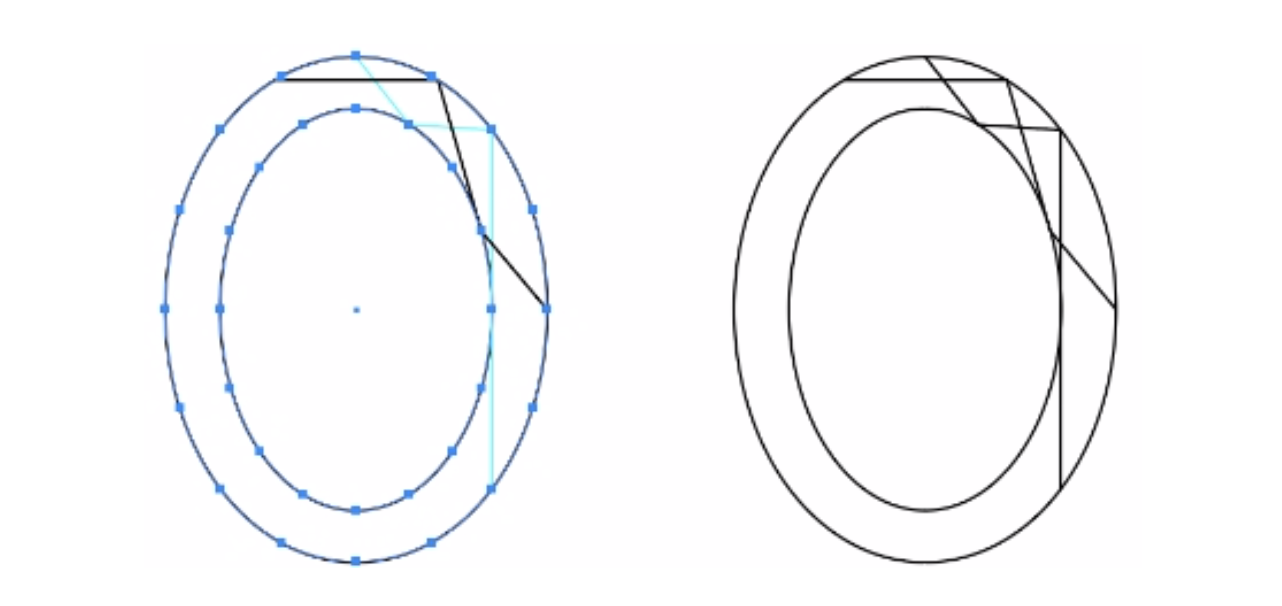
Repeat the step, but this time, start with the top anchor point, and make sure to cross all the previous lines with as few tangents as possible like in the example below.
Add one last line crossing the lower part of the section and ensure that the entire top quadrant of the gemstone is filled in with cut lines.
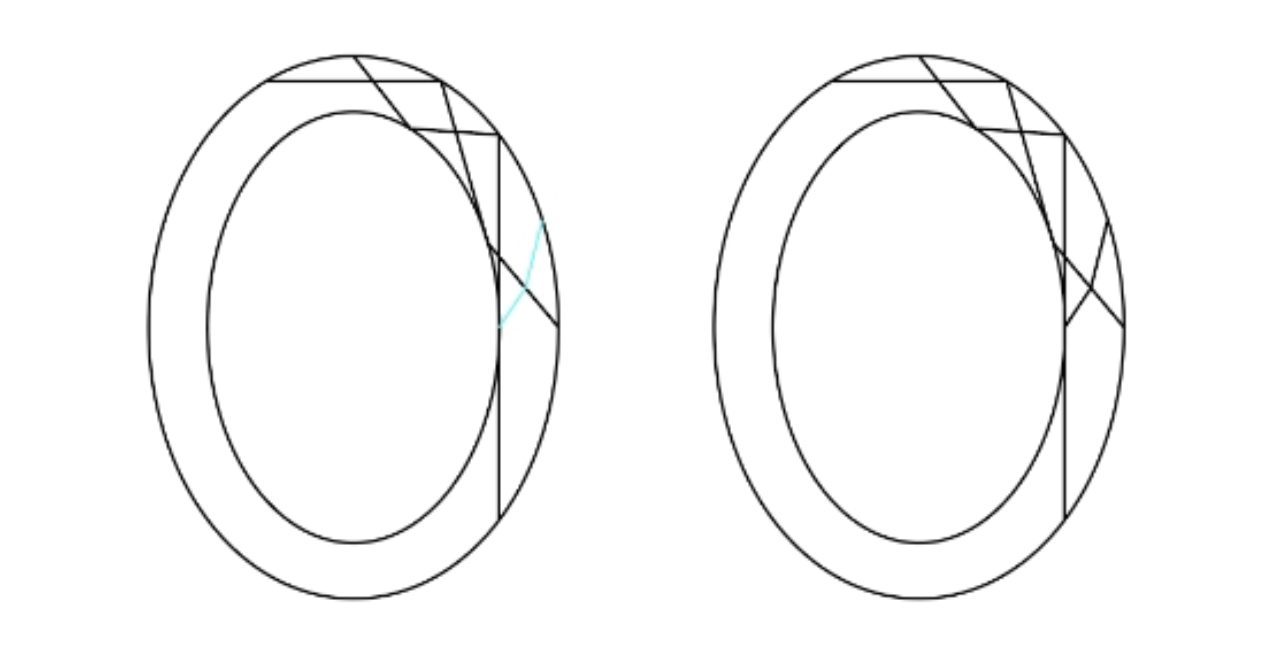
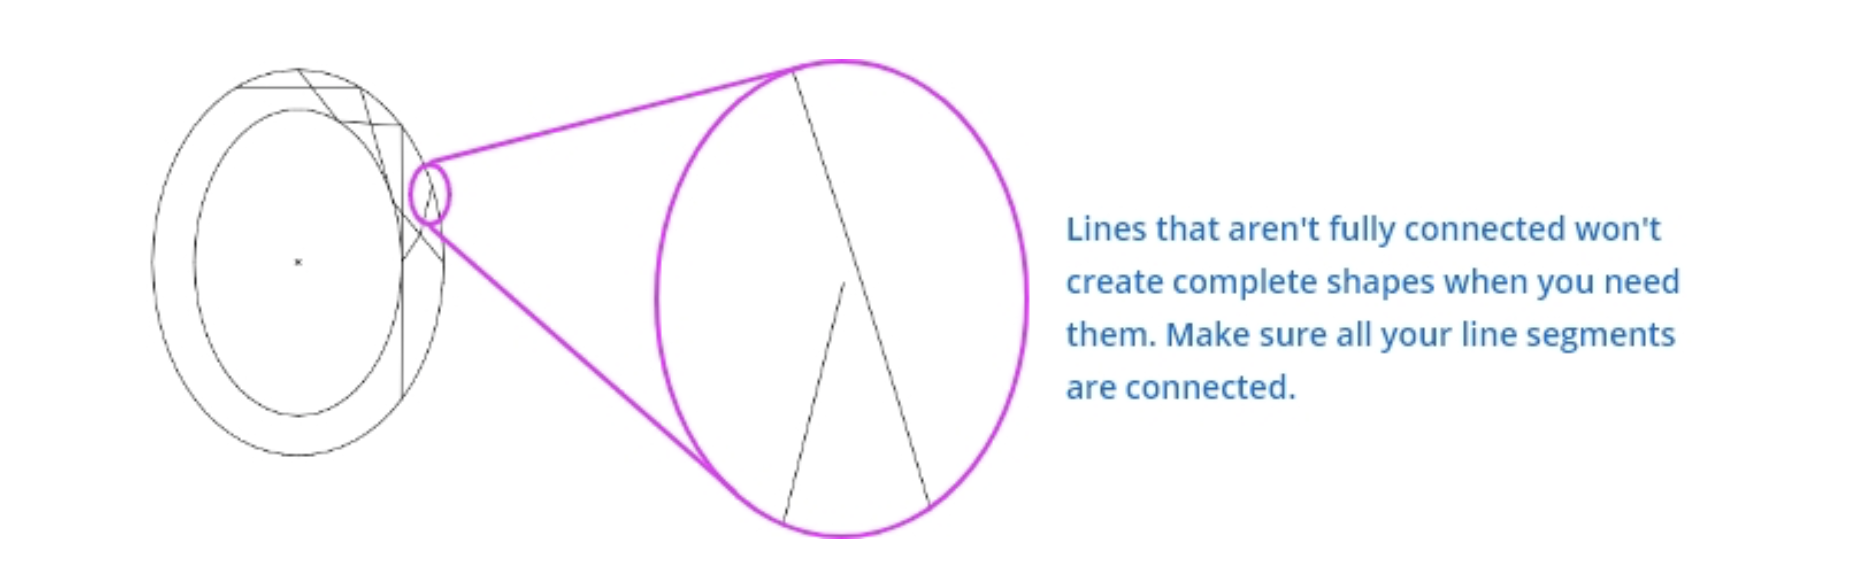
There isn't an exact science to it but the best rule of thumb is to make sure there aren't any awkwardly small shapes left from the crossing lines. Simply go through and make sure none of the lines you created, cross any of the oval shapes with small gaps or you may have more potential for problems later on.
Mirroring the cuts
Select only the lines contained within the two circles, and select your MirrorMe tool. You can use the Right and Left Brackets ( [ & ] ) to increase or decrease the number of mirror axes. For this example, I only have a vertical and a horizontal axis. Line the center of the axes up with the center of the ovals. When you click, you will get the 'Apply' confirmation panel. Make sure to select the "Apply to Selection" option, which will only mirror the lines you have selected.
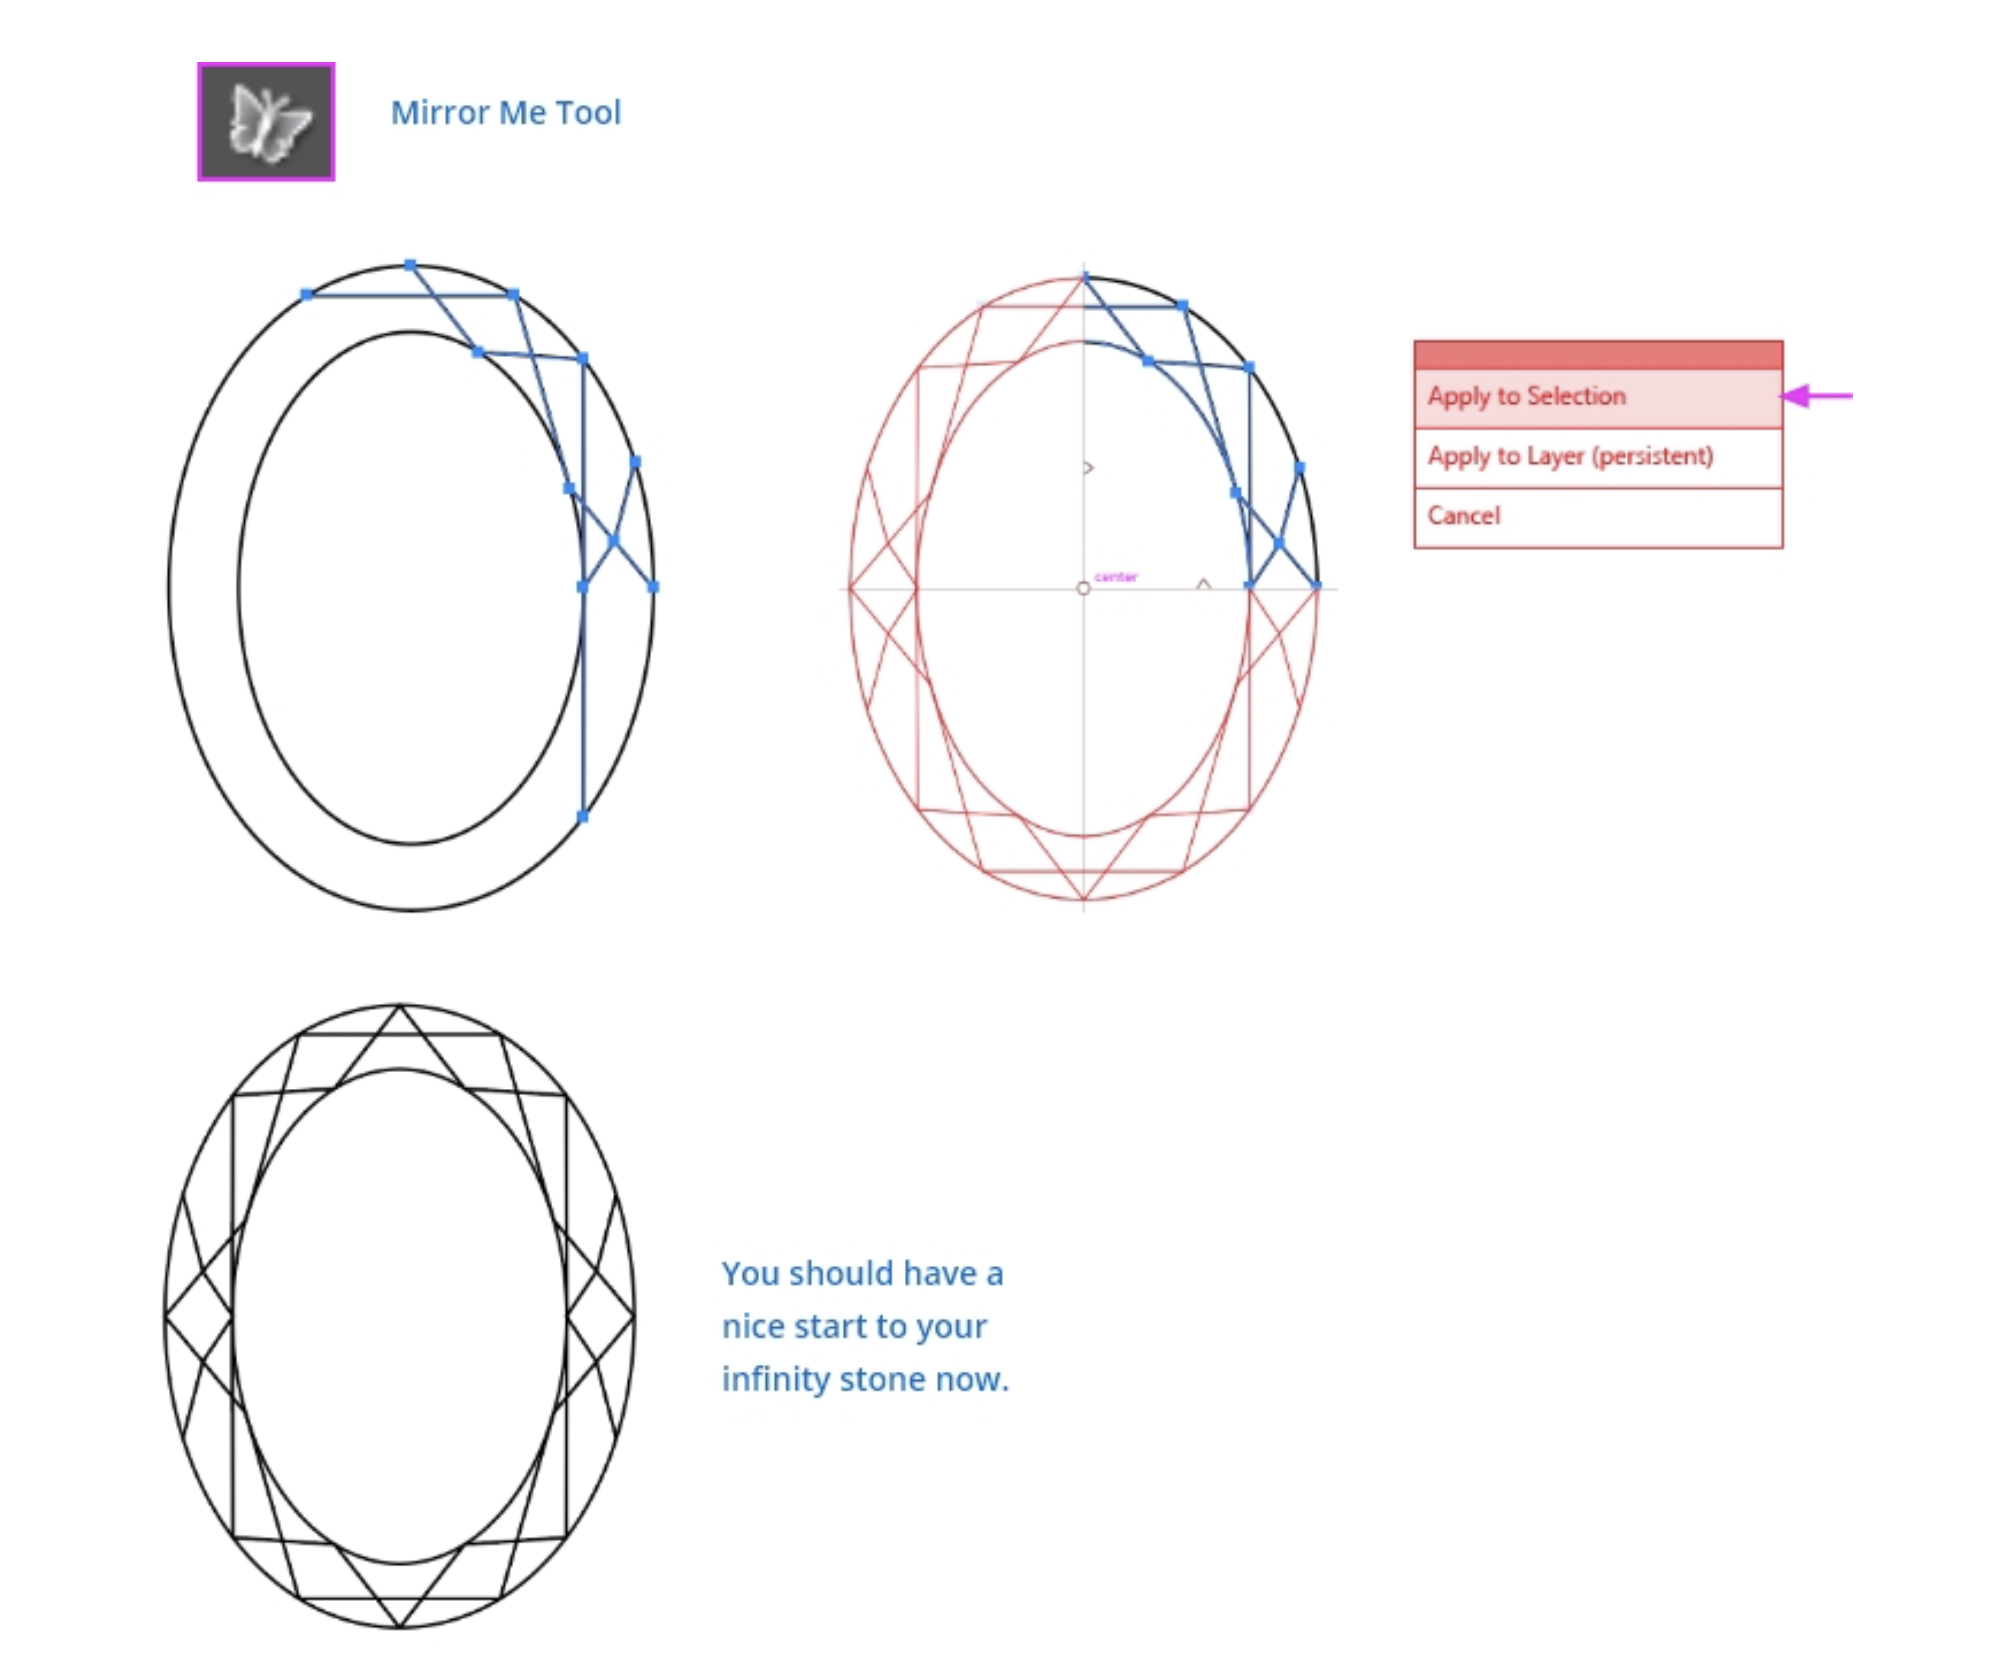
Create the inner cuts
For the next step, create a simple path connecting throughout the innermost oval. You can use the image below as an example for how to create it (also use your reference anchor points for snapping).
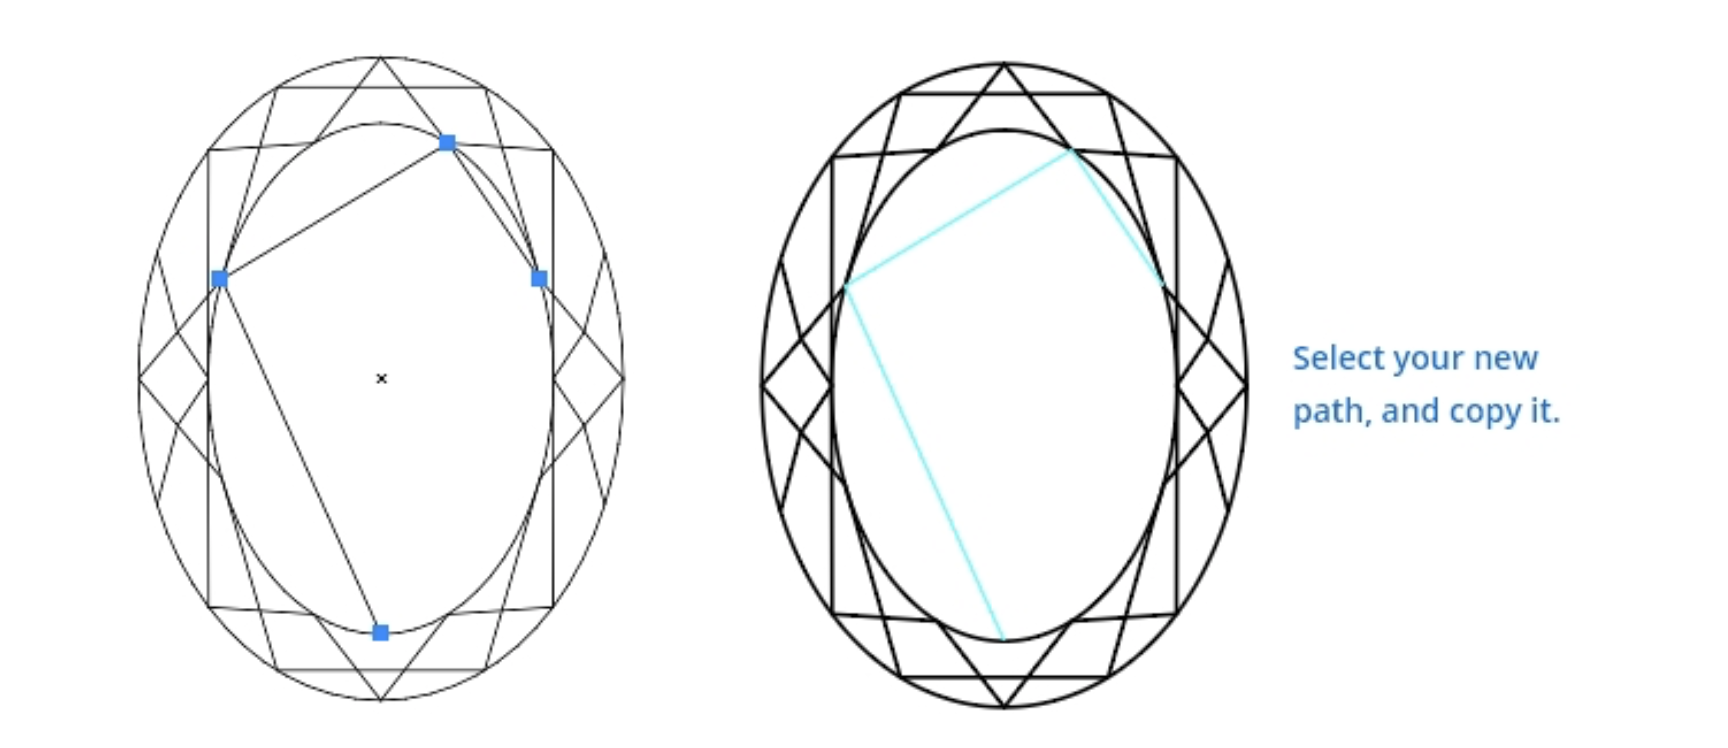
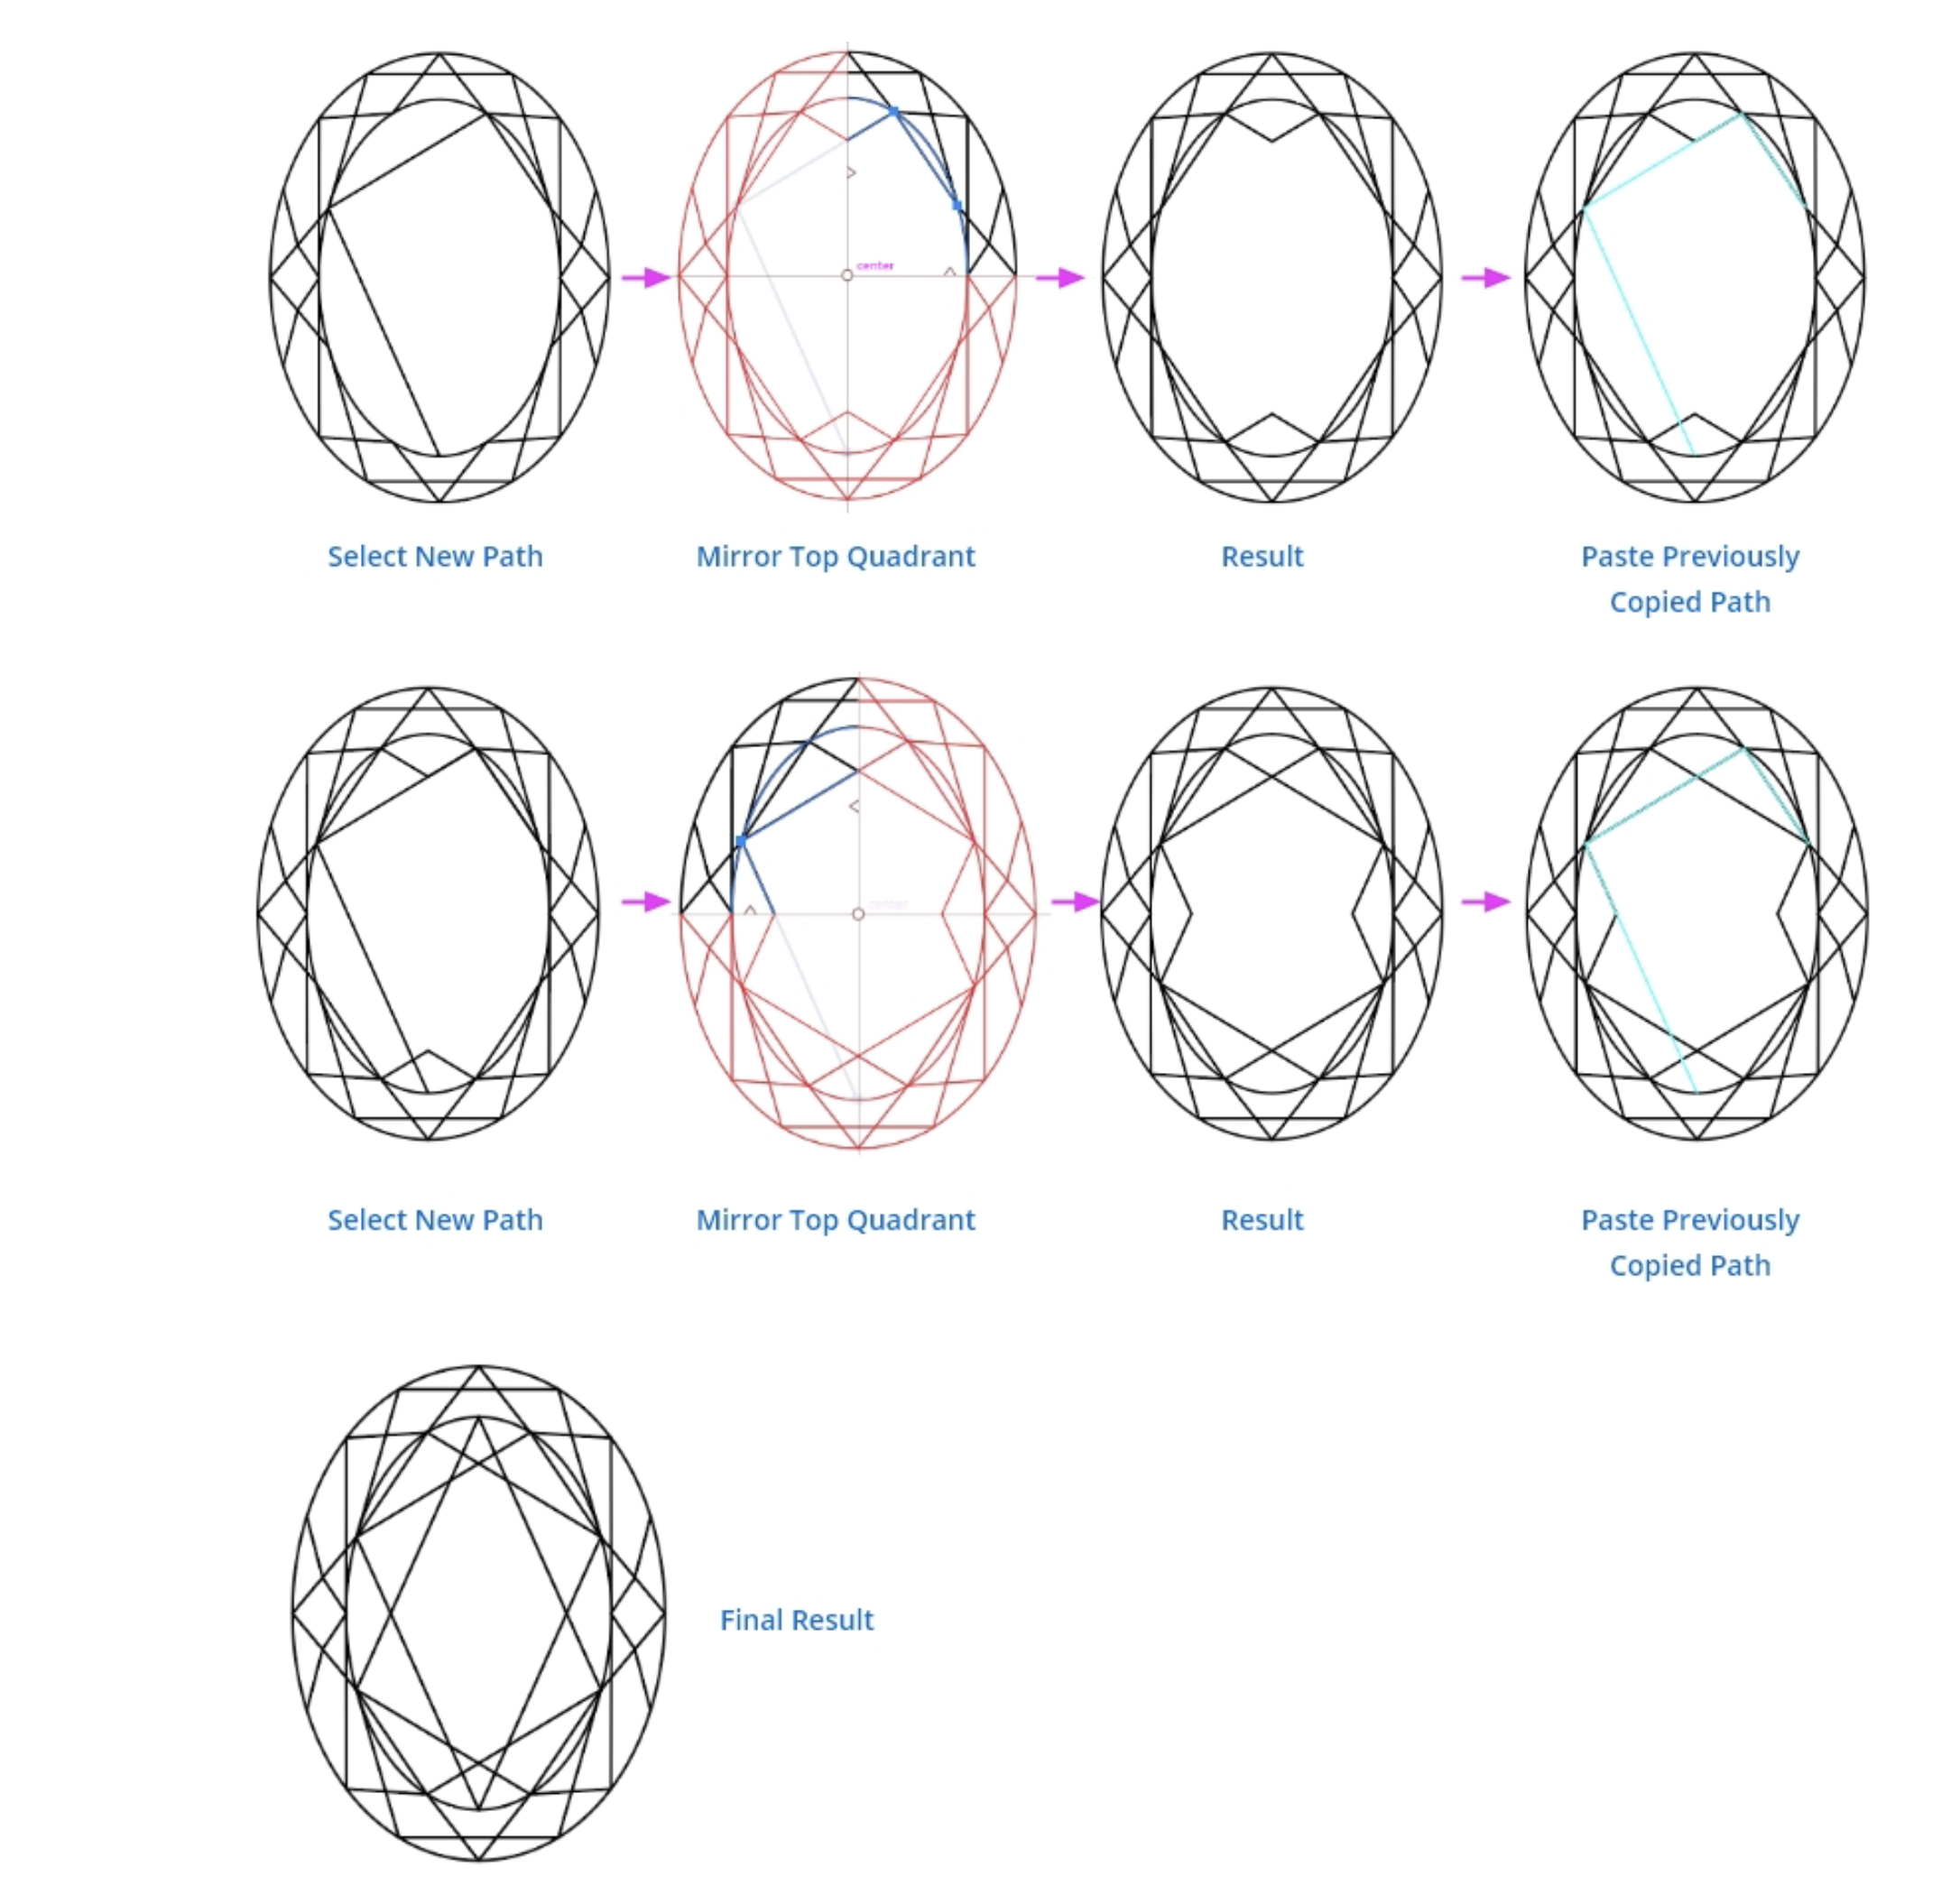
Copy the new path to your clipboard so you can use it repeatedly. Select the MirrorMe tool again and mirror the top right quadrant to the other 4 corners. Use (Shift + Ctrl + V PC) or (Shift Cmd + V MAC) to past the previous path you created in the same place or go to (Object > Paste In Place). Repeat the MirrorMe action, but this time, mirror the top left quadrant. To select a different quadrant, simply click and drag, with the MirrorMe tool active, to rotate your MirrorMe widget. Make sure ONLY the path you just pasted is selected though, or you will have duplicate mirrors.
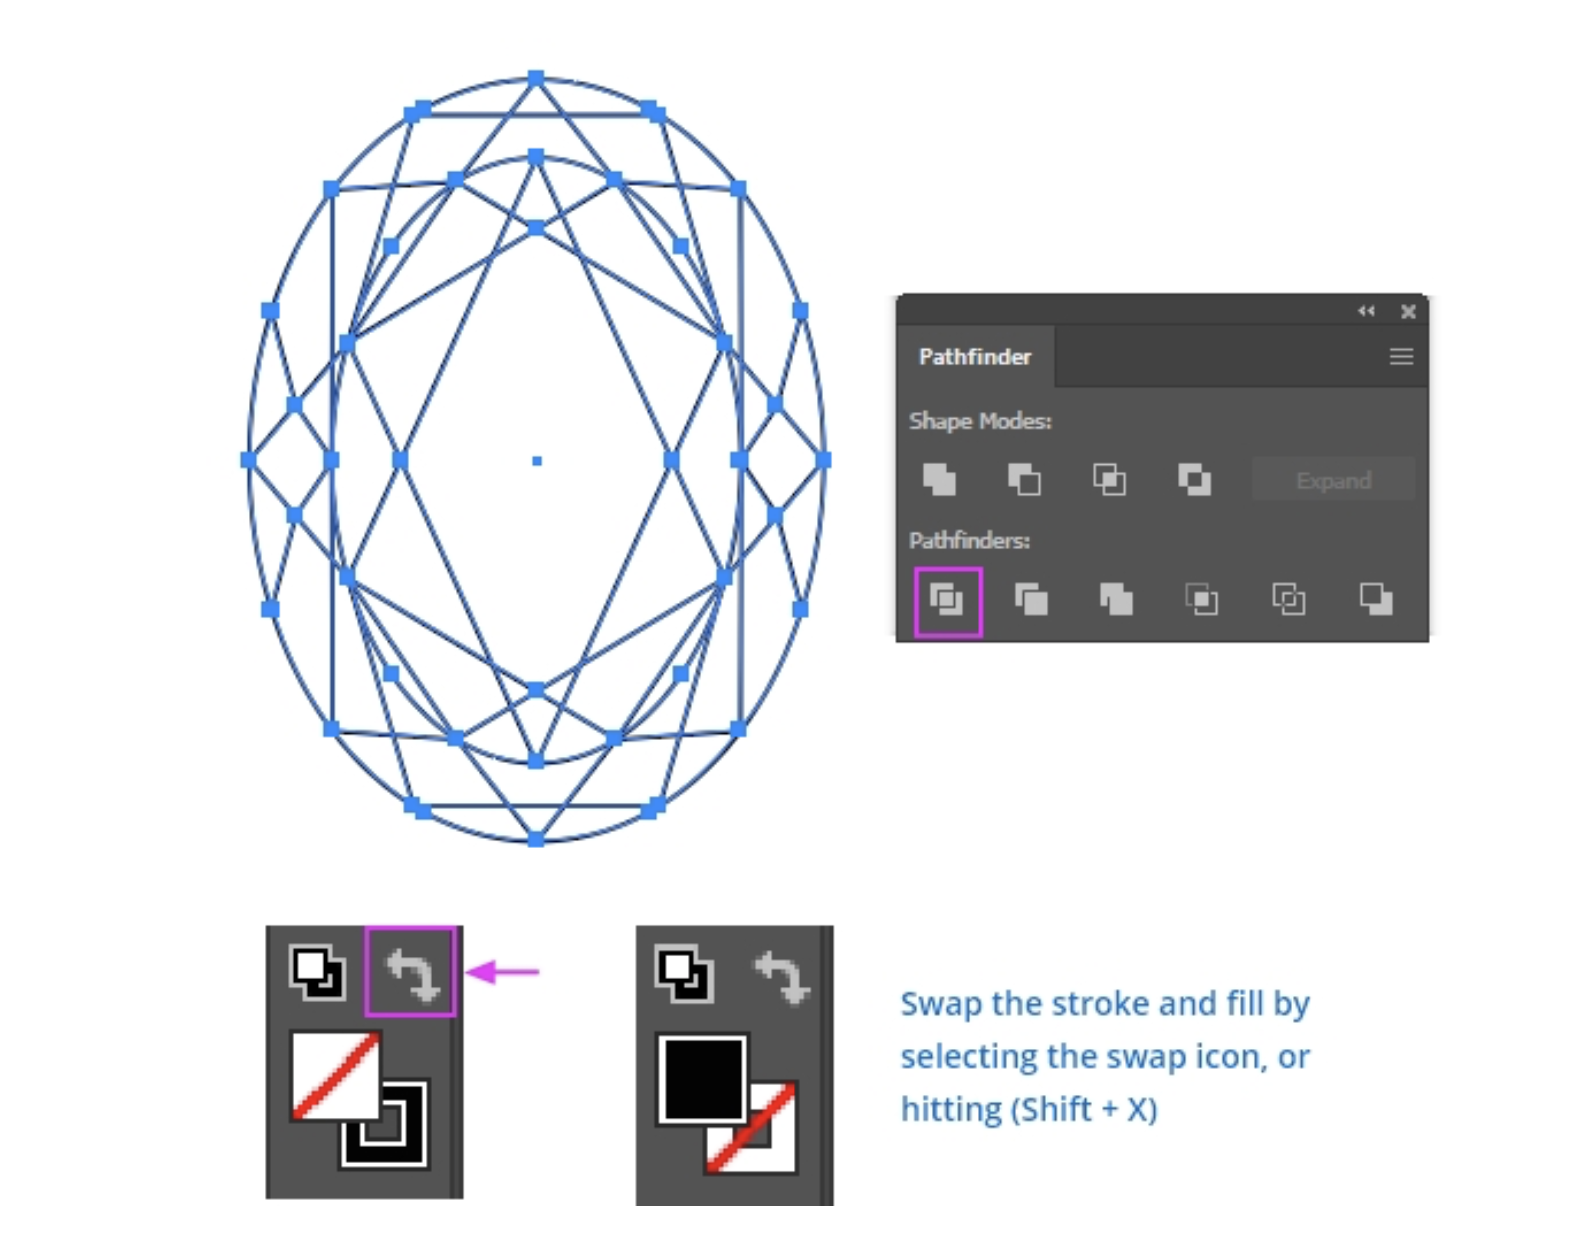
Convert the lines into shapes
Now select the entire object, and open the Pathfinder window. Select 'Divide' and all your lines should be divided into individual shapes. You can swap the Stroke and Fill to apply a fill to all the shapes and remove the stroke.
You can now either apply one single color to all the shapes, or apply different shades of a color to each shape individually.
One trick I that helps me a lot is using Adobe Illustrator scripts. This one is called 'Vary Hues'. To download it, select the 'Download all scripts in a zip file' option on the website. Your document must be in RGB mode for it to work. Select your shapes and give them a base color. Go to (File > Scripts > Other) and select the 'vary_hues.js' file. A prompt will open for you to type the amount of variation you want from your base color. Hit enter and watch your colors change.
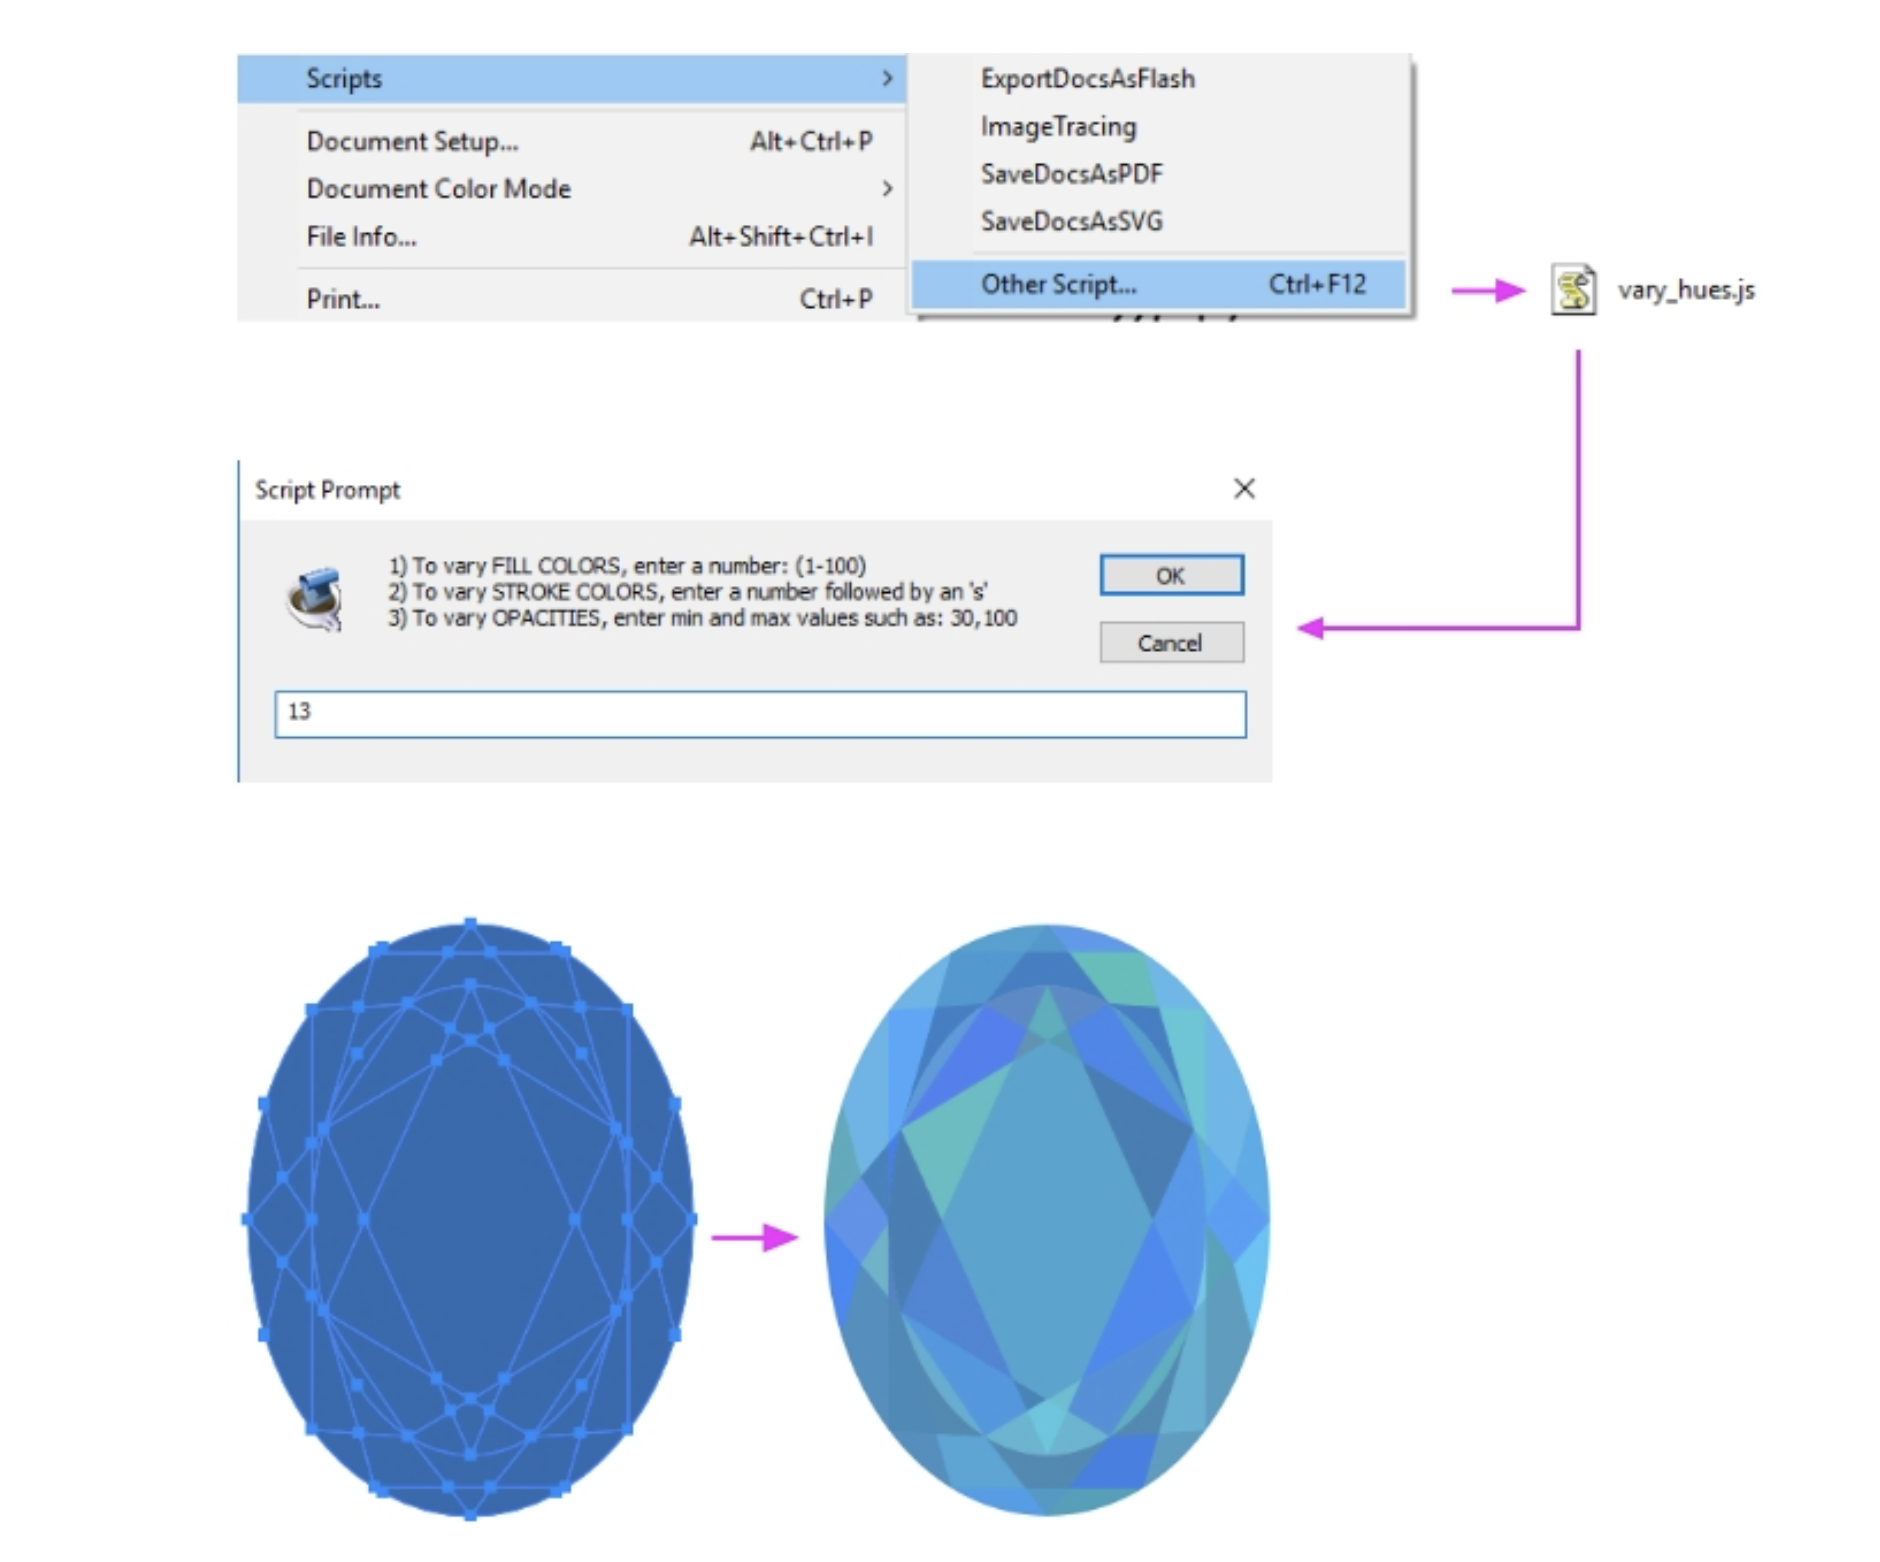
(Link: http://www.wundes.com/JS4AI/)
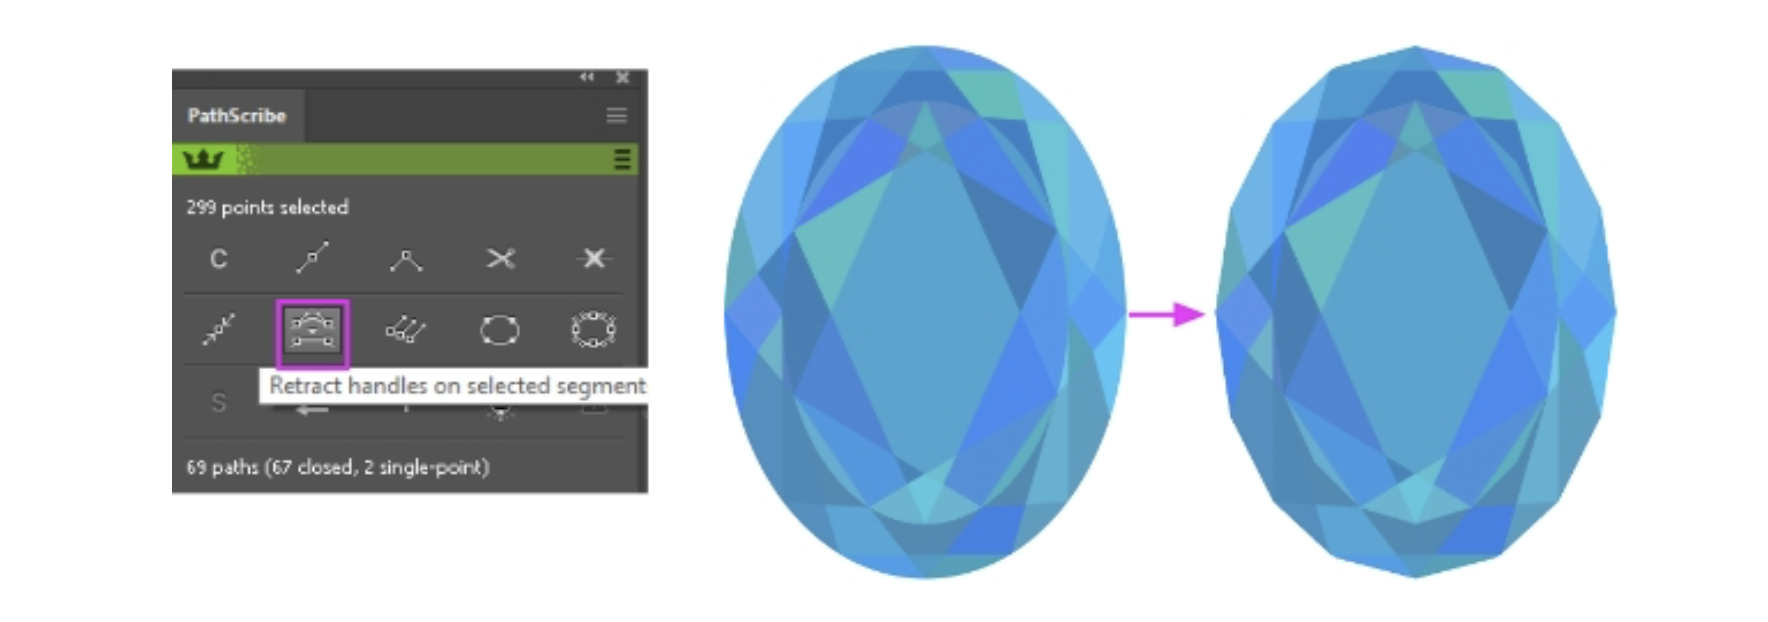
The infinity stone currently has all rounded edges. If you have the Path Scribe plugin, you can use the Retract Handles button on the path scribe panel, and it will straighten all those rounded edges, giving you more of a gemstone look.
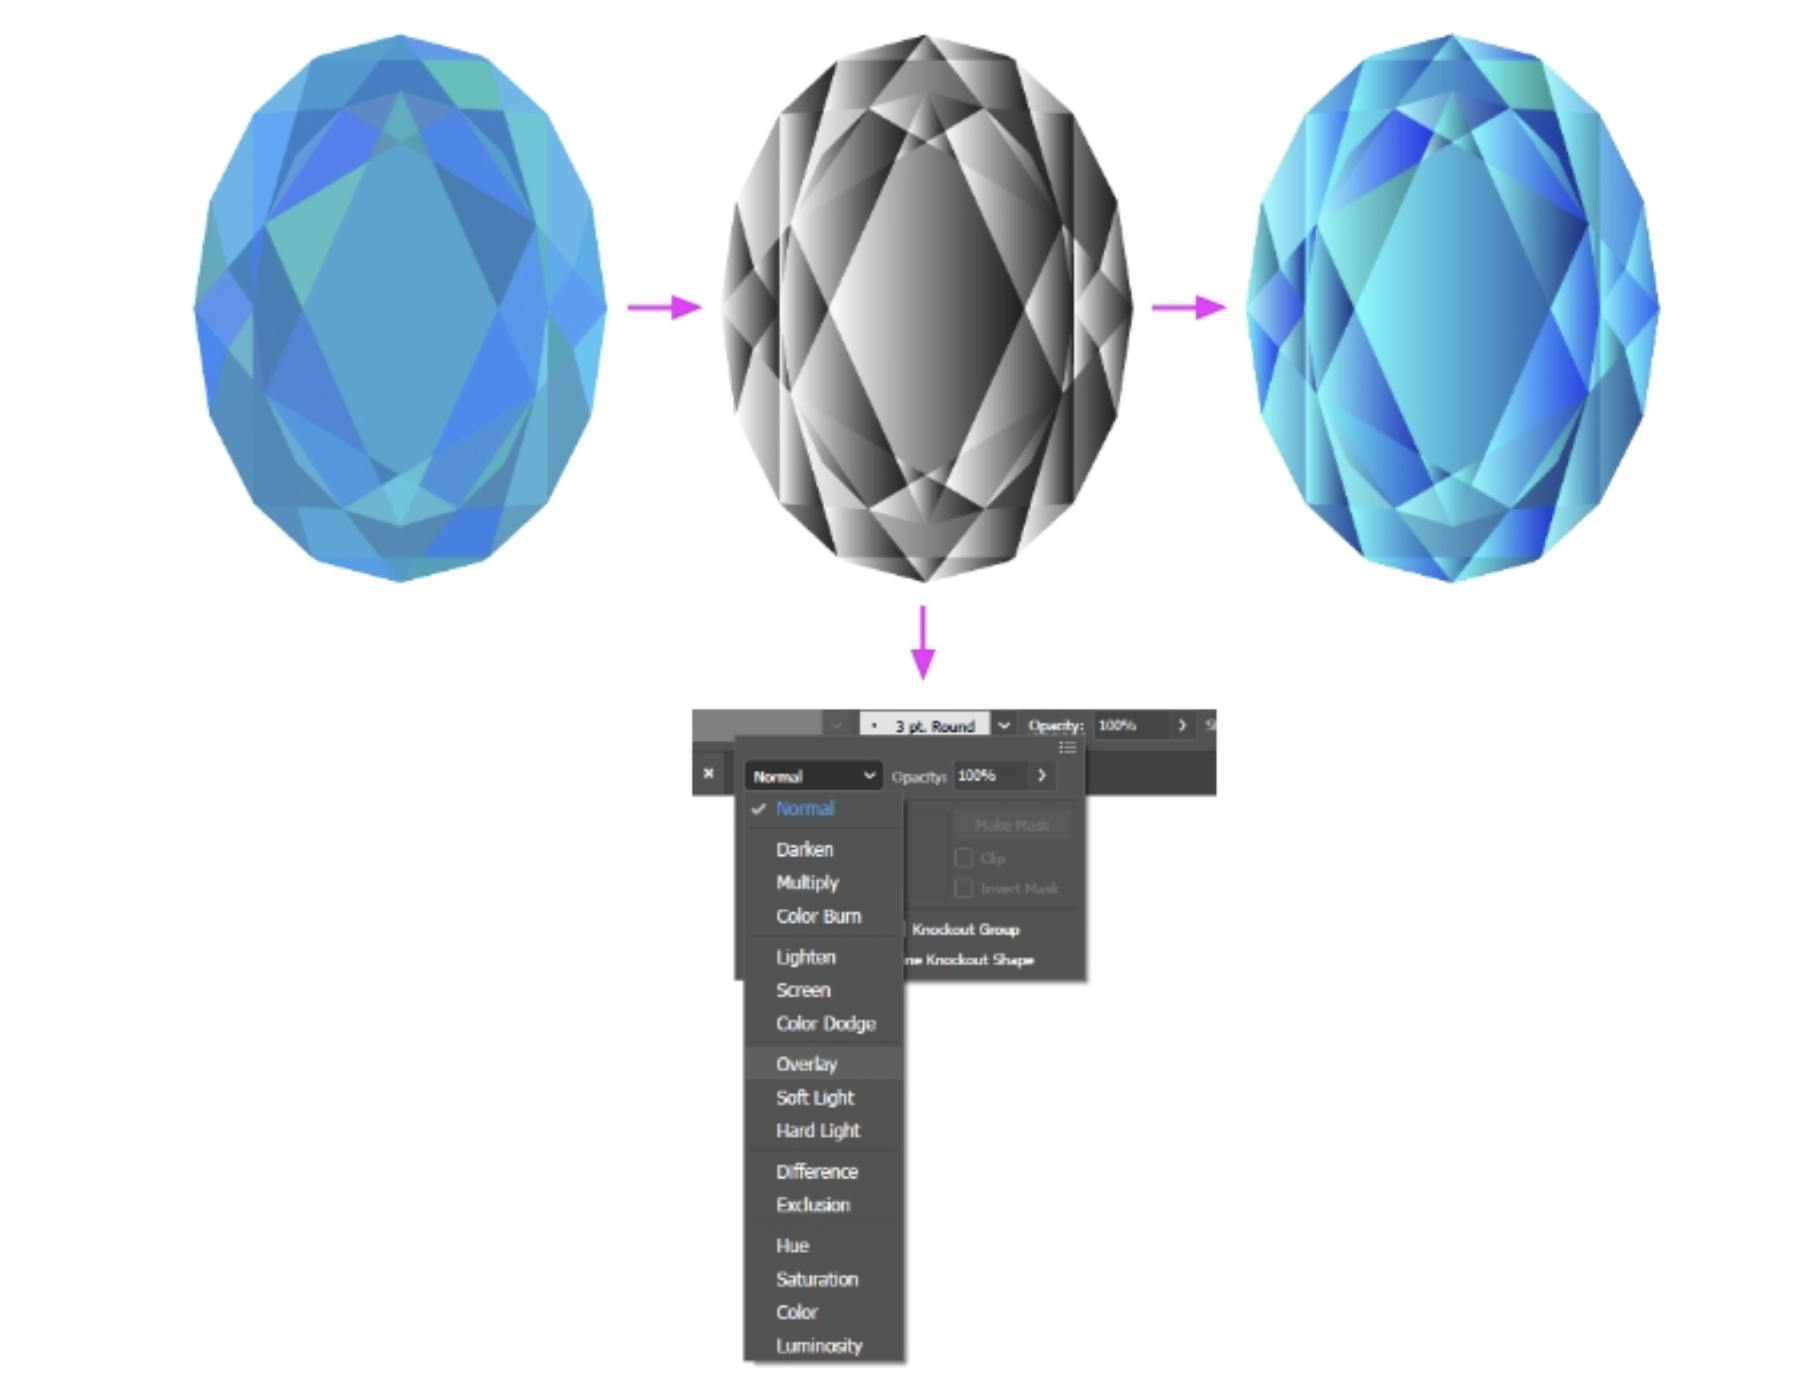
You can also optionally create a copy of your stone and click the default white and black gradient, which will apply an individual gradient to each of the shapes. Set the group to the 'Overlay' blend mode, and place it on top of the colored infinity stone. It should now have some nice gradient variations in it.
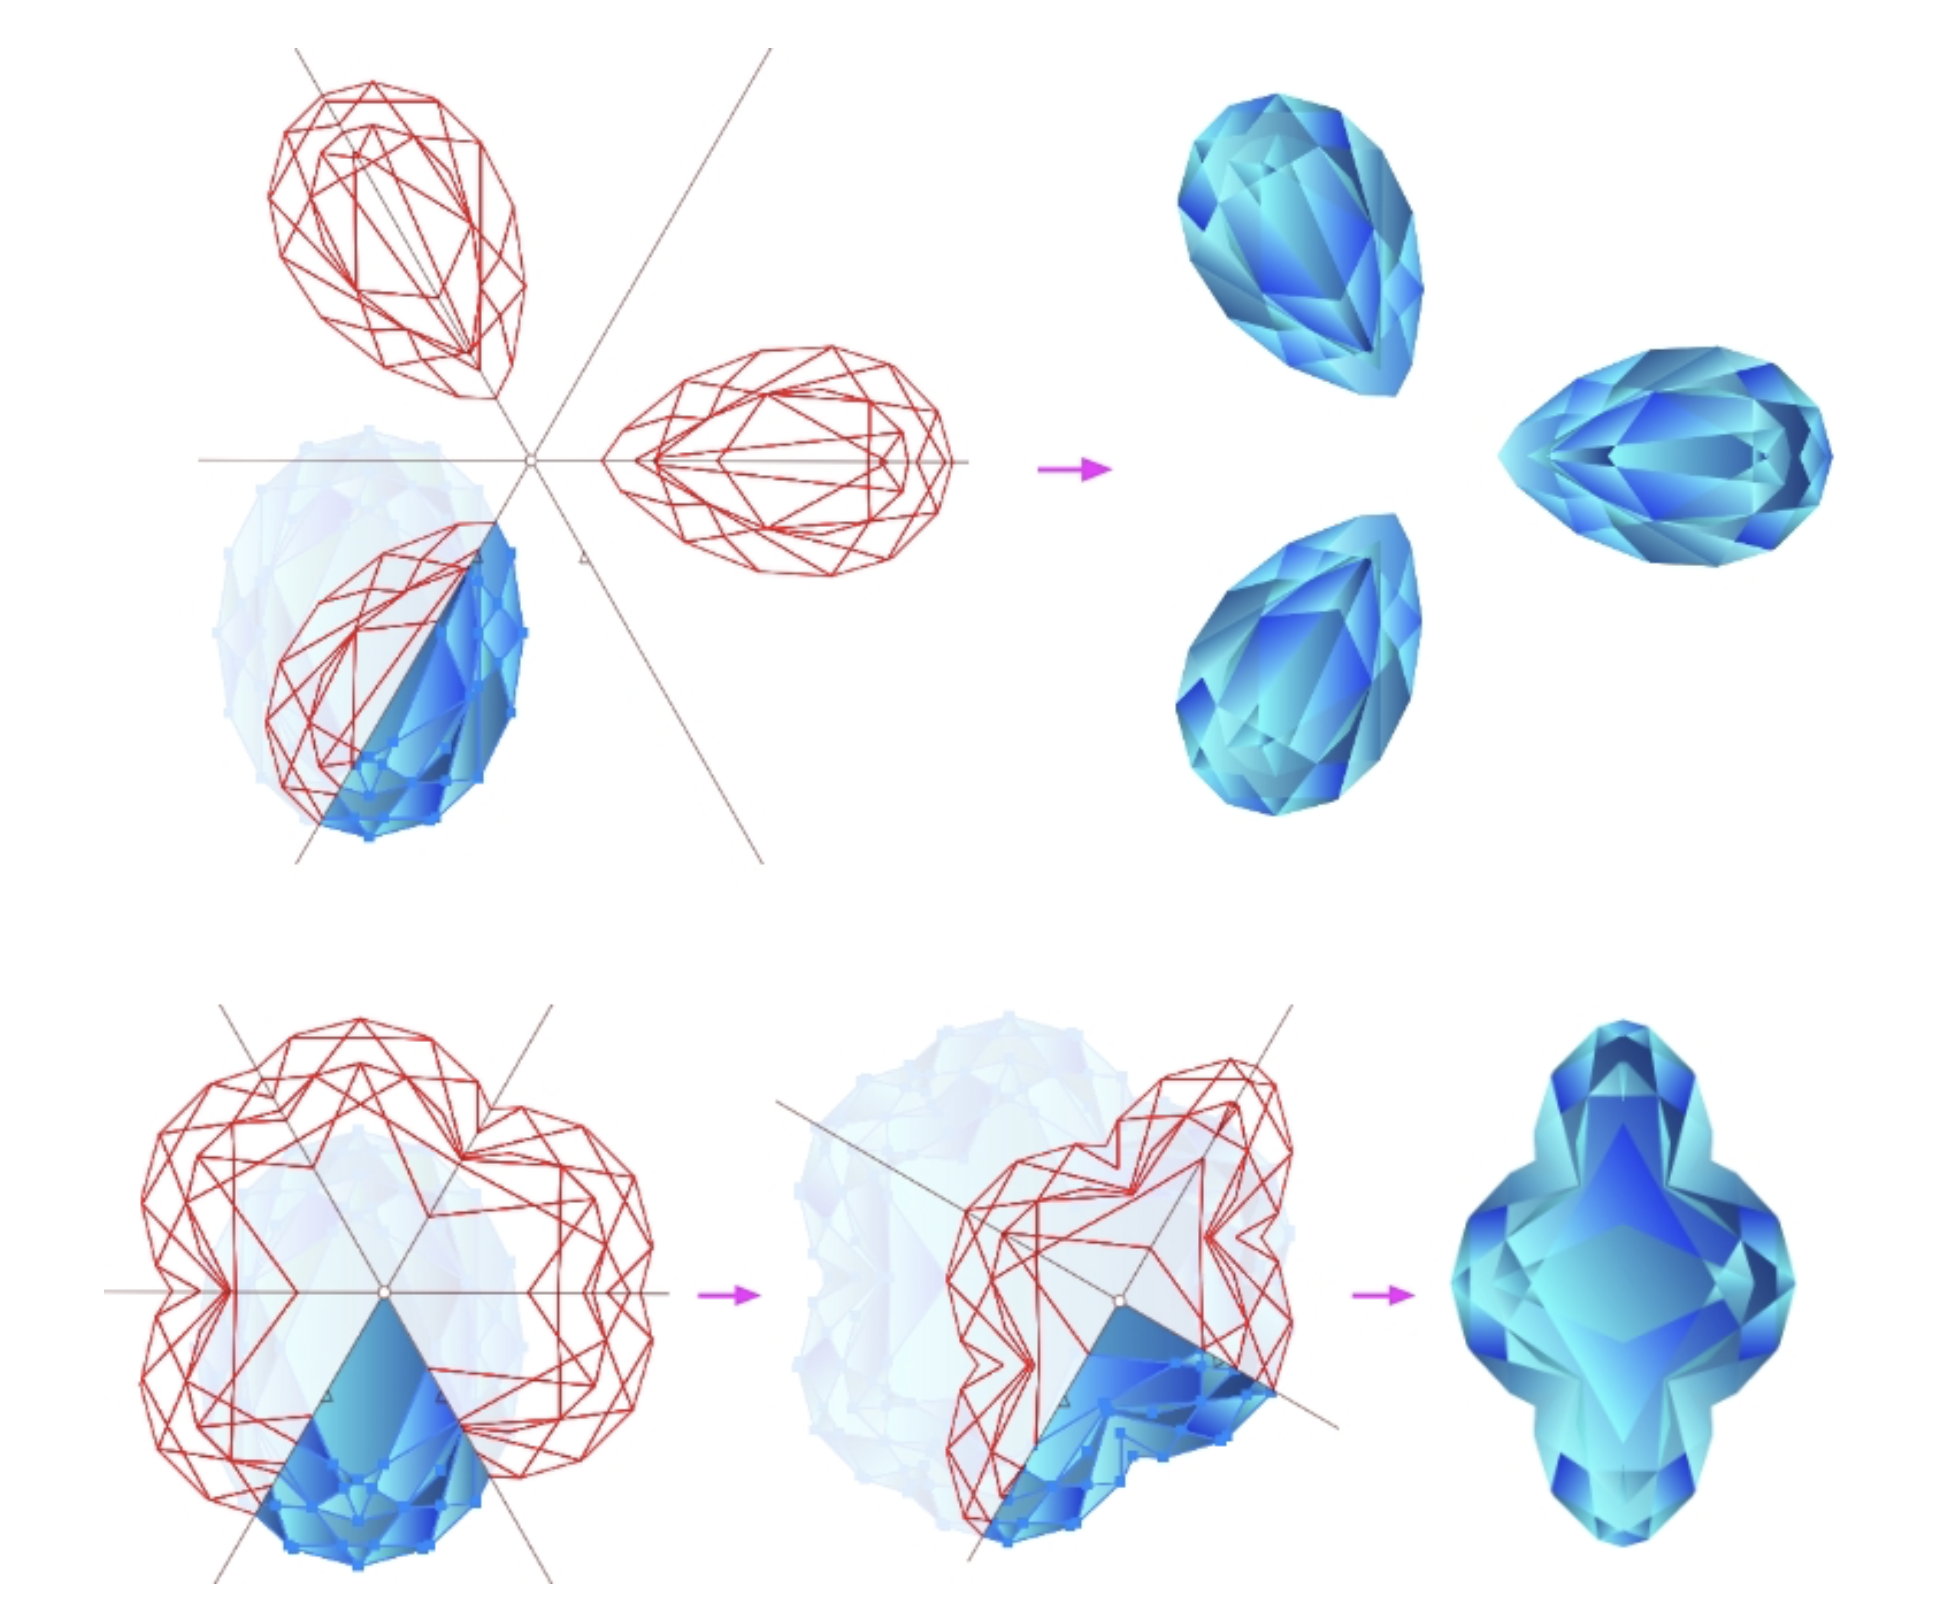
Use MirrorMe to create some cool new results
With your perfectly colored infinity stone, you are all set. But before you leave, MirrorMe has some other pretty cool tricks when it comes to creating cool infinity stones, or unique gemstones in general. With your entire infinity stone group selected, activate the MirrorMe tool, and increase the number of mirror axes. Drag a line however you like, or you can use the examples below as reference. Do this as many times as you want and play around with angles, and number of axes. You can get some pretty cool results and create a truly infinite number of infinity stones.