
Create wavy flame lines in Adobe Illustrator
11 minute readIn this tutorial we are going to look at some of the easiest ways to create wavy flame lines in Adobe Illustrator. To use Illustrator’s native options we are going to create a pattern brush. This technique repeats a piece of art along your path depending on the controls you set. But there’s also an even quicker way - the Reprofile tool and panel from Astute Graphics which can intelligently repeat paths with full scalability controls, heights, and different corner types.
How to create a flame pattern brush in Adobe Illustrator
Starting off with this piece of art which is a vector path, I have drawn in the shape of some flames, we need to add it to the Illustrator brushes panel so that we can continuously repeat this along any path.
Illustrator brushes can be made of raster or vector art, but once we apply it to our art it becomes very difficult to manipulate. Ensure that your artwork is the size you want it to repeat along the path. If you need to edit your brush later, double-click the brush in the Brushes panel to return to the Pattern Brush Options dialog. From there, you can adjust the artwork, spacing, and other properties (more details later).
Step by step guide to make a flame pattern brush:
1. Create the Artwork for the Brush: Start by designing your flames by using the Pencil tool or a combination of the Pen tool and Anchor Point tool, adding extra licks of flame if you wish.
2. Select the Artwork: Once you're happy with your artwork, select all the elements you want to use in your pattern brush.
3. Open the Brushes Panel: Go to Window > Brushes to open the Brushes panel.
4. Create a New Brush: In the Brushes panel, click the New Brush button (the Plus icon at the bottom right of the panel).
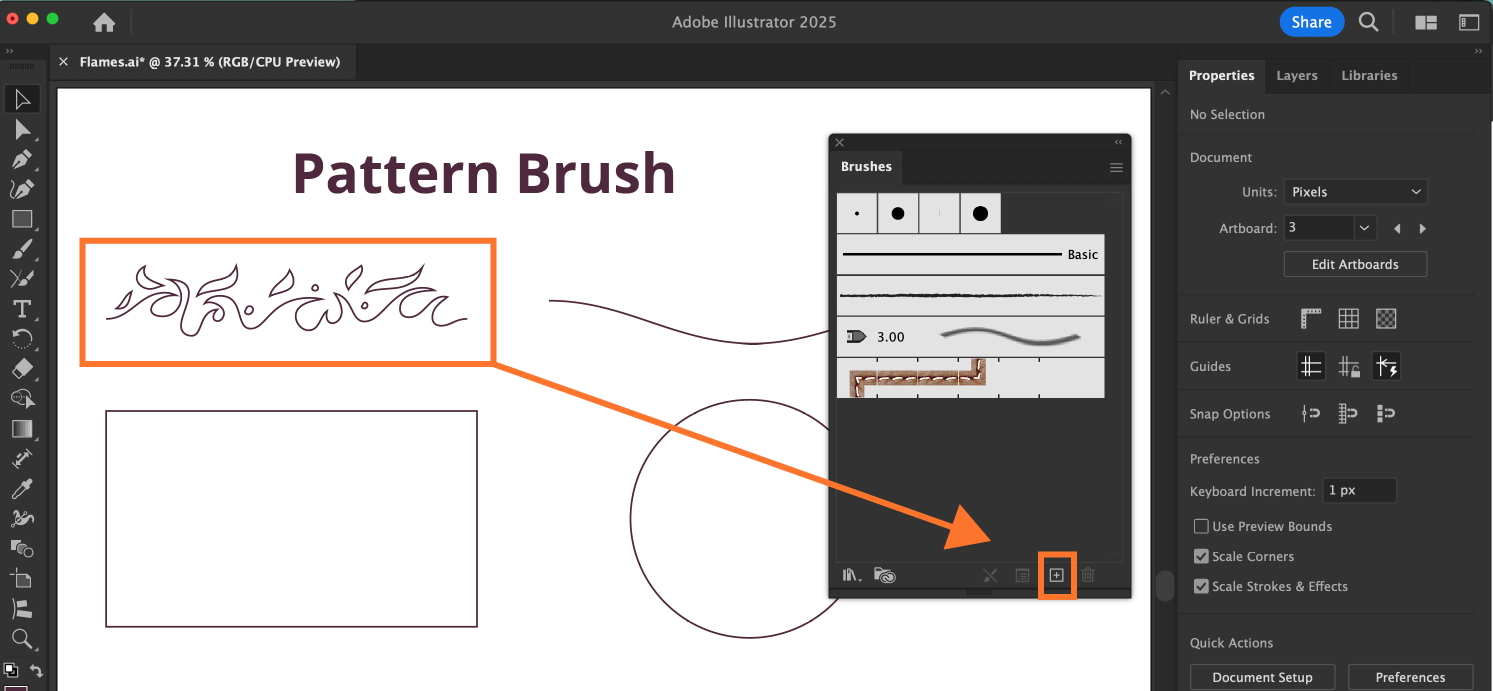
5. Choose 'Pattern Brush': From the New Brush dialog, select Pattern Brush and click OK. This will open the Pattern Brush Options dialog.
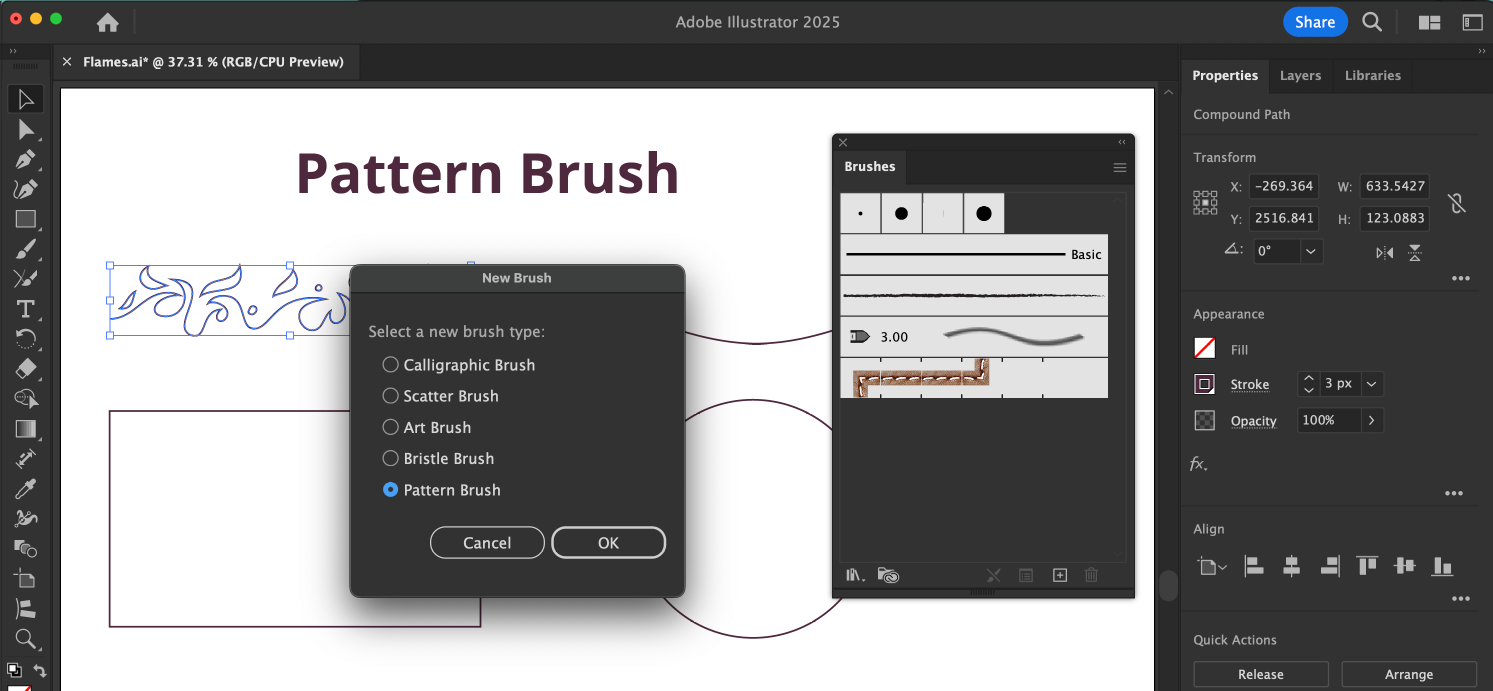
The Pattern Brush settings will not show you a preview at this point so we recommend naming your brush, and then saving it by clicking OK. Now you can select a new object and apply your newly created brush from the Brushes panel.
Adjusting your brush pattern
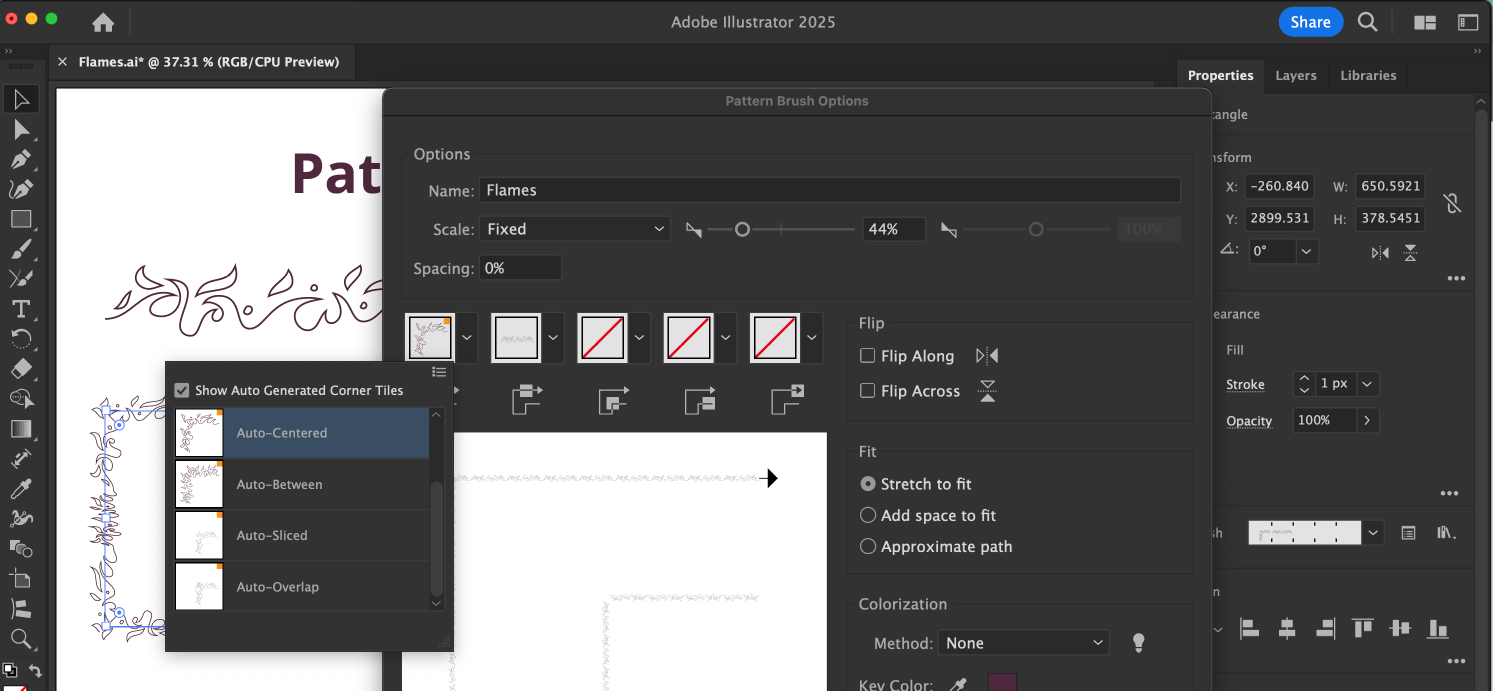
Select your object with the newly applied pattern brush and then double-click the brush in the Brushes panel to reopen the pattern Brush Options Dialog.
Make sure the Preview box is checked so that you can see how your brush looks in real-time. You can adjust the settings, spacing, and orientation until you're satisfied with how the brush looks.
Name: Change the name of your brush.
Scale: Adjust the scale of your path if the original you made is too large or small.
Space: Add spacing between each repeat, in this case it’s not needed.
Corner Tiles: You can create and add your own corner paths determining how the brush will react as it goes around different corners, or Illustrator will auto-generate it for you (not always successfully).
Flip: Choose to flip the orientation of your original path.
Fit: Stretch to Fit will allow the brush elements to stretch to fit the entire path.
Colorization: Adjust the color of your brush if you want it to be different to your original.
Once you're happy with your pattern brush, click OK to save it.
You can leave the paths you’ve created as brushes, or you can expand the appearance (Object > Expand Appearance) which will result in a group of clip groups that you can dive into by double-clicking on the object to reach the original compound path.
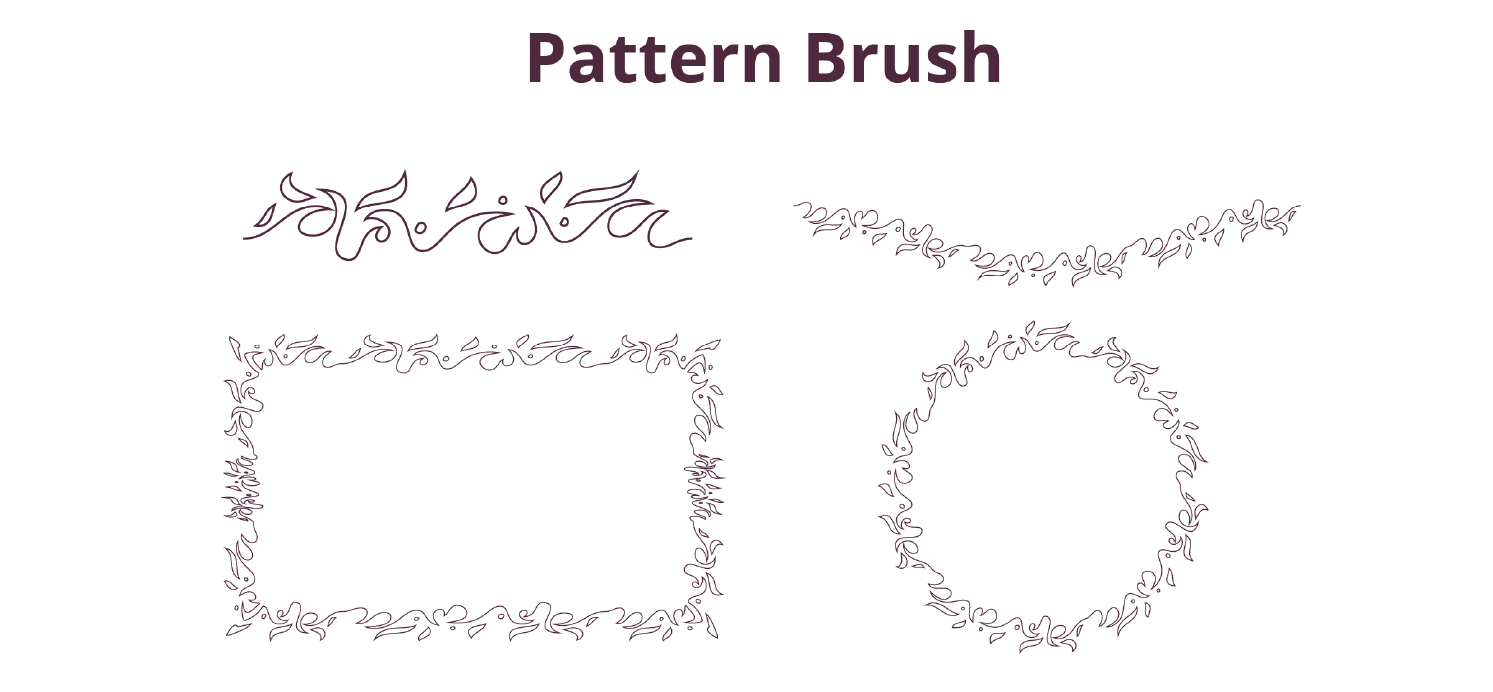
The other way to ensure a smooth pattern brush is to make the “tiles” (individual artwork pieces). Try to design your tiles in a way that enables them to connect seamlessly, especially when they repeat along the path or around corners. Be mindful of scaling issues when using a pattern brush on paths that are very short or long as the pattern might appear too stretched or squished. The brush will use the current stroke settings of the path, so make sure to adjust the stroke width for different effects.
Difference between Illustrator brushes and profiles?
An Illustrator brush is a tool used for creating strokes and designs with various styles, widths, and textures. A Reprofile profile, specifically within the Reform plugin, is used to customize profiles for vector shapes in Illustrator, allowing for unique design effects and manipulations. The key difference lies in their functionality and purpose: brushes are primarily for stroke styles, while Reprofile profiles are for shaping and manipulating vector objects.
How to add flame lines to any paths in Adobe Illustrator
What is Reprofile?
Reprofile is a tool and panel for Adobe Illustrator which lets you add a "profile", or extra geometry, to an entire path or portion of a path. It is designed to add complexity to basic paths, whilst keeping the broad path shape the same.

Try it for free for 7 days
Reprofile is part of the Reform plugin which you can try free for 7 days with just your email address. Find out more here…
Getting started with premade profiles
Reprofile comes with several pre-made built-in profiles that you can try on a trial, whilst full subscribers get access to 100s more. All are designed to work on any path, and yet you have easier control over the scale and repeats than you would with the native Illustrator Brush options.
As full subscribers we have access to the flame pack which is available for download from the Astute Manager. If you are using the free account and want to create a similar profile for yourself, skip to the next section.
To use the flame profile pack available from Astute Graphics, begin by opening your Astute manager, then in the Reprofiles sections locate and download the Flames pack.
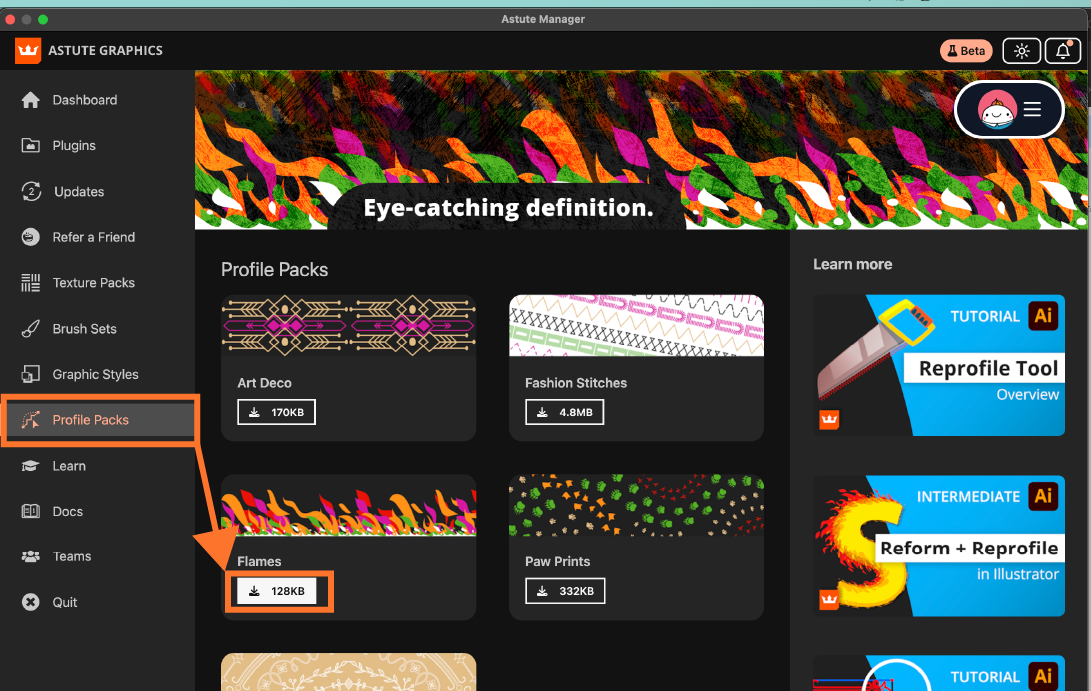
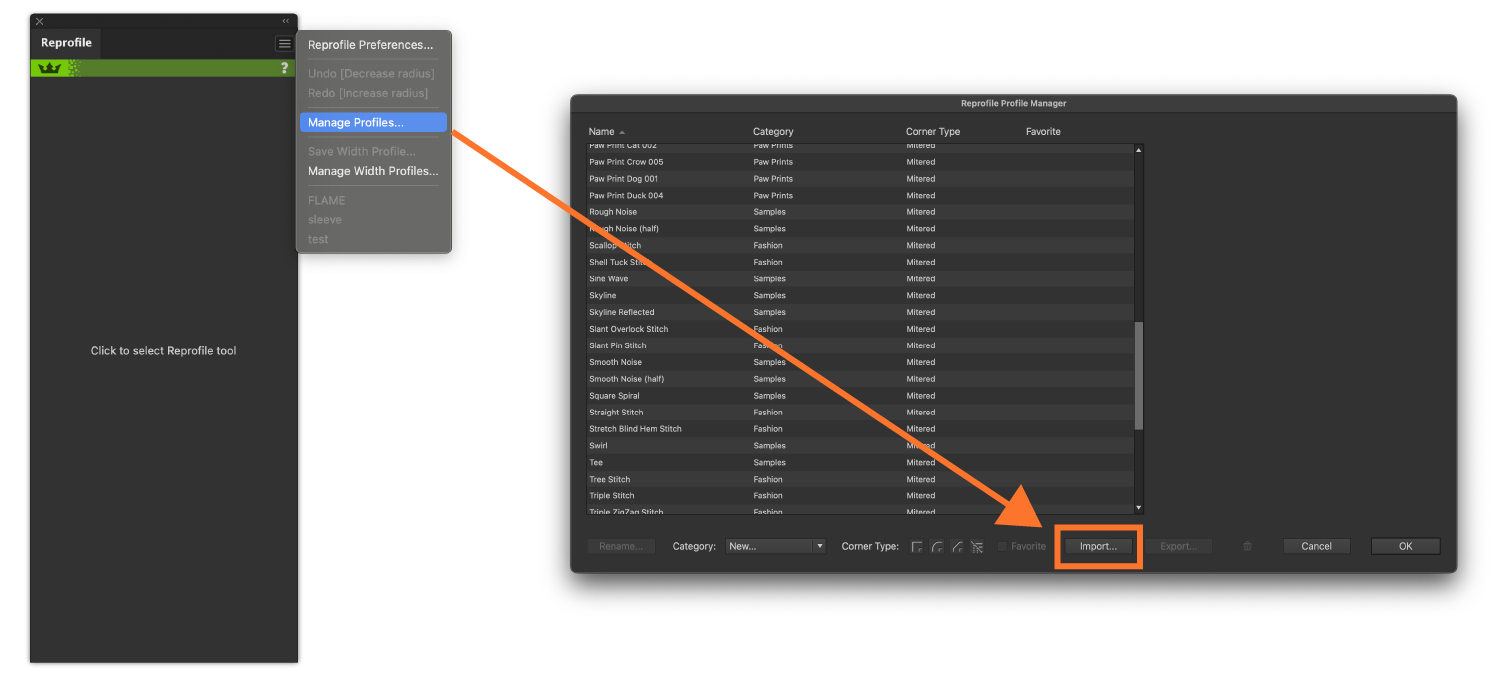
This will download a zip package containing the xml pre-made files. Unzip this folder, open your Adobe Illustrator and locate the Reprofile panel (Window > Astute Graphics > Reprofile).
Using the 3 bar flyout menu, select “Manage Profile…”. This will open the Reprofile Profile Manager Dialog window and you can use the Import button to find and add your newly downloaded xml files. Click OK to confirm.
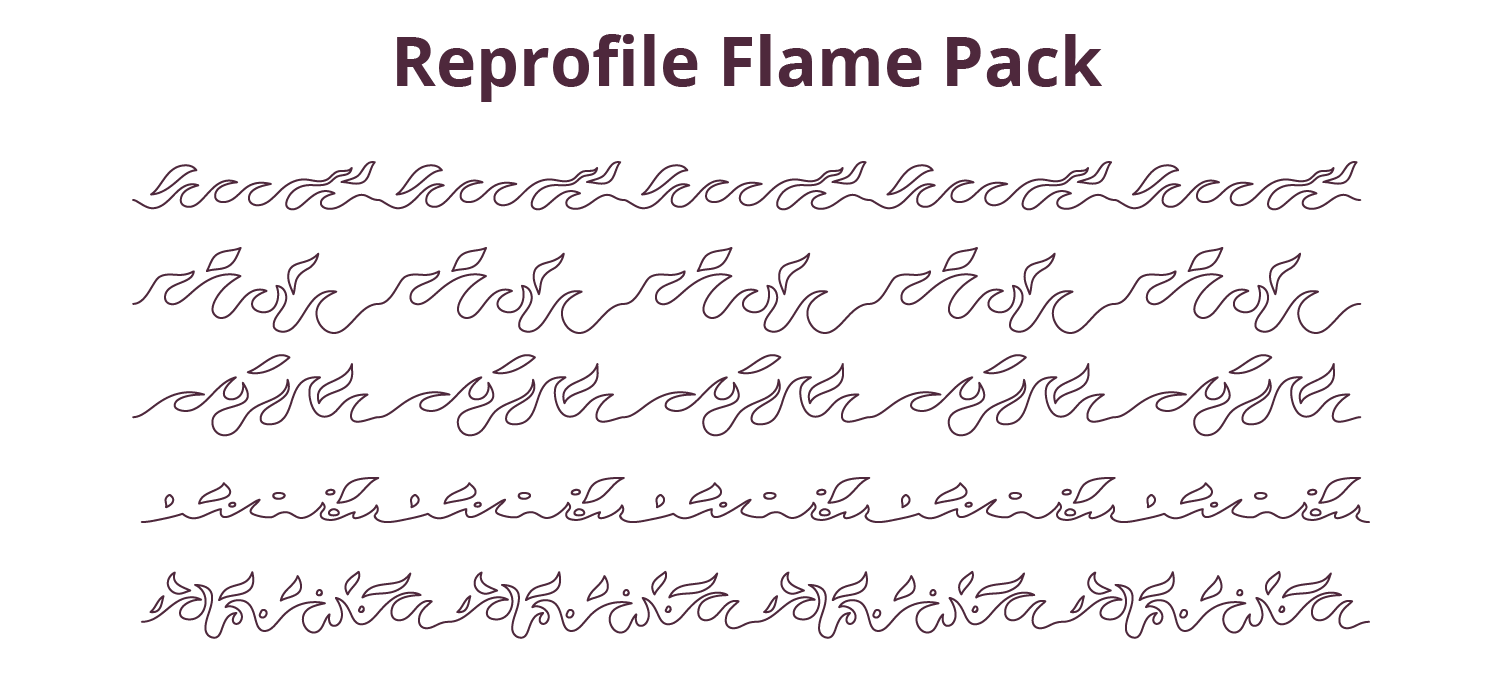
These pre-made Reprofile profiles have already been set up with their defined defaults.
You can use them in the same way you can any custom made Reprofiles, as instructed in more detail below.
Creating a custom profile for the Reprofile tool and panel
The reprofile tool and panel allows you to make custom paths and have full control over how they will react to any path in Illustrator.
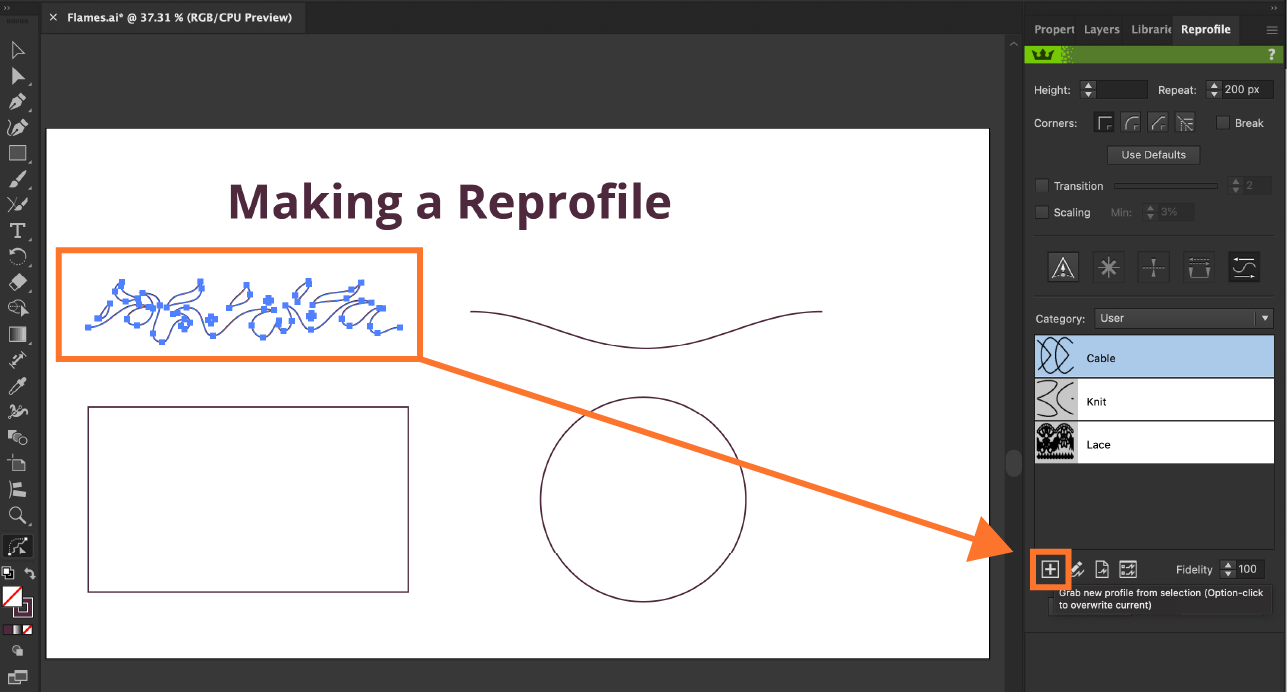
Create your Reprofile Segment: We have created this flame path with extra flame licks coming off of it. Select all the objects and combine them to be one Compound Path (Object > Compound Path > Make). Note that you must have the start and end points as the outermost points in your profile.
Open the Reprofile Panel:
To save the profile you first need to select it, then open the Reprofile Panel (Window > Astute Graphics > Reprofile).
Click inside the Reprofile panel to activate.
Click the Plus Icon button.
Reprofile Settings:
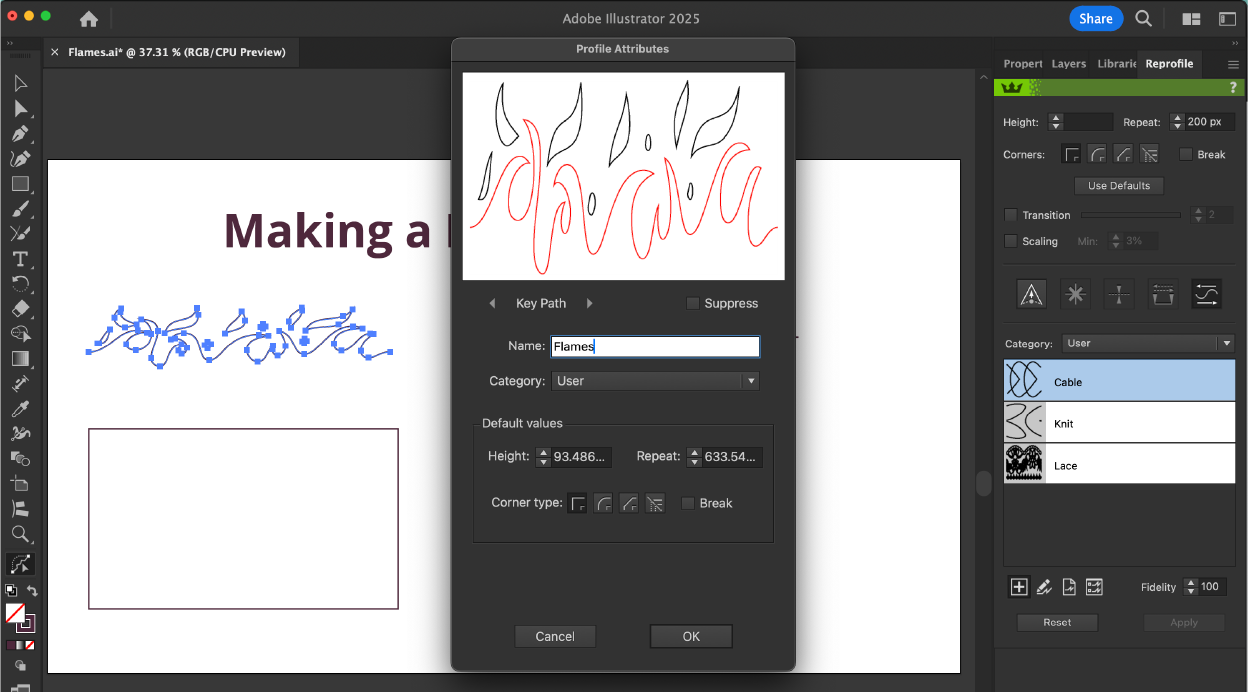
The Profile Attributes Dialogue will open up and give a preview of your path.
The Red Line symbolises the Key Path which every Reprofile must have. It symbolizes the start and end and the alignment of the path.
Leave the other defaults as is for now, you can always change them later.
Click OK when you’re ready.
Using Reprofile:
Select the object you want to Reprofile.
Click inside the panel to activate the tool.
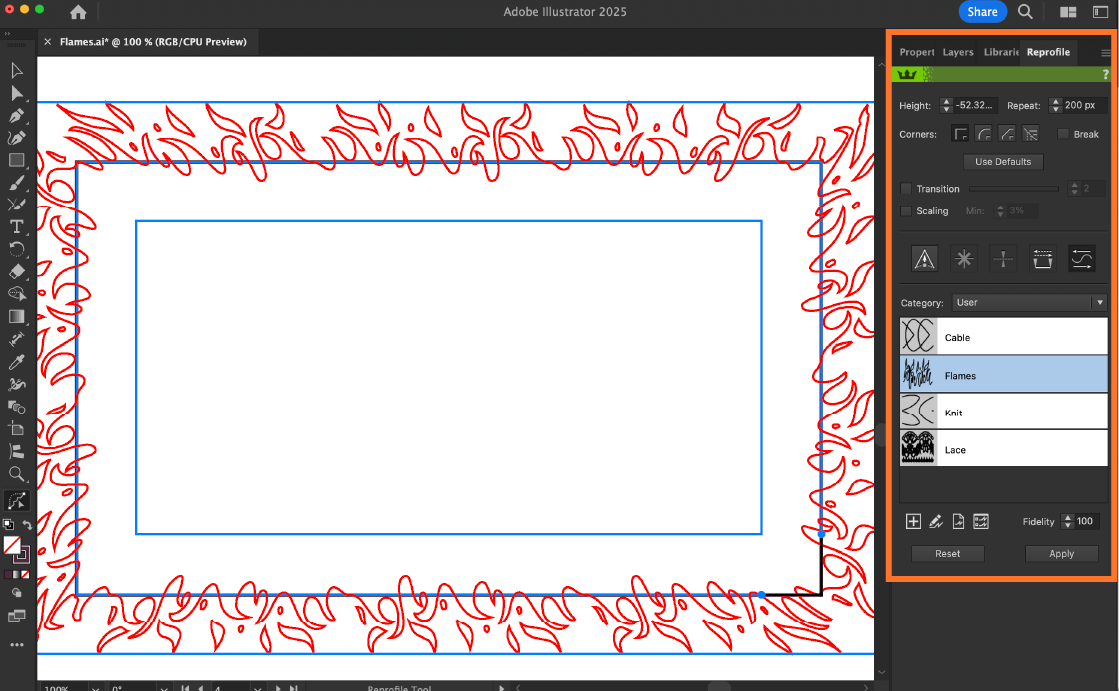
Select your newly created profile and drag out your first offset marker.
Click-and-drag more markers to change the reprofile path.
To delete a marker simply double-click it.
If you need to reposition your profile, you can move the start/end delimiters markers by dragging them along the path.
When you’re happy, click Apply. Or click Reset to start again.
To add the Reprofile as a constant offset around the entire path, hold down the Option (mac) / Alt (Windows) key when dragging out the first marker.
Continue to use the options in the panel to adjust the height, repeat frequency or corner types.

Make edits to your Reprofile’s defaults: To edit the defaults of your custom profile, double-click the profile in the Reprofile panel. Here you can change the corner type, height, and repeat distance.
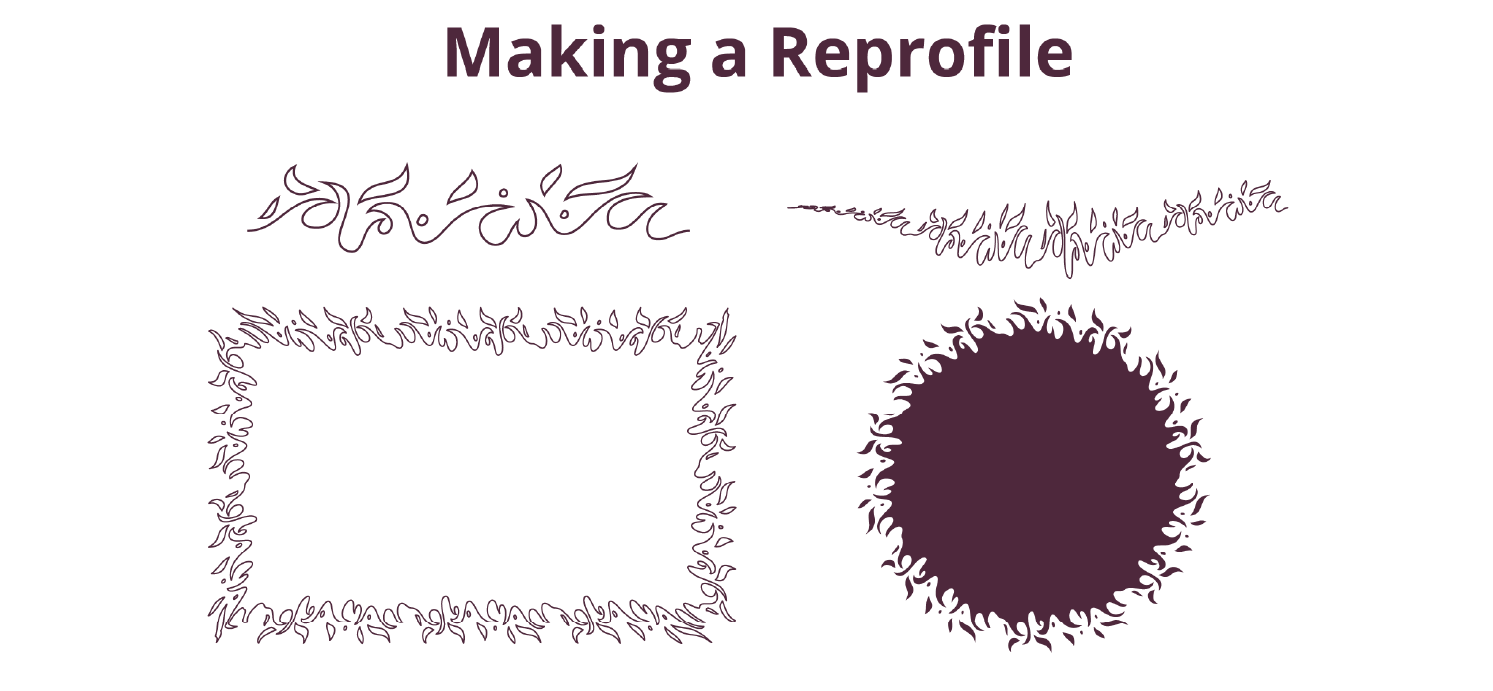
Reprofile paths are completely vector and do not need to be expanded or ungrouped when applied. You’re also able to add a fill color to your shapes, something you’re unable to do with regular brushes.
Try it for free for 7 days
Reprofile is part of the Reform plugin which you can try free for 7 days with just your email address. Find out more here…
Already a subscriber?
Ensure you have the Reform plugin installed through your Astute Manager, then you can find the Reprofile panel in the Window > Astute Graphics > Reprofile.
Need more help on this tool? Here's the full documentation…


