Stipple tattoo illustration in Adobe Illustrator (Native tools vs. Stipplism)
8 minute readStipple shading is a staple in tattoo illustration. Texture and depth is created by using varying sized dots to emphasise shadows and shapes. But creating clean, scalable stipple effects in Adobe Illustrator can be tricky, especially if you’re aiming for that hand-poked style or need the flexibility of vector art.
In this guide, we’ll explore how to create stippling in Illustrator using both native tools and the Stipplism plugin from Astute Graphics. Whether you’re new to stippling or already using it in your tattoo designs, this breakdown will help you choose the best method for your workflow.
In this step-by-step guide, you’ll learn how to:
1. Custom stipple brushes
A simple way to get a dot pattern shading effect in Adobe Illustrator is by using scatter brushes. Though time-consuming to set up, a scatter brush can be made to your specification and then you can use the Pencil tool, Line Segment tool or Pen tool to draw out shapes with your scattered dots.
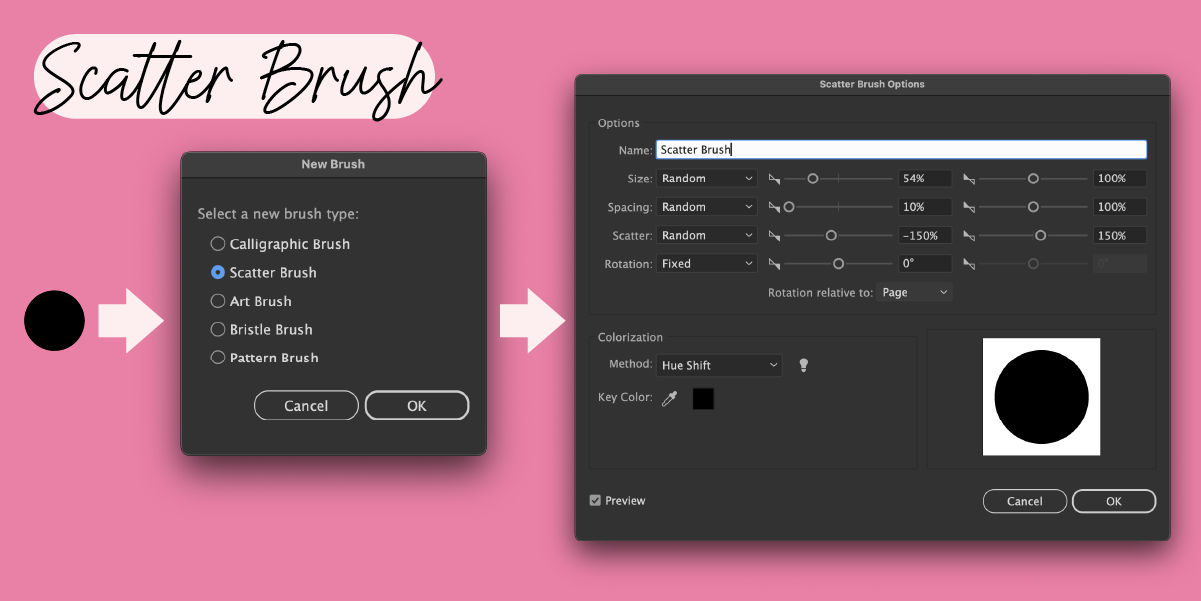
How to make a scatter brush:
Draw a tiny circle and open the Brush Panel (Window > Brushes).
Drag it into the Brushes panel > choose Scatter Brush.
The Scatter Brush Options Dialog will appear. Without a selected path to preview, we recommend naming the brush and pressing OK to confirm and close the dialog.
Create a new path with the Line Segment tool and click your new brush from the panel to apply.
Doubleclick the brush in the Brushes Panel and adjust the size, spacing and scatter. Note: If you use the Random option and adjust the sliders to choose the randomness parameters, you can create an effective scatter dot effect.
Click OK to confirm the new settings and Adobe Illustrator will ask if you want to apply this to the path you created.
Use your chosen drawing tool to shade your illustration with stipples.
🟢 Pros:
Vector-friendly
Fully customizable
Great for building layered shading
🔴 Cons:
Manual and time-consuming
Can’t easily vary the dots by tone
Can get heavy if overused
2. Symbol Sprayer Tool
Perfect for filling in large areas with a randomized dot pattern, the Symbol Sprayer allows you to virtually spray dots across your artwork, and then shift, resize and scrunch them around your artboard.
How to find symbol sprayer:
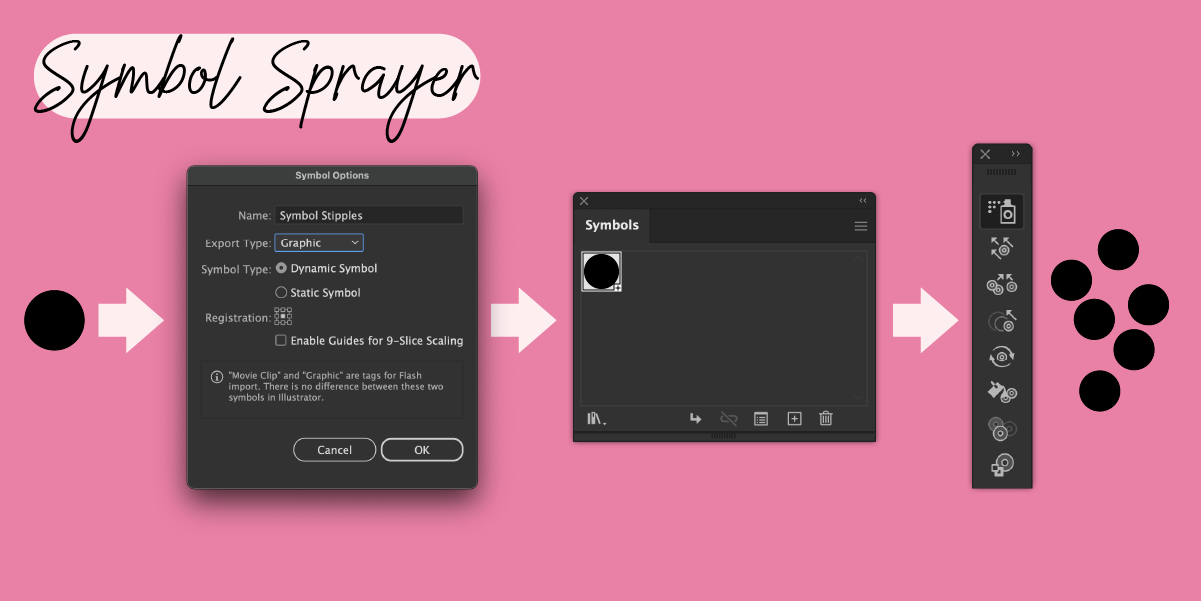
Create a small stipple dot and open the Symbols Panel (Window > Symbols).
Drag the dot into the Symbols panel, and in the dialog give it a name and click OK.
Use the Symbol Sprayer Tool (Shift+S) from the toolbar to apply clusters of dots around your artboard.
Click-and-hold on the Symbol Sprayer in the toolbar to switch to the different sprayer tools. For example: Select the Symbol Sizer Tool and ‘respray’ your dots to enlarge them, or the Symbol Shifter to push and pull them around the space.
You can open the Symbolism Tool Options preferences by doubleclicking the tool in the toolbar or using the Enter/Return key on your keypad. These preferences give you finer control of the randomness of the tools and size of the Symbol Sprayer brush.
🟢 Pros:
Fast way to fill backgrounds
Edit the symbol once to update all instances
🔴 Cons:
Less precise control
Not always great for tight, shaded areas
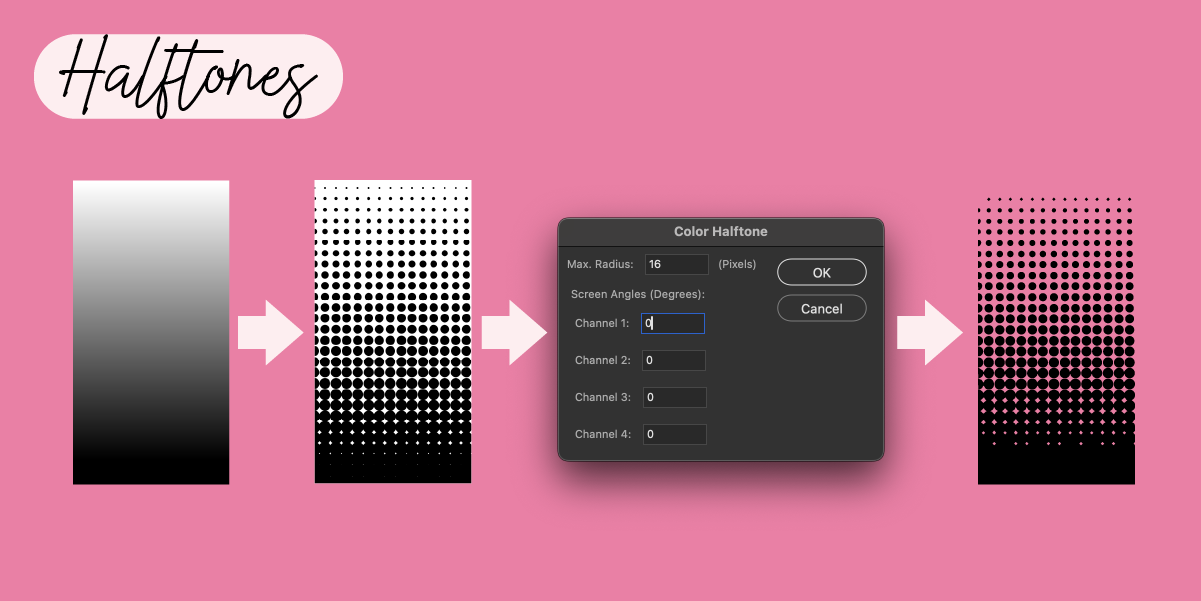
3. Photoshop-style raster Halftone dots
A collection of Photoshop’s live Effects are available to use inside Adobe Illustrator. Photoshop’s live Effects are Raster Effects, meaning they are pixel based and not vector shapes. You can find out more on how to vectorize raster effects, such as grains and color halftones in this tutorial: Create a Halftone Effect in Adobe Illustrator.
How to make halftones:
Create or select the object or artwork that you want to apply the halftone effect to.
Go to the top menu and click Effect > Pixelate > Color Halftone.
The Color Halftone dialog box will pop up, giving you the option to adjust the settings. Note: The Screen Angle option lets you pick the angles at which the halftone (dots) will be applied. Keeping all the values the same will produce black dots.
Color Halftone won’t preview the changes, so you need to click OK to confirm.
Top Tip: Try using a gradient fill as the dots will scale according to the tone of the object.
🟢 Pros:
Dots vary by the tone of the object underneath
Easily make edits as it’s a live Effect
Great for pop art vibes
🔴 Cons:
Not pure vector by default
Image Trace may reduce quality if not handled carefully
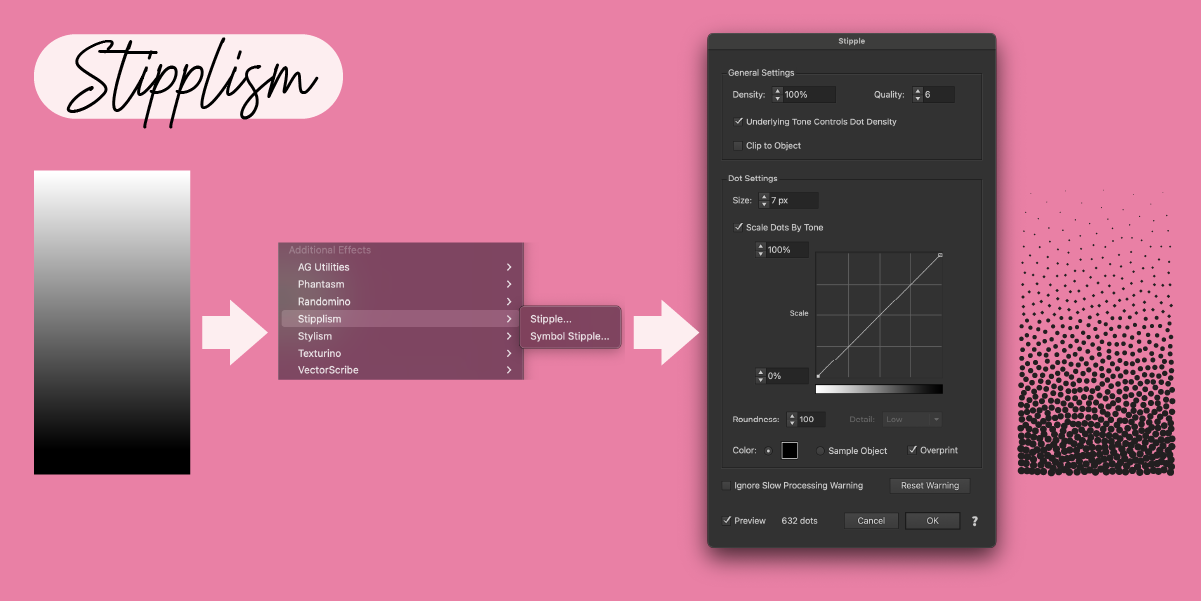
4. The Stipplism live Effect for Adobe Illustrator
If you want precision, speed, and control over your stippling, Stipplism is a game-changer. It’s a live Effect from Astute Graphics that lets you apply live stipple shading to any vector object. You have full control over the dot size and gain depending on what vector shape color you use as the starting point.
How to use Stipplism:
Ensure you have the Stipplism plugin installed (Try free for 7 days).
Select a shape you’d like to stipple.
Top Tip: Stipplism can vary dots by tone, so using a gradient fill will make more dynamic shading dots.
Go to Effect > Stipplism > Stipple.
The Stipple Dialog will open and allow you to adjust settings like dot density, size, color, dot gain and falloff.
Preview and tweak in real time. Stipplism can create 100,000s of dots, so be sure to be careful when you have the Preview option on.
Click OK to confirm the live Effect. Use the Appearance panel to reopen the Stipplism dialog to make further edits.
To vectorize the dots, select the objects and head up to Object > Expand Appearance.
🟢 Pros:
Fully editable stipples with dot gain and variations
Live effect that can easily be expanded to vector
Perfect for tattoo-style shading, botanical work, and illustrations with fine texture
🔴 Cons:
Requires Astute Graphics subscription, but you can try for free here
Slight learning curve if you’re new to plugins
Ready to try Stipplism?
✅ Download the Astute Graphics plugins (7-day free trial)
✅ Experiment with stippling on your tattoo sketches
✅ Use Illustrator’s native tools or level up with Stipplism