Reform User Manual
14 minute readOverview
Reform is a plugin for Adobe Illustrator which lets you “re-form”, or reshape, an entire path or a portion of a path without having to individually adjust or even worry about the individual anchor points and bezier handles that make up the path. It consists of a tool and an associated panel.
Getting Started
After installing the plugin, the Reform tool will show up in Illustrator's main toolbar (which must be in Advanced mode: Window > Toolbars > Advanced):
Click on the Reform tool in the toolbar to select it. If you use the tool frequently, you may want to assign it a keyboard shortcut key through Illustrator's Keyboard Shortcuts dialog (Edit > Keyboard Shortcuts...). You can also click on the Reform panel to select the Reform tool.
If you have Astute Graphics' DirectPrefs plugin installed, and its Auto Open Astute Graphics Panels preference enabled (enabled by default), then selecting the Reform tool will automatically show the Reform panel. Otherwise, if the panel is not visible, choose Window > Astute Graphics > Reform. While the Reform panel is not required in order to use the tool and reshape paths, it does contain various settings, options and commands that can only be accessed there.
For now, with a document open, simply hover the Reform tool's cursor over a basic open path. The path (or a section of it) will highlight (the default color is blue). Press the mouse button down and drag with the tool. You will see a new, red line appear, which is a preview of the reshaped path. How far you drag determines how far the reshaped path bends away from the original.
To finalize the reshape, press the Return or Enter key, or click the Apply button on the Reform panel. The newly-reshaped path remains selected. Alternatively, Option/Alt + Return or Enter, or holding down Option/Alt when clicking the Apply button will create a duplicate of the reshape path, maintaining the original as-is.
Terminology
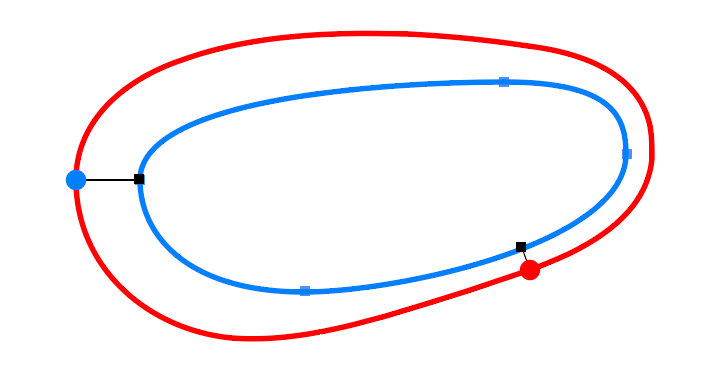
This diagram shows a path in the process of being reshaped, or “sculpted”, using the Reform tool (with the default interface settings).
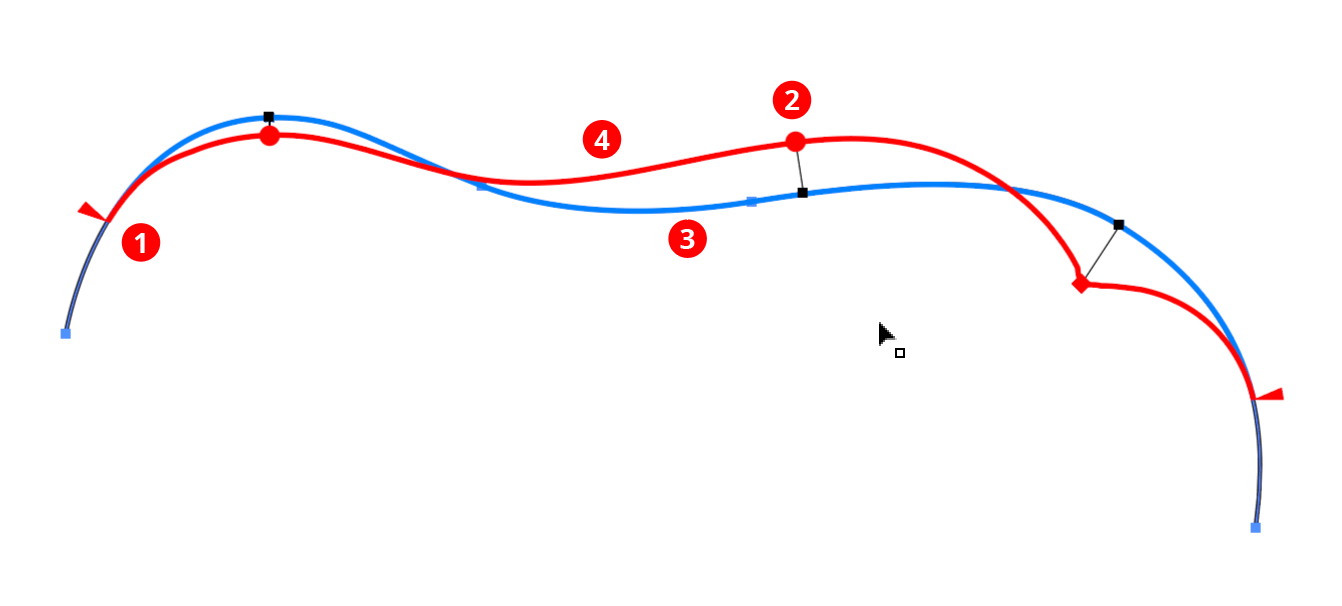
The following items are shown:
1. Start and End Delimiters (red triangles): The delimiters mark the section of the path that will be affected by the reshape. Initially, they are put at the nearest corner points on either side of the clicked or dragged segment. If the entire path is smooth, the delimiters will be placed at the ends of the path (for an open path) or at point zero (for a closed path).
2. Offset Markers (red circles/diamonds): Markers represent points along the path where you specify how far to offset the path from its original position. A marker's position along the path is indicated by a small black square, joined to it by a thin black line whose length represents the offset distance. Except in certain situations, the reshaped path will thus pass through each marker.
Markers drawn as circles are “smooth” markers: the reshaped path passes smoothly through them.
Markers drawn as diamonds are “sharp” markers: the reshaped path can make an abrupt angle change there.
You can use any number of markers to reshape a path, but, like anchor points, for the smoothest results you should use the fewest number that still produce the shape you want.
3. Original Path (blue path): The original shape of the path (or section of the path) is drawn as a blue line.
4. Virtual Reshaped Path (red path): The reshaped path is “virtual” because the underlying path art is not actually changed until you finalize the reshaping. Until this is done you may continue to refine it (e.g. by moving the delimiters, editing the markers, or changing parameters on the panel) or, if you change your mind, by resetting the Reform tool, thereby removing all annotations.
Basic Edits (Tool only)
The delimiters can be moved by dragging them. To disable snapping to anchor points, hold down Command (Mac) or Ctrl (Windows) while dragging. To quickly move the delimiters so that the entire path is affected by the Reform tool, double-click either one of them. For an open path, this will move them to the path's endpoints. For a closed path, this will enter “looped mode” (see below). If a delimiter is dragged such that a marker would fall outside of the newly-delimited portion of the path, the marker will be automatically deleted. If a marker is located exactly on a delimiter, then moving the delimiter will also move the marker.
Markers can be moved by dragging them within the delimited reshape extent. To disable snapping to the path's underlying anchor points, hold down Command (Mac) or Ctrl (Windows) while dragging. Dragging a marker by its circle annotation will allow you to freely change both its position along the path and its offset; to change only its offset, hold down Shift while dragging.
To change only its position, drag the marker's black line or black square annotation.
Multiple markers can be moved simultaneously if they are selected.
To select a single marker, click on its circle annotation.
Multiple markers may be selected by Shift-clicking them or by dragging a marquee over them in the normal manner.
To delete a marker, double-click its circle.
To create an additional marker, place the cursor over either the original or virtual reshaped path and click or click-and-drag.
To change a marker from smooth to sharp or vice versa while dragging it, press the “X” key.
When using the Reform tool, Astute Graphics’ AstuteBuddy panel should be kept open to show relevant keypresses.
Panel Settings and Operations
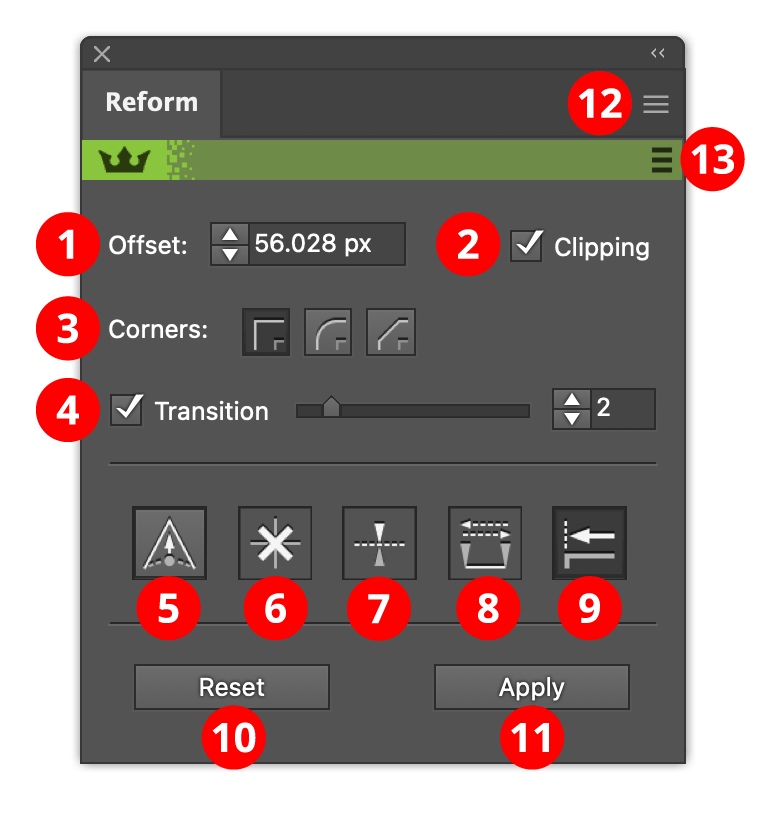
1. Offset value: Lets you numerically enter the offset value of the selected markers. Note that negative values are allowed, and push the path in the opposite direction from a positive value.
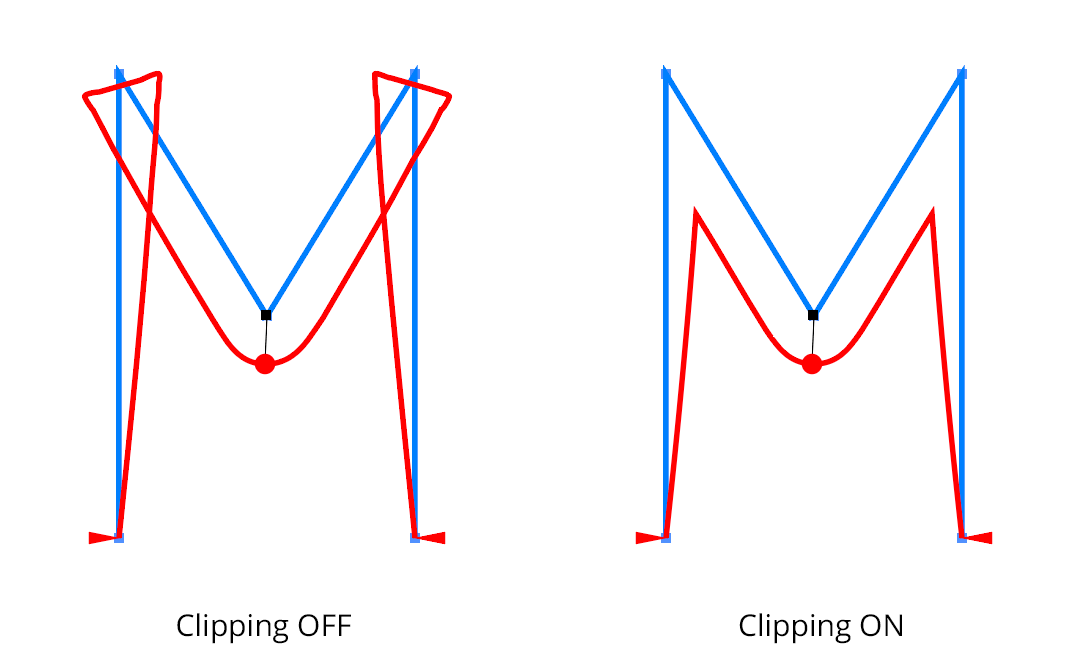
2. Clipping checkbox: Turns on and off clipping. Clipping is useful when the specified offsets cause the path to cross over itself, by removing those loops:
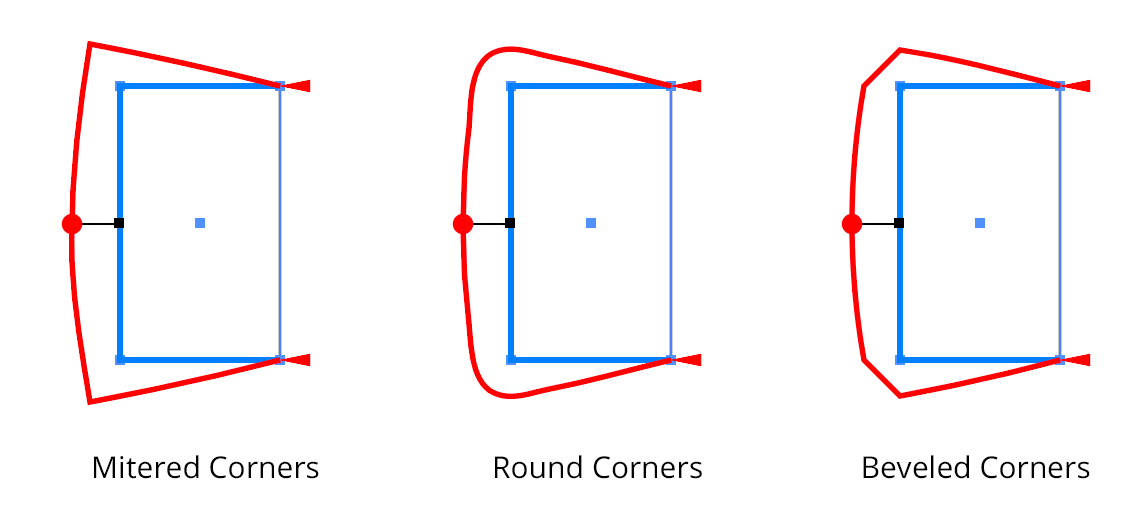
3. Corners buttons: When reshaping a path with an abrupt change in path direction, the corner type specifies how the reshaped path bends around the original corner:
4. Transition checkbox/value: Controls the smoothness of the transition between the original path and its reshaped portion (Off, or values of 1-10):
5. Sharp marker button: Toggles the selected markers between smooth and sharp (see above for explanation of different types). It also controls the type of any newly-created markers.
6. Delete marker button: Removes all selected markers.
7. Mirror offset button: Changes the direction of the offset of all selected markers. This is the same as changing the sign of the offset value.
8. Swap marker direction button: Changes the position of all markers (selected or not) along the reshape extent. If, for example, a marker is located 1/5 of the way from the start to the end delimiter, swapping the direction will change it to be 1/5 of the way from the end to the start delimiter. Offset values are not changed.
9. Smart Joining button: See “Smart Joining”, below.
10. Reset button: Cancels the reshape operation. The path remains unmodified. This can also be achieved by pressing the Esc key when the cursor is in motion.
11. Apply button: Finalizes the path reshape. This can also be achieved by pressing Return or Enter.
12. Flyout menu: Provides access to the preferences dialog, and allows saving and recalling of profiles (see below).
13. Banner menu: Provides links to the Astute Graphics website.
Looped Mode
When reshaping an entire closed path, delimiters are not necessarily helpful, because, in a sense, the path does not have a beginning and an end. In this case you may use “looped mode”. In this mode, which is only applicable for closed paths, there are no delimiters. Instead, there is a special blue marker pair which is located at “point zero” along the path and cannot be moved or deleted. If point zero is smooth, the pair will appear as a single marker; if point zero is a corner point, the markers will appear separately. In either case, the pair's common length may be adjusted by dragging either of the blue markers to set the offset of the path at that point. Additional normal markers may be set at other positions along the path.
To enter looped mode on a closed path which is already being reshaped, double-click either one of the delimiters. To enter looped mode immediately when starting a new reshape, hold down Option (Mac) or Alt (Windows) when initially clicking or dragging the path.
Since the entire path is affected in looped mode, the Transition parameter is no longer applicable.
Constant Offsets
A common operation is to extend one section of a path by a uniform amount. You can achieve this by placing markers of equal offset value exactly on the start and end delimiters. To save time, you may quickly create a constant offset by holding down Shift-Option (Mac) or Shift-Alt (Windows) while initially dragging the path to create a new reshape:
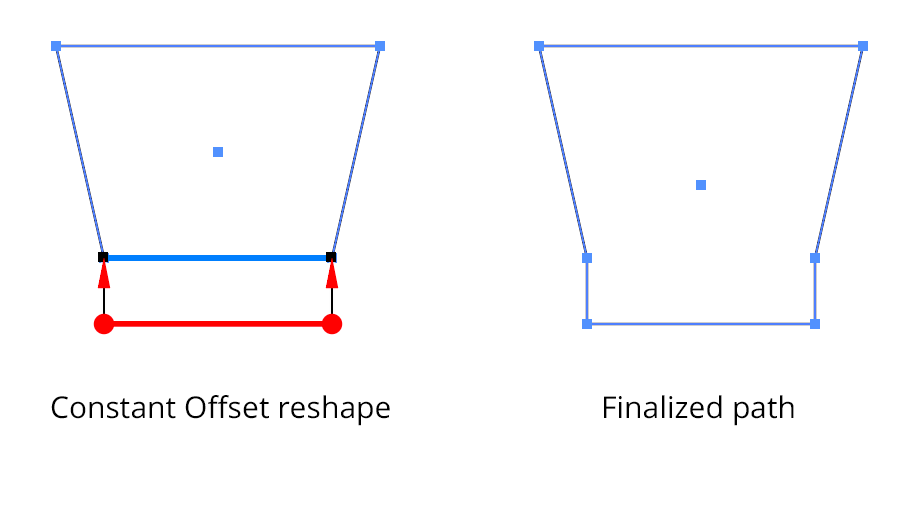
Smart Joining
In the above example of a Constant Offset reshape, it is natural to want the offset path section to extend from the original path at its original angle. This is where “Smart Joining” provides a solution. With Smart Joining enabled (by clicking the button on the panel), Reform will, when possible, try and extend the path section while keeping the path's original angle:

When dragging out a constant offset, you can toggle Smart Joining by pressing the S key. The Smart Joined extension is always straight, even if the path is curved.
Undo and Redo
Reform has an internal Undo/Redo system that keeps track of all changes as you refine the profile. If you move a marker, for example, but then want to put it back exactly where it was, you can simply undo your last change. Reform uses the keystrokes that Illustrator assigns to the tool commands “Decrease/Increase Diameter” to do this. By default, these are the left and right square bracket keys respectively ( [ and ] ), but these may be reassigned, as with any keyboard shortcut.
Resetting or applying a Reform profile clears the Undo/Redo history. To save a profile, see below.
Preferences
The Reform Preferences dialog may be opened by either double-clicking the Reform tool icon in the toolbar, or by choosing “Reform Preferences...” at the top of the panel flyout menu (#12 on the annotated panel screenshot above).
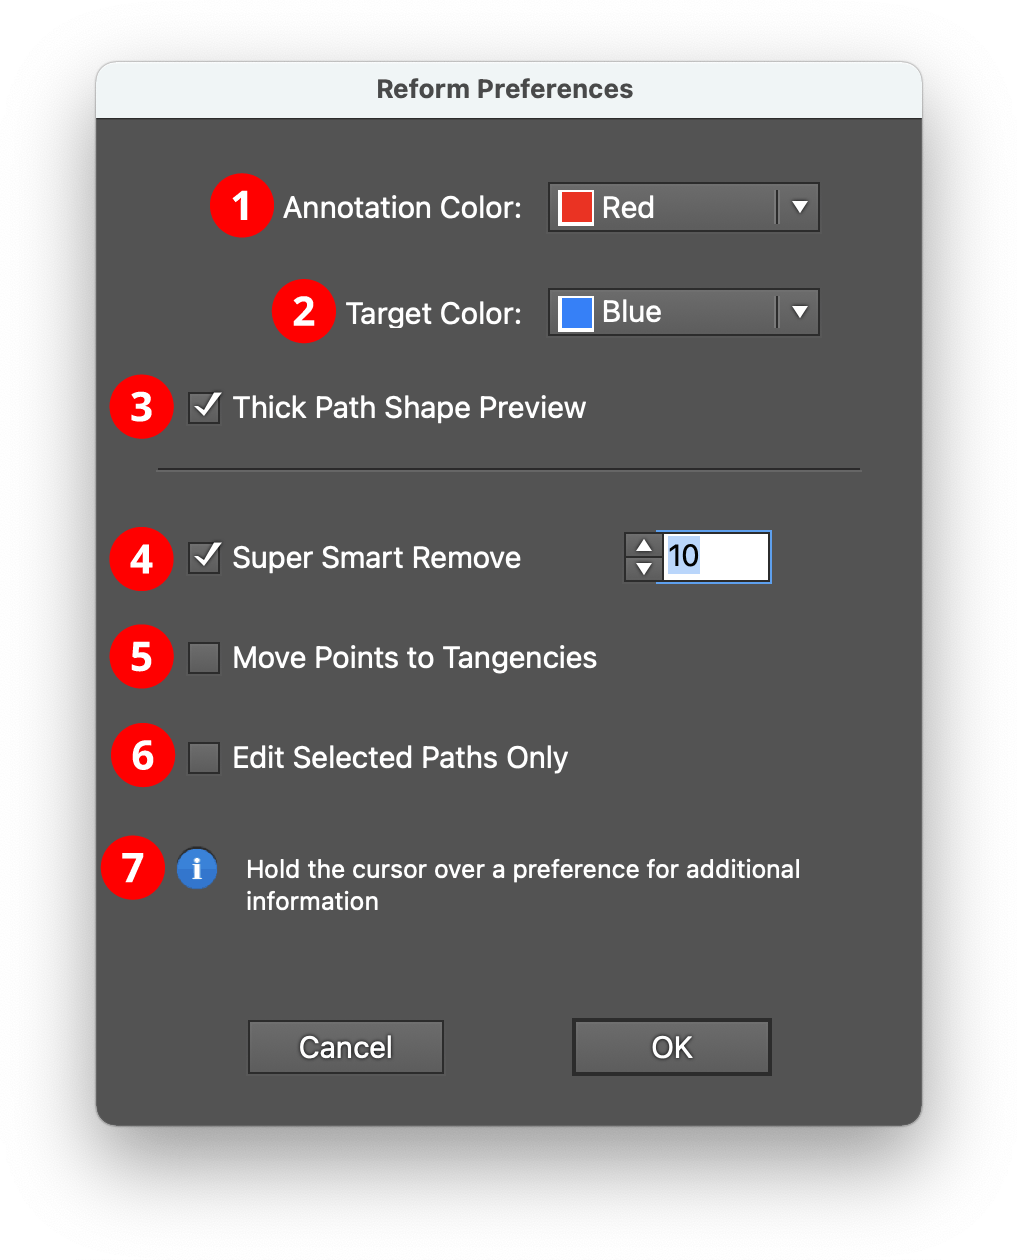
1. Annotation Color: The main color used to draw the reshaped path, markers, and delimiters; red by default.
2. Target Color: The color used to show the original path. It is also used for loop mode markers; blue by default.
3. Thick Path Shape Preview checkbox: When enabled, the original and reshaped path previews are drawn with a thick line, and larger marker annotations are used.
4. Super Smart Remove checkbox/value: When enabled, unnecessary anchor points are removed from the final reshaped path, using the value as a tolerance. Higher tolerance values will remove more points but may make the final path vary from its preview slightly.
5. Move Points to Tangencies checkbox: When enabled, points along the reshaped path will be located at horizontal and vertical tangencies when possible.
6. Edit Selected Paths Only checkbox: When enabled, paths must be selected before the Reform tool will edit them.
7. Informational area: Shows a brief description of each preference setting when the cursor is being held over it.
Saving and Recalling Profiles
“Profiles” (sequences of offset markers along a delimited extent) may be saved and recalled, so that multiple paths may be reshaped in the same manner. To save a profile, use the panel flyout menu when a reform operation is in progress and choose Save Profile... and give the profile a name. To apply an existing profile to a path, start editing the path with the Reform tool and (if necessary) move the delimiters to the desired positions. Then choose the desired profile from the panel flyout menu.
Note that parameters such as transition and clipping are not saved with the profile.
Profiles may be renamed or deleted by choosing Manage Profiles... from the panel flyout menu.
Other
Reform gives the best results when it is used to make subtle changes to paths. Very large offsets will often produce unpredictable results, especially at corners.
We are always striving to improve our plugins. We encourage you to report bugs or inconsistencies, as well as ideas for new features or other ways to make the plugin perform better for you.
Learn more
Watch Adobe Illustrator designer and instructor, Dave Watkins, explore Reform in a creative workflow:


